Showing posts with label candy. Show all posts

February 11, 2016

All in One Valentine

Pin It
Margaret's Morsels | Dum Dums Valentine Flowers


Today I'm doing something I haven't done before.  Instead of sharing a recipe in the traditional sense, I'm sharing a 'recipe' for a cute and easy craft perfect for Valentine's Day.  My son and I used to make these for his classmates when he was young, so this was an opportunity for me to take a sentimental stroll down memory lane.

Let me preface this by saying I am not a crafter.  I don't sew, knit, crochet, embroider, cross stitch, paint, draw, quilt, weave or make jewelry, so you don't need to worry about seeing many -- if any -- posts like this in the future.

Four years ago, I wrote about making heart shaped lollipops out of leftover Christmas candy canes by adding a lollipop stick, melted white chocolate and sprinkles.  This craft uses a lollipop stick too, plus cardstock, adhesive and a hole punch.

Margaret's Morsels | Dum Dums Valentine Flowers


Cardstock is a thicker, more durable paper typically used in scrapbooking. It's available in 8 1/2 x 11-inch and 12 x 12-inch sizes.  You can use either size, but I've found there's a bigger selection of colors and patterns to choose from in the 12 x 12-inch size.  I'm not a fan of red so I tend to pick shades of pink and, although not as heavy as solid color cardstock, patterned papers that have a Valentine's Day look to them.  The total number of sheets depends on what size paper you buy and how large you make the hearts.

You'll need to cut out four hearts for each lollipop.  This can be done in several ways.  My artistic friends can do this freehand, but not me.  I can't even draw a straight line with a ruler!  To solve this dilemma, I bought a heart shaped paper punch that cuts out hearts that are about 2 1/2-inches tall.

Margaret's Morsels | Dum Dums Valentine Flowers


Margaret's Morsels | Dum Dums Valentine Flowers


There are heart shaped templates available on the Internet, but you'd have to print and cut them out which could be time consuming.  Depending on the craft stores in your area, you may be able to find precut hearts, but the sizes and colors might be limited.

Stack four hearts together -- you can use the same color or be creative and mix and match -- and use a small hole punch to make a hole approximately 3/8-inch from the bottom.

Margaret's Morsels | Dum Dums Valentine Flowers

Margaret's Morsels | Dum Dums Valentine Flowers


The first time I ever made these, I used a regular size hole punch.  Not being a crafter, I didn't know hole punches came in different sizes, including 1/8-inch which is what I use now.  If you want to include to/from, conversation heart sentiments, or a message to someone special, now is the time to do that.

Fold the four hearts in half lengthwise to make a crease.  


Margaret's Morsels | Dum Dums Valentine Flowers


Line up the holes and insert a Dum Dums lollipop.  If you're not familiar with Dum Dums, they're lollipops that are available in numerous flavors including classics like grape, orange and cherry, plus fan favorites like blueberry, cotton candy and bubblegum.  Dum Dums are gluten free making them a treat almost everyone can enjoy.  If you can't find Dum Dums, you can substitute other lollipops, but don't use any that are too big or heavy for the size hearts you made.
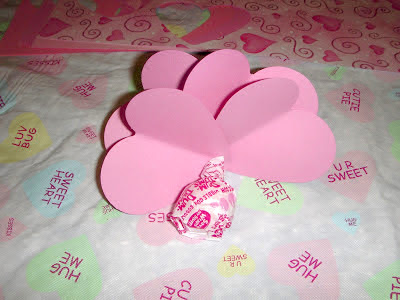
Fan the hearts into a flower shape.

Margaret's Morsels | Dum Dums Valentine Flowers
This isn't a flower shape, but I had to do it
this way in order to take a picture.

Put a small bit of adhesive -- glue, double sided tape or clear mounting squares -- on the top or bottom of each heart.  I use mounting squares which are a scrapbookers version of double sided tape.  Mounting squares are smooth and thin with a sticky bottom and a removable strip on the top.  


Margaret's Morsels | Dum Dums Valentine Flowers
The removable strip on the top 
of the mounting square.

Margaret's Morsels | Dum Dums Valentine Flowers
It's hard to see, but the upper right heart shows
the adhesive that remains after the strip is peeled off.


Peel the strips off, press the hearts together and you're done.  If you use glue, allow plenty of time for the glue to dry.  

These are fun to give out on Valentine's Day to young kids, the young at heart and everyone in between.  It's a card; it's a flower; it's candy.  On Valentine's Day, what more do you need?

© Margaret's Morsels


December 5, 2015

12 Days of Christmas Gifts from the Kitchen: Day 5

Pin It
I thought I'd stick with yesterday's theme and share another candy recipe. I've made this Peanut Butter Fudge for Valentine's Day, but it's also wonderful to give as Christmas gifts.  One batch yields 70 pieces making it easy to cross several names off your list at one time!  You don't even have to turn on your stove to make this fabulous fudge.  It's made in the microwave!

Margaret's Morsels | Peanut Butter Fudge


© Margaret's Morsels

December 4, 2015

12 Days of Christmas Gifts from the Kitchen: Day 4

Pin It
Every year at Christmas, one of my former coworkers would give me a Mason jar filled with homemade chocolate covered cherries made by his wife.  She decorated the jar by attaching a round piece of Christmas fabric between the lid and the ring.  This added a touch of festivity to the delicious treat waiting inside.  I don't have her recipe, but I do have one that I shared four years ago.  If you want to make these, you need to plan ahead because the finished cherries need to sit five days before they're ready to eat.  

Margaret's Morsels | Chocolate Covered Cherries


© Margaret's Morsels

December 31, 2013

Best of 2013

Pin It
This is the time of year when TV news shows and newspapers have stories that highlight the year in review.  With that in mind, I thought I'd count down the top 10 most viewed recipes I posted during 2013. Some of the top 10 came as a surprise, but none more than the recipe that took the number one spot.  I almost didn't post the recipe because I was afraid it wouldn't appeal to many people.  I'm glad this old family favorite was a hit with my readers!  

10.  Strawberry Delight Cake:  A cake recipe that doesn't require any baking!  It doesn't get much easier than that!

Margaret's Morsels | Strawberry Delight Cake


9.  Peanut Butter Fudge:  If you think you can't make candy, think again! There's no cooking involved, unless softening ingredients in a microwave counts as cooking!

Margaret's Morsels | Peanut Butter Fudge

8.  Carrot Cake:  This cake takes some time to make, but it's worth the effort!  Unlike most carrot cake recipes, this one doesn't use pineapple.

Margaret's Morsels | Carrot Cake


7.  Chocolate Dream Pie:  A chocoholics dream.  A pie that only uses four ingredients and half of them are chocolate!  

Margaret's Morsels | Chocolate Dream Pie


6.  Chicken Parmesan:  This version is baked not fried.  It's also kid friendly, delicious and ready in under an hour!

Margaret's Morsels | Chicken Parmesan


5.  Salisbury Steak:  A tasty one dish recipe that turns ground beef from ho hum to wow!

Margaret's Morsels | Salisbury Steak


4.  Cherry Pie Filling Salad:  This versatile dish can be served as a salad or dessert.  It can also be frozen in paper baking cups for a cold treat on a hot summer day!

Margaret's Morsels | Cherry Pie Filling Salad


3. Unfried Refried Beans:  These beans look and taste like refried beans, but there's a twist.  They're not fried at all!

Margaret's Morsels | Unfried Refried Beans


2.  Eggs Benedict Casserole:  You don't have to poach a single egg to make this version of Eggs Benedict.  With this recipe, it's easy to make brunch for a bunch!

Margaret's Morsels | Eggs Benedict Casserole


1.  Loaf Cake:  This unfrosted, made from scratch, plain pound cake made with my grandmother's recipe was the most popular recipe I posted this year.  It's an oldie, but goodie!

Margaret's Morsels | Loaf Cake


As 2013 draws to a close, I want to thank everyone for reading Margaret's Morsels.  I especially appreciate the comments, emails and feedback. This interaction is what makes sharing the recipes worthwhile!  This year was challenging on several levels and I wasn't able to post as frequently as I wanted.  Hopefully, I'll be sharing a lot more recipes in 2014.  My husband gave me a 35mm camera with lenses and some other blogging necessities for Christmas, so I have some things in mind for Margaret's Morsels in 2014.  In the meantime, 
HAPPY NEW YEAR FROM MY KITCHEN TO YOURS!!!!!

© Margaret's Morsels  

February 8, 2013

Fabulous Fudge

Pin It
Margaret's Morsels | Peanut Butter Fudge

Valentine's Day is less than a week away.  If you want to do something different this year, leave the box of chocolates at the store and make your Valentine some homemade candy instead.  Making candy doesn't have to be hard.  It doesn't have to be chocolate either!

My mother made the best peanut butter fudge.  Her recipe called for cooking part of the ingredients until they reached the soft-ball stage.  The remaining ingredients were stirred in and the mixture was spread in a square 9-inch pan.  The result was perfect fudge every time.  She made it look so easy!  I've never had success with her recipe, even though I've used a candy thermometer and a digital thermometer to know when the mixture was at the soft-ball stage.  Fortunately, I found a recipe that rivals my mother's fudge, but is much easier to make.

Before you begin, measure all the ingredients and line a 13 x 9 x 2-inch pan with foil.  A quick and easy way to line the pan is to turn it upside down and shape the foil around the pan.

Margaret's Morsels | Peanut Butter Fudge

Remove the foil, turn the pan right side up and put the foil in the pan.

Margaret's Morsels | Peanut Butter Fudge

The fudge gets its smooth texture from cream cheese.  My family is used to eating Neufchatel 1/3 less fat cream cheese so that's what I use.  The fudge will be firmer, though, if you use regular cream cheese.  You can use whichever one you prefer, but don't use fat-free cream cheese.  The fat in the cream cheese helps make the fudge firm.

Put cream cheese, peanut butter and peanut butter chips in a microwave-safe bowl. 

Margaret's Morsels | Peanut Butter Fudge

Microwave on High 45 seconds.  Remove from the microwave and stir. Continue to microwave in 15 second intervals, stirring each time, until the ingredients are melted.

Margaret's Morsels | Peanut Butter Fudge

The original recipe didn't call for any flavoring, but I think the fudge tastes better with the addition of pure vanilla extract.  Pure vanilla extract is expensive, but it's so much better than imitation vanilla.  Imitation vanilla is made from artificial flavorings and leaves a bitter aftertaste.  If you don't have the real thing, leave the vanilla out; the fudge will still be good.

Add powdered sugar, one cup at a time, using your hands to knead it into the peanut butter mixture.  Once all the powdered sugar has been incorporated, press the mixture evenly into the foil-lined pan.

Margaret's Morsels | Peanut Butter Fudge

You may think the pan is too big, but it's not.  The fudge is rich so you want the pieces to be thin rather than thick.  Let set at room temperature until firm, about 2 hours.  Cover the pan with foil and refrigerate overnight.

The next day, use the foil to lift the fudge out of the pan.

Margaret's Morsels | Peanut Butter Fudge

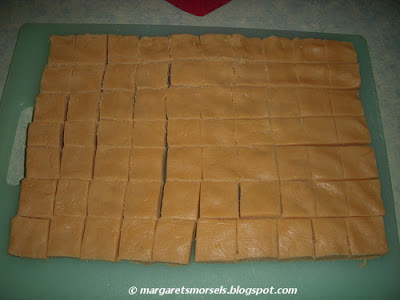
Peel the foil off and put the fudge on a cutting board.  To make the pieces look nicer, I trim the edges off before cutting the fudge into 1 1/4-inch pieces.

Margaret's Morsels | Peanut Butter Fudge

If it's just not Valentine's Day without chocolate, check back next week for the chocolate dessert I'm making for my family.


Peanut Butter Fudge
70 (1 1/4-inch) Pieces

1 (8 oz.) pkg. cream cheese (regular or Neufchatel)
1/2 cup creamy peanut butter
1 cup peanut butter chips
1 Tbsp. vanilla
4 cups powdered sugar

Line a 13 x 9 x 2-inch pan with foil so that foil extends over the sides of the pan.  Put the cream cheese, peanut butter and peanut butter chips in a microwave-safe bowl.  Microwave on High for 45 seconds.  Remove from the microwave and stir.  Microwave in 15 second intervals, stirring each time, until the mixture is melted.  Stir in the vanilla; blend well.  Add powdered sugar, 1 cup at a time, using your hands to knead it into the peanut butter mixture.  After the powdered sugar has been incorporated, press the mixture evenly into the foil-lined pan.  Let stand at room temperature until set, about 2 hours.  Cover the pan with foil and refrigerate.  The next day, use the foil to lift the fudge out of the pan. Remove the foil, place the fudge on a cutting board and cut into squares. Store in the refrigerator.

© Margaret's Morsels


February 7, 2012

A Crafty Edible Valentine

Pin It
Margaret's Morsels | Candy Cane Lollipops

When my son was in preschool, I'd help him make heart shaped Valentine cards for his classmates using two candy canes.  You can take the idea a step further and put the candy canes on a lollipop stick, use melted chocolate to hold everything together and decorate it with Valentine sprinkles.

Start by putting two mini candy canes together in a heart shape on a piece of parchment paper.  Leave enough space at the bottom of the candy canes to insert a lollipop stick. 


Margaret's Morsels | Candy Cane Lollipops
Stagger the candy canes so there's
room for the lollipop sticks.

Center the lollipop stick at the top of the candy canes where the two pieces meet.  Once the stick is centered on the top, slide the bottom of the candy canes over until they touch the lollipop stick.


Margaret's Morsels | Candy Cane Lollipops

Normally when I melt chocolate, I use a 1 1/2-quart crock-pot so I don't have to keep remelting the chocolate.  However, I'm usually coating cookies or chocolate covered cherries or making candy molds, all of which are more time consuming.  Filling the candy cane hearts with melted chocolate is quick so I use the microwave to melt the chocolate.

Spoon the chocolate into the heart shaped opening -- I fill one side at a time -- being careful not to overfill.  If any chocolate gets on the candy canes, gently wipe it off with a paper towel.


Margaret's Morsels | Candy Cane Lollipops

Let the chocolate set a minute or two and then decorate the top with Valentine sprinkles.


Margaret's Morsels | Candy Cane Lollipops

Let the lollipops dry completely on the parchment paper.  Once they're dry, put them in lollipop treat bags and tie the bags closed with ribbon or, what I like to use, raffia.


Margaret's Morsels | Candy Cane Lollipops

Candy canes are the essential ingredient for this recipe.  If you don't have any, keep the idea in mind for next year.  I'll even post a reminder blog in December so you can stock up on candy canes.  If you're lucky enough to have some candy canes on hand, the recipe is quick and easy to make and, unlike a card, is edible. 


Candy Cane Lollipops
6 Servings

12 mini candy canes
1/2 cup white chocolate chips
1 1/2 tsp. vegetable oil
Valentine sprinkles

Put the candy canes in a heart shape on parchment paper.  Insert a lollipop stick, making sure to slide the bottom part of the candy canes over so they touch the stick.  Melt the chocolate chips and oil in a microwave until melted, stirring at 15 second intervals.  Spoon the chocolate mixture into the heart shape opening and decorate the top with sprinkles.  Let dry completely.  Place each lollipop into a lollipop size treat bag and tie closed with ribbon or raffia.


© Margaret's Morsels


February 7, 2011

Sweets for Your Valentine

Pin It
Margaret's Morsels | Chocolate Covered Cherries

I love giving gifts from the kitchen.  Unlike Christmas, I only have one recipient on my list for Valentine's Day:  my husband.


A few years ago, I made my husband a batch of Chocolate Covered Cherries for Valentine's Day.  He loved them so I'm making them for him again this year.  If you want to make them for your Valentine, you'll need to get started because they need to be made several days in advance.  The recipe makes approximately 5 dozen, but you can halve the recipe.


The cherries need to be thoroughly drained.  I drain them in a colander for an hour before placing them on a double layer of paper towels.  Make sure to put a piece of waxed paper under the towels.  If you don't, you'll be cleaning stains off the counter.  Let the cherries sit on the paper towels an hour and then dry each cherry individually.


Margaret's Morsels | Chocolate Covered Cherries
The drained and dried cherries.


While the cherries drain on the paper towels, I make a fondant with sweetened condensed milk, corn syrup and powdered sugar.  The recipe calls for 4 1/2 to 5 cups of powdered sugar.  Start with 4 1/2 cups and add more if it's needed.  You can mix the fondant with a spoon until it's too thick to stir.  At that point, you'll have to knead the remaining powdered sugar in with your hands.  Fondant dries out easily so make sure to cover the bowl with a towel when you're not using it.


Margaret's Morsels | Chocolate Covered Cherries
Partially mixed fondant.


Once the cherries are completely dry and the fondant made, you're ready to wrap the cherries with the fondant.  It's imperative the cherries are completely dry before adding the fondant.  Wet cherries plus fondant equals a sticky mess!


There's two ways to put the fondant on the cherries.  One, you can pinch off some fondant and wrap it around the cherries.


Margaret's Morsels | Chocolate Covered Cherries


Two, you can roll the fondant on a cutting board with a fondant rolling pin.


Margaret's Morsels | Chocolate Covered Cherries
Fondant rolling pin.


You don't need to sprinkle the cutting board, rolling pin or fondant with anything before it's rolled.  I prefer rolling the fondant in small batches and cutting pieces to wrap around the cherries.


Margaret's Morsels | Chocolate Covered Cherries
A small piece of rolled fondant.

Either way, make sure to cover the entire cherry with fondant.  If you don't have enough fondant on the cherry, add some more.  If there's too much fondant on the cherry, remove the excess.  Once the fondant is on the cherry, gently roll the cherry between your palms like you would when shaping a meatball or cookie.  This makes the fondant smoother.


Margaret's Morsels | Chocolate Covered Cherries
A smooth fondant covered cherry.


Put the wrapped cherry, stem side up, on a cookie sheet lined with waxed paper.  Once all the cherries are wrapped, put the cookie sheet in the refrigerator for 30 minutes for the fondant to get firm.


While the cherries are in the refrigerator, melt the chocolate coating.  I use a 1 1/2-quart crock-pot to melt the coating.  The crock-pot keeps the temperature consistent so I don't have to remelt the coating.  Like any other chocolate, the coating retains its shape until it's stirred.  Once the chocolate coating is melted and smooth, you're ready to dip the cherries.


Holding onto the stem, dip one cherry at a time in the melted chocolate. This is easy to do when the pot is full of chocolate.  When the chocolate level gets low, dip one side of the cherry into the chocolate at an angle. Lift the cherry up slightly and dip the other side into the chocolate the same way.  Hold the stem and gently spin the cherry in the pot to remove the excess chocolate.  Since this is the first coating, it's ok if the entire cherry isn't covered in chocolate.  Put the cherries back on the waxed paper lined cookie sheet and put them in the refrigerator for another 30 minutes.


Margaret's Morsels | Chocolate Covered Cherries
The first coating of chocolate.


Once the chocolate coating is hard, dip the cherries into the chocolate coating again.  You may find using a spoon the easiest way to cover the cherries with the remaining chocolate.  This is the final coating so make sure the entire cherry is completely covered with chocolate.  Once again, hold the stem and spin the cherry to remove the excess coating.  Put the cherries on a clean piece of waxed paper on a cookie sheet.  Cover the pan loosely with wax paper and put the pan in a cool place overnight.


The next day, remove any excess dried coating from the cherries.  The easiest way to do this is with a table knife.  Using the dull side of the knife, run the blade around the coating, scraping off the excess chocolate.  Put the cherries back on the waxed paper lined cookie sheet and cover loosely with waxed paper.


Margaret's Morsels | Chocolate Covered Cherries
Before the excess coating is removed.

After the excess coating is removed.


Let the cherries sit in a cool place for five more days.  An amazing thing happens during this time.  The fondant softens and liquefies making a sticky, tasty, gooey center.


Margaret's Morsels | Chocolate Covered Cherries
Notice how gooey the fondant is after five days.


I like to think outside the "heart shaped" box when I package the cherries. I like to put the cherries in a martini or wine glass or a champagne flute.   Over the years, I've found Valentine themed glasses that I use, but plain glasses are fine too.


Margaret's Morsels | Chocolate Covered Cherries
Left to Right:  Valentine's martini glass, plain martini glass,
Valentine's wine glass, plain champagne flute.

If you don't want to use a glass, you can put the cherries in paper candy cups and arrange them in a container.  You could always keep it simple and just stack the candy in a bowl.


You may have noticed I didn't say this recipe was easy.  It is the most time consuming recipe in my recipe box.  That's why I don't make Chocolate Covered Cherries except for Valentine's Day every few years.  It is truly a labor of love for the one I love.  


Chocolate Covered Cherries 
5 Dozen

2 (10 oz.) jars maraschino cherries with stems, drained
2/3 cup sweetened condensed milk
4 tsp. light corn syrup
4 1/2 to 5 cups powdered sugar
2 (16 oz.) pkg. chocolate candy coating

Drain cherries thoroughly.  If necessary, dry each cherry with a paper towel. 

In a medium bowl, combine condensed milk and corn syrup; blend well. Add powdered sugar gradually, stirring until mixture forms a stiff dough. When mixture is too stiff to stir, knead in the remaining powdered sugar with your hands.  Wrap a small amount of fondant around each cherry to cover completely.  Refrigerate 30 minutes or until fondant is firm.

Line cookie sheet with waxed paper.  Melt candy coating.  Holding the stem, dip chilled cherries into candy coating.  Place on waxed paper lined cookie sheet; refrigerate until coating is hard, about 30 minutes.

Dip chilled candies into melted coating again, making sure to coat completely.  Place on waxed paper lined cookie sheet; cover loosely with waxed paper.  Let stand several days in a cool place to allow fondant to liquefy.  DO NOT REFRIGERATE.


© Margaret's Morsels

December 16, 2010

Gifts from the Kitchen

Pin It
Margaret's Morsels | Chocolate Covered Ritz Cracker Cookies

I love giving gifts from the kitchen, especially at the holidays.  Before I had children, recipients included family, friends, co-workers and neighbors.   After having children, the list grew to include teachers, coaches and Sunday school teachers to name a few.  Fortunately, food truly is a one size fits all gift.  You don't need to know the person's size or home decor or hobbies.  Food is the one gift that's not likely to get shoved into the back of a closet!


This year, there are 24 people on my list.  Since it's the holidays and the cookies are a gift, I want them to be special, but not time consuming like cut out cookies.  This is when I make a cookie that is so simple it doesn't even have a name.  In fact, it's a technique rather than an actual recipe! All you need are Ritz crackers, peanut butter, chocolate coating and, if desired, sprinkles.  You can make as many or as few as you need.


Start by putting the peanut butter on half of the crackers.  When you spread the peanut butter on the crackers, don't spread it all the way to the edge.  If you do, the peanut butter will ooze out when you add the second cracker.  If that happens, you can use a butter knife to go around the cracker and wipe off the excess peanut butter.  Use the remaining crackers to sandwich the "cookies" together.  To save time, you can assemble the crackers while the chocolate coating melts.  Or, you can assemble the crackers the night before and store them in an airtight container.


Margaret's Morsels | Chocolate Covered Ritz Cracker Cookies
Don't spread the peanut butter to the edge of the cracker.

When I first started making these cookies, the coating was called almond bark.  It's now called chocolate coating.  The name isn't the only thing that's changed.  The blocks of chocolate coating are in a new design and harder to break apart.  I had to use a knife to cut them into blocks for melting.  The coating now comes in a microwave-safe tray for easy melting.


Margaret's Morsels | Chocolate Covered Ritz Cracker Cookies
The new, but not necessarily improved, chocolate coating.

If the next couple of paragraphs sound familiar, it's because I'm recycling them from a previous blog -- the tips are applicable for these cookies too -- plus adding some additional information.

I always use a 1 1/2-quart crock-pot to melt chocolate coating.  It takes longer to melt, but it remains smooth and you don't have to remelt it like you do when you use a microwave.  A crock-pot keeps the temperature consistent, something that can be tricky if you melt the coating in a double boiler on the stove.  No matter which method you use -- crock-pot, microwave or stove top -- do not cover the container.  If you do, the condensation falls into the coating which hinders melting.  The chocolate coating holds its shape when it melts so you need to stir it periodically until it's smooth.  


I use this candy coating dipping set from Wilton when I coat the cookies.  If you don't have the set, you can use a dinner fork instead.


Margaret's Morsels | Chocolate Covered Ritz Cracker Cookies
I use the tool on the left.

To make the cookies, push one cookie at a time under the melted chocolate coating for a few seconds.  Turn the cookie over a time or two to make sure the entire surface gets covered.  Lift the cookie out of the chocolate coating and tap the fork against the container.  This helps the excess coating fall off plus it pops any air bubbles that are on the surface of the coating.  Put the cookie on wax paper.  I can coat three to four dozen cookies with one 16 ounce package of chocolate coating.  You might get more or less depending on how thick you coat the cookies.


Margaret's Morsels | Chocolate Covered Ritz Cracker Cookies


Once you have a row of cookies dipped and on the waxed paper, you can sprinkle them with holiday sprinkles or you can leave them plain.

Margaret's Morsels | Chocolate Covered Ritz Cracker Cookies

The easiest way to add sprinkles is to shake them out of the bottle.  This only works if your bottle has a lid with holes designed for shaking.  If you don't have a lid with holes, you'll need to put the sprinkles in a bowl and use your fingers or a small spoon to put them on the cookies.

Once the cookies are dry, remove them from the wax paper.  Some of the cookies may have excess coating on the side.  It can be easily corrected. Wipe the excess chocolate with your finger, smoothing the cookie as you do.  If the chocolate doesn't fall off easily, use the dull side of a butter knife to remove the excess, being careful not to scrape away too much coating. You can smooth the area with your finger once the excess coating is removed.  Store the cookies at room temperature in an airtight container, separating the layers with wax paper.

Margaret's Morsels | Chocolate Covered Ritz Cracker Cookies
 Before


Margaret's Morsels | Chocolate Covered Ritz Cracker Cookies
 After

Since the cookies are a gift, I like to package them festively.  I use a variety of containers, but you could use a Christmas paper plate.  I line boxes with wax paper and tins with a doily -- Christmas if I have one -- or wax paper. Since some people have peanut allergies, I write "Contains Peanut Butter" on a piece of masking tape and adhere it to the outside of the container.  If the cookies are on a tray, I put the tape on the side of the tray where it is easily visible.

Margaret's Morsels | Chocolate Covered Ritz Cracker Cookies
Different types of containers I've used.

The cookies may seem time consuming, but they are really quick.  I can make 80 -- start to finish -- in less then three hours.  If they sound good, but you don't want to make them, I saw them advertised in a catalog a few years ago for $12.95 a dozen.  They probably cost more than that now.  If you buy them from a catalog, you might want to order a couple of packages because, like potato chips, you can't eat just one!

© Margaret's Morsels