Showing posts with label Valentine's Day. Show all posts

February 11, 2016

All in One Valentine

Pin It
Margaret's Morsels | Dum Dums Valentine Flowers


Today I'm doing something I haven't done before.  Instead of sharing a recipe in the traditional sense, I'm sharing a 'recipe' for a cute and easy craft perfect for Valentine's Day.  My son and I used to make these for his classmates when he was young, so this was an opportunity for me to take a sentimental stroll down memory lane.

Let me preface this by saying I am not a crafter.  I don't sew, knit, crochet, embroider, cross stitch, paint, draw, quilt, weave or make jewelry, so you don't need to worry about seeing many -- if any -- posts like this in the future.

Four years ago, I wrote about making heart shaped lollipops out of leftover Christmas candy canes by adding a lollipop stick, melted white chocolate and sprinkles.  This craft uses a lollipop stick too, plus cardstock, adhesive and a hole punch.

Margaret's Morsels | Dum Dums Valentine Flowers


Cardstock is a thicker, more durable paper typically used in scrapbooking. It's available in 8 1/2 x 11-inch and 12 x 12-inch sizes.  You can use either size, but I've found there's a bigger selection of colors and patterns to choose from in the 12 x 12-inch size.  I'm not a fan of red so I tend to pick shades of pink and, although not as heavy as solid color cardstock, patterned papers that have a Valentine's Day look to them.  The total number of sheets depends on what size paper you buy and how large you make the hearts.

You'll need to cut out four hearts for each lollipop.  This can be done in several ways.  My artistic friends can do this freehand, but not me.  I can't even draw a straight line with a ruler!  To solve this dilemma, I bought a heart shaped paper punch that cuts out hearts that are about 2 1/2-inches tall.

Margaret's Morsels | Dum Dums Valentine Flowers


Margaret's Morsels | Dum Dums Valentine Flowers


There are heart shaped templates available on the Internet, but you'd have to print and cut them out which could be time consuming.  Depending on the craft stores in your area, you may be able to find precut hearts, but the sizes and colors might be limited.

Stack four hearts together -- you can use the same color or be creative and mix and match -- and use a small hole punch to make a hole approximately 3/8-inch from the bottom.

Margaret's Morsels | Dum Dums Valentine Flowers

Margaret's Morsels | Dum Dums Valentine Flowers


The first time I ever made these, I used a regular size hole punch.  Not being a crafter, I didn't know hole punches came in different sizes, including 1/8-inch which is what I use now.  If you want to include to/from, conversation heart sentiments, or a message to someone special, now is the time to do that.

Fold the four hearts in half lengthwise to make a crease.  


Margaret's Morsels | Dum Dums Valentine Flowers


Line up the holes and insert a Dum Dums lollipop.  If you're not familiar with Dum Dums, they're lollipops that are available in numerous flavors including classics like grape, orange and cherry, plus fan favorites like blueberry, cotton candy and bubblegum.  Dum Dums are gluten free making them a treat almost everyone can enjoy.  If you can't find Dum Dums, you can substitute other lollipops, but don't use any that are too big or heavy for the size hearts you made.
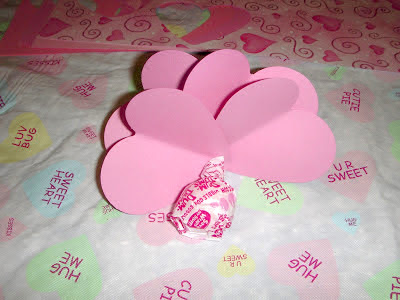
Fan the hearts into a flower shape.

Margaret's Morsels | Dum Dums Valentine Flowers
This isn't a flower shape, but I had to do it
this way in order to take a picture.

Put a small bit of adhesive -- glue, double sided tape or clear mounting squares -- on the top or bottom of each heart.  I use mounting squares which are a scrapbookers version of double sided tape.  Mounting squares are smooth and thin with a sticky bottom and a removable strip on the top.  


Margaret's Morsels | Dum Dums Valentine Flowers
The removable strip on the top 
of the mounting square.

Margaret's Morsels | Dum Dums Valentine Flowers
It's hard to see, but the upper right heart shows
the adhesive that remains after the strip is peeled off.


Peel the strips off, press the hearts together and you're done.  If you use glue, allow plenty of time for the glue to dry.  

These are fun to give out on Valentine's Day to young kids, the young at heart and everyone in between.  It's a card; it's a flower; it's candy.  On Valentine's Day, what more do you need?

© Margaret's Morsels


February 13, 2014

Chocolate Lovers Delight

Pin It
Margaret's Morsels | Chocolate Cobbler

Ever since we got married, my husband and I celebrate Valentine's Day at home.  We'd rather go out another night when restaurants aren't as crowded and in a hurry to seat the next party and prices aren't inflated because of the holiday.  To celebrate at home, I always fix something special for supper.  This year, my husband and son both asked if I would fix Grilled Peppered Steaks.  My husband would love Chocolate Covered Cherries for dessert, while our son would prefer a Peanut Butter Pie with a Magic Shell chocolate topping.  Unfortunately, my son doesn't like cherries and my husband doesn't like chocolate and peanut butter combined.  I don't have time to make both so I decided to keep it simple and just make something chocolate.

My mother found the recipe for Chocolate Cobbler in the newspaper in the early 1990's.  The name is misleading because it doesn't use fruit like most cobbler recipes, but like a cobbler it only has one crust.  I've seen the recipe called by other names including, "Pudding Cake," "Fudge Cake" and "Brownie Pudding."

Usually when I serve dessert, it's something that can be made ahead of time and served cold or at room temperature.  Chocolate Cobbler, though, is best served hot from the oven.  To make it less stressful at the end of the day when I'm cooking supper, I measure the cobbler ingredients ahead of time.  By the time supper's on the table, I've got the cobbler mixed up and ready to go in the oven.  By the time supper's over, the cobbler is ready to eat.

The cobbler starts by combining sugar, cocoa, milk, oil and self-rising flour.

Margaret's Morsels | Chocolate Cobbler


Self-rising flour is a time saver because it already has the leavener and salt added.  If you don't have self-rising flour, you can make your own.  For 1 cup self-rising flour, add 1 1/2 teaspoons baking powder and 1/2 teaspoon salt to 1 cup all-purpose flour.

Once the cobbler ingredients are combined, spread them in a greased 8 or 9-inch square pan.

Margaret's Morsels | Chocolate Cobbler


Combine cocoa and brown sugar in a bowl and sprinkle the mixture over the cobbler ingredients.

Margaret's Morsels | Chocolate Cobbler


Unlike white sugar, brown sugar needs to be firmly packed into the measuring cup.  If you need to know how to do this, or want to know why, you can read about it here.

The final ingredient is hot -- not boiling -- water.  Turn the hot water on and let it run until the faucet feels hot to the touch.  Measure the water in a liquid measuring cup and pour it slowly over the brown sugar mixture.  Do not stir the water with the other ingredients!  

Margaret's Morsels | Chocolate Cobbler


Put the pan in the oven and bake the cobbler for 45 minutes.  When you remove the cobbler from the oven, you'll see that the batter has risen to the top and made a crust.  The cocoa and brown sugar mixture melts and turns the hot water into a delicious chocolate sauce underneath the crust!

Margaret's Morsels | Chocolate Cobbler


Scoop the cobbler into a serving dish, making sure to spoon some of the sauce over the top.  The cobbler is good plain, but it's even better topped with whipped cream or a scoop of vanilla ice cream.  For a truly decadent dessert, substitute chocolate ice cream for the vanilla!

Margaret's Morsels | Chocolate Cobbler


Chocolate Cobbler is a tasty way to celebrate Valentine's Day, but it's also a great dessert to serve year round.  It's delicious, easy to mix up and, since it doesn't use eggs, chances are you've got the ingredients on hand. To be on the safe side, though, you might want to keep some ice cream in the freezer!


Chocolate Cobbler
6 Servings

1 cup self-rising flour
1/2 cup sugar
2 Tbsp. cocoa
1/2 cup milk
3 Tbsp. vegetable oil
1 cup brown sugar, firmly packed
1/4 cup cocoa
1 3/4 cups hot water (not boiling)

Combine the first 5 ingredients in a mixing bowl.  Pour into a greased 8 or 9-inch square pan.  Stir together the brown sugar and 1/4 cup cocoa; sprinkle over the batter.  Pour hot water evenly over the brown sugar mixture.  Do not stir!  Bake at 350° for 45 minutes.  While hot, scoop into serving bowls and spoon sauce over each serving.  If desired, top with whipped cream or ice cream.

© Margaret's Morsels