Showing posts with label kid friendly. Show all posts

February 11, 2016

All in One Valentine

Pin It
Margaret's Morsels | Dum Dums Valentine Flowers


Today I'm doing something I haven't done before.  Instead of sharing a recipe in the traditional sense, I'm sharing a 'recipe' for a cute and easy craft perfect for Valentine's Day.  My son and I used to make these for his classmates when he was young, so this was an opportunity for me to take a sentimental stroll down memory lane.

Let me preface this by saying I am not a crafter.  I don't sew, knit, crochet, embroider, cross stitch, paint, draw, quilt, weave or make jewelry, so you don't need to worry about seeing many -- if any -- posts like this in the future.

Four years ago, I wrote about making heart shaped lollipops out of leftover Christmas candy canes by adding a lollipop stick, melted white chocolate and sprinkles.  This craft uses a lollipop stick too, plus cardstock, adhesive and a hole punch.

Margaret's Morsels | Dum Dums Valentine Flowers


Cardstock is a thicker, more durable paper typically used in scrapbooking. It's available in 8 1/2 x 11-inch and 12 x 12-inch sizes.  You can use either size, but I've found there's a bigger selection of colors and patterns to choose from in the 12 x 12-inch size.  I'm not a fan of red so I tend to pick shades of pink and, although not as heavy as solid color cardstock, patterned papers that have a Valentine's Day look to them.  The total number of sheets depends on what size paper you buy and how large you make the hearts.

You'll need to cut out four hearts for each lollipop.  This can be done in several ways.  My artistic friends can do this freehand, but not me.  I can't even draw a straight line with a ruler!  To solve this dilemma, I bought a heart shaped paper punch that cuts out hearts that are about 2 1/2-inches tall.

Margaret's Morsels | Dum Dums Valentine Flowers


Margaret's Morsels | Dum Dums Valentine Flowers


There are heart shaped templates available on the Internet, but you'd have to print and cut them out which could be time consuming.  Depending on the craft stores in your area, you may be able to find precut hearts, but the sizes and colors might be limited.

Stack four hearts together -- you can use the same color or be creative and mix and match -- and use a small hole punch to make a hole approximately 3/8-inch from the bottom.

Margaret's Morsels | Dum Dums Valentine Flowers

Margaret's Morsels | Dum Dums Valentine Flowers


The first time I ever made these, I used a regular size hole punch.  Not being a crafter, I didn't know hole punches came in different sizes, including 1/8-inch which is what I use now.  If you want to include to/from, conversation heart sentiments, or a message to someone special, now is the time to do that.

Fold the four hearts in half lengthwise to make a crease.  


Margaret's Morsels | Dum Dums Valentine Flowers


Line up the holes and insert a Dum Dums lollipop.  If you're not familiar with Dum Dums, they're lollipops that are available in numerous flavors including classics like grape, orange and cherry, plus fan favorites like blueberry, cotton candy and bubblegum.  Dum Dums are gluten free making them a treat almost everyone can enjoy.  If you can't find Dum Dums, you can substitute other lollipops, but don't use any that are too big or heavy for the size hearts you made.
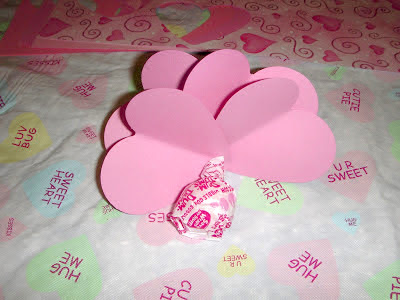
Fan the hearts into a flower shape.

Margaret's Morsels | Dum Dums Valentine Flowers
This isn't a flower shape, but I had to do it
this way in order to take a picture.

Put a small bit of adhesive -- glue, double sided tape or clear mounting squares -- on the top or bottom of each heart.  I use mounting squares which are a scrapbookers version of double sided tape.  Mounting squares are smooth and thin with a sticky bottom and a removable strip on the top.  


Margaret's Morsels | Dum Dums Valentine Flowers
The removable strip on the top 
of the mounting square.

Margaret's Morsels | Dum Dums Valentine Flowers
It's hard to see, but the upper right heart shows
the adhesive that remains after the strip is peeled off.


Peel the strips off, press the hearts together and you're done.  If you use glue, allow plenty of time for the glue to dry.  

These are fun to give out on Valentine's Day to young kids, the young at heart and everyone in between.  It's a card; it's a flower; it's candy.  On Valentine's Day, what more do you need?

© Margaret's Morsels


December 20, 2011

No Bake Snowman Cookies

Pin It
Margaret's Morsels | No Bake Snowman Cookies

I love giving gifts from the kitchen.  For years, I made chocolate covered Ritz cracker and peanut butter cookies to give people at Christmas. This year, I wanted to make something different and made the snowman cookies pictured above.  So many people asked me how I made them, I decided it would make a good topic for "Margaret's Morsels."

Previously, I wrote about using Nutter Butter cookies to make ghost cookies.  The snowman cookies start the same way, but with a few additional items added to make them look like a snowman.  The additional items need to be added while the coating is still wet.  Since you need to work quickly, it's a good idea to line up the ingredients in an assembly line.

Start by coating the Nutter Butters with melted white almond bark.  If you're not sure how to do that, click here to read how it's done.


Margaret's Morsels | No Bake Snowman Cookies

Put the cookies on a piece of wax paper.  While the coating is still wet, add two mini chocolate chips for the eyes,


Margaret's Morsels | No Bake Snowman Cookies

an orange Tic Tac for the nose


Margaret's Morsels | No Bake Snowman Cookies

and two mini M&M's for the buttons.

Margaret's Morsels | No Bake Snowman Cookies

For aesthetic reasons, I turn the pointed side of the chocolate chips down. I also turn the M&M's over so the "m" doesn't show.

Let the cookies dry completely.  If there's excess coating on the edges, you can break it off or, if it's stubborn, scrape it off with the dull side of a table knife.  Store the cookies in an airtight container.

You may be wondering why the scarves aren't on the cookies yet.  The first time I made these, I put the scarves on as soon as the cookies were dry. The next morning, I discovered half the scarves broke overnight.  Since then, I add the scarves when I'm ready to give away or serve the cookies.

The scarves are made from thin string licorice.  The only brand I could find, Twizzlers Peel and Pull, separates into thin strands.


Margaret's Morsels | No Bake Snowman Cookies

Tie a strand around each snowman, trimming any excess licorice with a pair of kitchen shears.


Margaret's Morsels | No Bake Snowman Cookies

If you prefer, you can use tubes of decorator icing to pipe on the eyes, noses, buttons and scarves.  Make sure to let the coating dry completely before you decorate the cookies.

The nice thing about snowman cookies is they're not limited to Christmas. You can make them all winter long.  I doubt many people would complain if you did!


© Margaret's Morsels

November 22, 2011

No Bake Turkey Cookies

Pin It
Margaret's Morsels | No Bake Turkey Cookies

I was looking through my recipe box the other day and came across the recipe for No Bake Turkey Cookies.  The last time I made these cookies, my son and his cousins were young kids.  A wave of nostalgia swept over me so I went to the store and bought the ingredients.

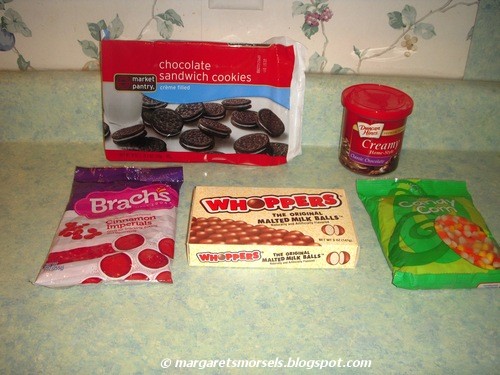
You start with these:


Margaret's Morsels | No Bake Turkey Cookies


and end up with these:


Margaret's Morsels | No Bake Turkey Cookies

The easiest way to make the cookies is to set everything up in an assembly line.  Put the malted milk balls in one bowl, red cinnamon candies in another and candy corn in yet another.  Take the cookies apart and separate the cream filled side from the plain side.


Margaret's Morsels | No Bake Turkey Cookies

Normally, when I work with frosting, I use a pastry bag.  Unfortunately, that doesn't work with this recipe.  Since a pastry bag is open on one end, it's difficult to keep the bag closed while assembling the pieces periodically. You can use a knife or, what I prefer, a decorating set.


Margaret's Morsels | No Bake Turkey Cookies

A decorating set is similar to a cookie press.  It has a tube that can be filled, in this case, with frosting.  Instead of having interchangeable discs like a cookie press, the tube has a coupler -- a device that lets you easily and quickly change tips -- with a pastry tip attached.  After the tube is filled with frosting and the handle attached, the frosting can be piped using as little or as much as you need.  I find this much easier to use than a knife, especially when I only need a dollop of frosting.

If you're making a large number of cookies, it's a good idea to make them in batches so the frosting doesn't dry before the cookies are assembled.  I work in batches of 10.

Line up the malted milk balls -- the turkey body -- and add a dollop of frosting to each one.


Margaret's Morsels | No Bake Turkey Cookies

Before the frosting dries, press a red cinnamon candy -- the turkey head -- into the frosting.


Margaret's Morsels | No Bake Turkey Cookies

While those pieces set up, add a dollop of frosting on the cream filled side of the cookies.


Margaret's Morsels | No Bake Turkey Cookies

Place a malted milk ball on top of the frosting, pressing down lightly so it adheres to the cookie.


Margaret's Morsels | No Bake Turkey Cookies

Spread frosting on the inside half of each cookie that does not have the cream filling.


Margaret's Morsels | No Bake Turkey Cookies

After the frosting is on the cookies, attach several pieces of candy corn for the tail.  I use five pieces per cookie, but add more if you have room or think it looks better.


Margaret's Morsels | No Bake Turkey Cookies

While the tails dry, add a dollop of frosting in the center of each turkey body.


Margaret's Morsels | No Bake Turkey Cookies

Attach the tail to the turkey body by pressing it against the frosting.


Margaret's Morsels | No Bake Turkey Cookies

Store the completed cookies in the refrigerator so the frosting doesn't get soft and the pieces fall off.

Kids love to help make these cookies and, more importantly, it's something they remember doing when they get older.  The cookies may not be gourmet or look picture perfect but, to me, making memories is what it's all about.


No Bake Turkey Cookies

cream filled chocolate sandwich cookies (one per turkey)
malted milk balls (one per turkey)
red cinnamon candies (one per turkey)
1 (16 oz.) container ready to spread chocolate frosting
1 (13 oz.) pkg. candy corn

Separate the cookies, leaving cream filling on one side; set cookie halves without filling aside.

Put a dollop of frosting on each malted milk ball -- turkey body -- and attach a red cinnamon candy -- turkey head.  Put a dollop of frosting in the center of each cookie half with cream filling.  Press the turkey body into the frosting.

Spread chocolate frosting on the inside of each cookie half that does not have cream filling.  Arrange candy corn -- turkey tail -- on the frosting.  Put a dollop of frosting behind the turkey body and attach the turkey tail.  Store cookies in the refrigerator.


© Margaret's Morsels