November 15, 2011

Stuffing or Dressing?

Pin It
Margaret's Morsels | Cornbread Dressing

For many people, the centerpiece of the Thanksgiving table is a succulent roast turkey.  For others, the most highly anticipated dish is the dressing. There are two schools of thought when it comes to this versatile side dish: stuffing or dressing.  Some people say they're the same, but they're not.

The most obvious difference is stuffing is, well, stuffed in the turkey and baked.  Dressing, on the other hand, is baked separately in a pan.  Stuffing tends to be more common north of the Mason-Dixon line and dressing more common in the South.  People in some parts of the country use white or wheat bread as the base whereas Southerners use cornbread.

A typical recipe for Southern dressing includes cornbread, white bread -- usually biscuits -- celery, onion, chicken broth, poultry seasoning, sage, salt, pepper, eggs and, if you cook the vegetables, butter.  Additional ingredients vary depending on which region of the country you reside. Common additions include oysters, rice, sausage, turkey giblets, dried cherries, cranberries, pecans and almonds.

For years, I made cornbread dressing using my mother's recipe.  Although the dressing was good, it was never as good as what my mother always prepared.  A couple of years ago, one of my nieces made the best cornbread dressing I'd ever tasted.  She shared the recipe with me and it has since become a staple on my holiday table.  The recipe makes a lot so be sure to use a big mixing bowl.  I don't have a mixing bowl big enough so I mix everything in my biggest stockpot.


Margaret's Morsels | Cornbread Dressing


The recipe uses the ingredients listed above for Southern dressing, but with two notable differences.  First, the recipe uses cornbread and Mexican cornbread.  The Mexican cornbread adds additional flavor without any additional work.  Second, in addition to chicken stock, the recipe also uses milk.

To save time, I bake the cornbread and biscuits the day before and store them in a covered container.  When I'm ready to assemble the dressing, I use a food processor to chop the cornbread and biscuits into very fine crumbs.  If you don't have a food processor, grate the bread into crumbs using a hand or box grater.  No matter which method you use, you want the crumbs to look like this:


Margaret's Morsels | Cornbread Dressing
Crumbs made with the cornbread.

If you've got a food processor, use it to chop the onions and celery too. They also need to be chopped very fine which, of course, you can also do with a knife.


Margaret's Morsels | Cornbread Dressing

Once everything is chopped, cooked and combined, add milk to the dressing until it's the consistency of a thick cake batter.  Don't add too much milk; you don't want the dressing to be soupy.


Margaret's Morsels | Cornbread Dressing
The dressing after the milk has been added.

When all the ingredients are combined, there's enough dressing to fill a 13 x 9 x 2-inch pan and a 9-inch pan.  Bake the dressing 45 minutes covered with foil; remove the foil and bake an additional 15 minutes to brown the top.


Margaret's Morsels | Cornbread Dressing

The house smells so good while the dressing bakes.  To dressing aficionados, the dressing makes the house smell like Thanksgiving more so than the turkey!


Cornbread Dressing
8 to 12 Servings

1 (6.5 oz.) pkg. yellow cornbread mix
1 (6 oz.) pkg. Mexican cornbread mix
15 biscuits (canned, frozen or homemade)
1 stick butter
3 onions, finely chopped
6 celery stalks, finely chopped
6 eggs, beaten
2 tsp. salt
pepper to taste
2 tsp. poultry seasoning
4 tsp. sage
1 (32 oz.) box chicken broth
1 (14 oz.) can chicken broth
milk

Cook cornbread and biscuits; cool.  Chop into very fine crumbs using a food processor.  Mix to evenly distribute.  Chop onions and celery in a food processor.  Melt butter and cook onions and celery for about 15 minutes until wilted.

Add eggs to the bread crumbs.  Stir in salt, pepper, poultry seasoning and sage.  Stir well; mixture will be very thick.  Stir in cooked vegetables.  Add chicken broth, adding additional broth, if necessary.  Add milk so the mixture is the consistency of thick cake batter. 

Pour mixture into a greased 13 x 9 x 2-inch pan and a greased 9-inch square pan.  Cover each pan with foil and bake at 350° for 45 minutes. Remove foil and bake for 15 minutes to brown the top. 


© Margaret's Morsels

November 10, 2011

Assemble Today, Bake Tomorrow

Pin It
Margaret's Morsels | French Toast Souffle

It's nice to have a wide variety of recipes to choose from:  family favorites handed down through the generations; crock-pot recipes that cook all day; recipes that can be prepared in 30 minutes or less; recipes for comfort food that nourish the body and soothe the soul; recipes that can be assembled the night before and baked the next day.  The last category is a real timesaver, especially when you want to serve a nice breakfast.

Although not a souffle in the traditional sense, French Toast Souffle is a light airy dish that elevates French toast from ordinary to extraordinary. Although the word "souffle" may sound intimidating, this recipe is really easy to prepare.  You don't even need a souffle dish.  It's baked in a 13 x 9 x 2-inch baking dish.

Start by cooking a combination of brown sugar, butter and corn syrup in a saucepan.  If you've never worked with cooked sugar before, take it from me, it's hot.  I have the scar to prove it!  Don't touch the mixture with your hands and try to avoid splatters.  Pour the mixture in the baking dish, spreading it to cover the bottom completely.  It hardens fast so work quickly.


Margaret's Morsels | French Toast Souffle


The original recipe used a loaf of cinnamon bread cut into 1-inch thick slices.  I've never been able to find unsliced cinnamon bread so I substitute a loaf of sliced cinnamon bread.  Since the slices are thin, I use two slices for each serving.  Stack the bread on top of the brown sugar mixture, inserting a toothpick in each serving to hold the two slices together.

The remaining ingredients -- eggs, half and half, vanilla and salt -- are combined and poured over the bread.  For additional flavor, a dash of cinnamon can be added to the mixture, if desired.  Cover the pan and put it in the refrigerator overnight.

The next morning, remove the pan from the refrigerator and let it stand at room temperature while the oven preheats.


Margaret's Morsels | French Toast Souffle
This is what it looks like after being
refrigerated overnight.

It takes 40 to 45 minutes for the souffle to cook, but it's worth the wait! When cooked, the brown sugar mixture melts and becomes a delicious sauce that can be spooned over the French toast in place of syrup.


Margaret's Morsels | French Toast Souffle

Add some bacon and fresh fruit and you've got a meal that everyone will think you spent hours preparing!


French Toast Souffle
6 Servings

1 cup packed brown sugar
1/2 cup butter
2 Tbsp. light corn syrup
12 pieces sliced cinnamon bread 
8 eggs, beaten
3 cups half and half or light cream
2 tsp. vanilla
1/2 tsp. salt
dash of cinnamon (optional)

In a medium saucepan, combine the brown sugar, butter and corn syrup; cook and stir until the mixture comes to a boil.  Boil uncovered 1 minute. Pour into a 13 x 9 x 2-inch baking dish, spreading to cover the bottom evenly.  Arrange bread, two slices per serving, on top of the brown sugar mixture, inserting a toothpick to hold the slices together.  In a bowl, combine the remaining ingredients; pour over bread slices.  Cover and refrigerate overnight.

Preheat the oven to 350°.  Let the baking dish stand at room temperature while the oven preheats.  Bake uncovered for 40 to 45 minutes, or until the top is browned and puffed and a knife inserted near the center comes out clean.  Remove toothpicks before serving.  Refrigerate leftovers.


© Margaret's Morsels


November 4, 2011

Awesome Apples

Pin It

Margaret's Morsels | Baked Apples

I love this time of year.  Days are cool and nights are crisp, leaves turn to vivid shades of yellow, orange and red and newly harvested apples are arriving at the grocery store.

Although available year round, apples have a season just like other fruits and vegetables.  Fall is apple season.  Apples that aren't sold right away go into storage and are sold throughout the year.  Compare apples sold in the summer to ones sold in the fall.  You'll be able to see and taste the difference.

Baked apples are wonderful year round, but they're especially delicious made with apples fresh from the orchard.  Start by selecting all-purpose or baking apples -- they retain their shape and don't turn mushy when baked -- that are firm and free of bruises and blemishes.  Although I use a combination of apples when I bake a pie, I stick with one variety -- Rome -- for baked apples.  You'll also get good results with Empire, Golden Delicious, Granny Smith or McIntosh apples.

Unlike apples that are baked whole, this recipe uses sliced apples.  This reduces the cooking time and puts the finished dish on the table in less than 30 minutes.  I use an apple wedger to core and slice each apple into eight equal pieces.


Margaret's Morsels | Baked Apples

If you don't have one of these handy gadgets, slice the apples as close to the same size as possible to ensure even coooking.  Toss the apples with lemon juice to prevent them from turning brown and place them -- this is important -- cut side down in a baking dish.


Margaret's Morsels | Baked Apples

The remaining ingredients are heated and poured over the sliced apples. The apples are baked for 10 minutes and then turned over, cut side up. This is easy to do since all the apples are turned the same way at the beginning of the cooking process.


Margaret's Morsels | Baked Apples
Turned over after cooking 10 minutes.

Continue baking until the apples are tender, about 8 to 10 more minutes.  I test the apples with the tip of a knife.  If the apples aren't tender, I bake them a few more minutes.

Margaret's Morsels | Baked Apples

I like to serve baked apples as a side dish with sauteed pork chops.  They can also be served warm as a dessert with a scoop of ice cream, if desired.   


Margaret's Morsels | Baked Apples


Whether you fix baked apples, apple pie or eat apples straight from the refrigerator, they're most flavorful and juicy when they're in season.

Baked Apples
4 Servings

3 large Rome apples, peeled, cored and sliced into eighths
2 Tbsp. lemon juice
2/3 cup apple juice
2/3 cup light brown sugar
2 Tbsp. butter or margarine
1/4 tsp. ground cinnamon

In a large glass dish, toss apples with lemon juice.  Rearrange apples cut side down; set aside.  In a small saucepan, combine the remaining ingredients.  Cook over medium-high heat until the sugar dissolves and butter melts.  Pour the mixture over the apples.  Bake at 400° for 10 minutes; turn apples over.  Bake until tender, about 8 to 10 more minutes. Serve warm.


© Margaret's Morsels

October 29, 2011

Ghoulish Goodies: The Treats

Pin It
Margaret's Morsels | Halloween

I shared Halloween tricks on Wednesday.  Today, I want to share the treats.  I gave a hint about one of the treats -- bones -- in my last blog. Bones might look like a trick, but when they're made with pretzels, marshmallows and white chocolate, they're a treat!


Margaret's Morsels | Halloween Bones


To make these edible bones, start by breaking thin pretzel sticks into various sizes, but don't make them too short.  Insert the flat side of a miniature marshmallow into each end of the pretzel.


Margaret's Morsels | Halloween

Melt one 12 ounce package of white chocolate chips in a microwave, double boiler or, my preferred method, a 1 1/2-quart crock-pot.  Using a fork, dip the bones in the chocolate -- they don't have to look perfect, but make sure to cover all the ingredients -- letting the excess chocolate drip off.  Place the bones on waxed paper to dry and then store in an airtight container.

I made a congealed salad in a large brain shape mold for one of the tricks. For the treats, I use smaller molds made specifically for candy.  Candy molds are inexpensive and come in a variety of shapes and sizes for almost any occasion.  The mold I used for a Halloween treat served two purposes.  One, it was candy that looked like a bat.  Two, the bat was on top of a party pick that could be used to garnish another dessert.


Margaret's Morsels | Halloween

Candy melts -- what you use to fill the molds -- come in a rainbow of colors so you can use more than one color in a mold.  I've used multiple colors a few times but, to be honest, I don't have the time or patience so I stick with one color.

No matter which method you choose to melt the candy melts -- microwave, double boiler or crock-pot -- do not cover the container.  If you do, condensation falls into the container which hinders the melting process. The candy coating retains its shape so you need to stir it periodically to help the melting process.

Using a spoon -- I use an iced teaspoon -- fill the cavities to the top with the melted candy melts.  Once all the cavities are filled, tap the tray on the counter a couple of times to distribute the chocolate and remove any air bubbles.  Using the dull edge of a table knife, scrape any excess chocolate off the tray.  Removing the excess chocolate gives the finished candy a nicer look.  Put the tray in the freezer for 10 minutes until the candy is firm.


Margaret's Morsels | Halloween
Ready to go in the freezer.

To remove the candy from the molds, turn the tray upside down over waxed paper.  Sometimes the candy will fall out on its own.  If not, tap the bottom of the mold to help loosen the stubborn pieces.  If some of the candy breaks, put the pieces back in the crock-pot and melt them again. Store the finished candy in a food storage bag or airtight container.

Cupcakes baked in festive paper liners are always fun to serve at a party. They aren't as messy as cake and you can bake exactly as many as you need.  If you want something similar to cupcakes, but a little fancier, make mini Mason jar cakes instead.

It's fun to decorate cupcakes or Mason jar cakes with colored frosting.  I've found that store bought cream cheese frosting is just as good and a lot easier than making frosting from scratch.  I use a gel icing color to tint the frosting.  Gel icing color is much thicker than liquid food coloring and doesn't dilute the frosting.  Gel icing color also produces a deeper, richer color than liquid food coloring.  To use the gel, insert a clean toothpick into the gel.


Margaret's Morsels | Halloween

Wipe the toothpick with the gel into the frosting, stirring with a spatula to incorporate the color.


Margaret's Morsels | Halloween

Repeat the process using a clean toothpick until the frosting reaches the desired color.


Margaret's Morsels | Halloween

The cupcakes and Mason jar cakes can be left plain or decorated with sprinkles or colored sugar.  I used the bat party picks in the cupcakes and garnished the Mason jar cakes with a variety of Halloween sprinkles.


Margaret's Morsels | Halloween

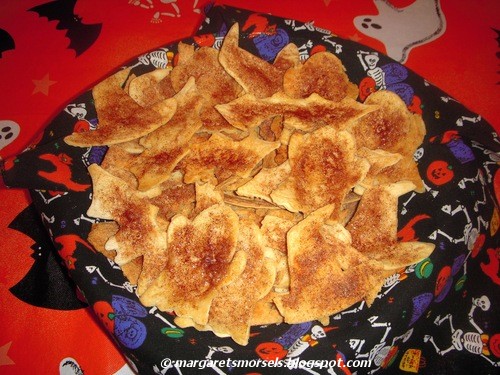
I have one more treat to share.  Instead of sprinkling Halloween shaped tortilla chips with salt, brush them with melted butter and sprinkle cinnamon sugar on top.  Bake just like you would the salted tortilla chips.


Margaret's Morsels | Halloween

May your Halloween be frightfully fun and your treats delightfully delicious!!!


© Margaret's Morsels

October 26, 2011

Ghoulish Goodies: The Tricks

Pin It
Margaret's Morsels | Halloween

Halloween was never a favorite holiday of mine until I became a mother. When our son was two, my husband came home from work to find decorations in the yard, window clings on the front door and Halloween decor inside the house.  The holiday spirit extended into the kitchen with a variety of Halloween themed foods.

Last year, I posted Halloween ideas and recipes for young kids or the young at heart.  Today, I want to share some ideas that work for the older crowd too.  This isn't a menu, but rather ideas you can mix and match for your own holiday feast.

Although I like to alter the holiday menu from year to year, I always serve Halloween shaped sandwiches as the entree.  People, young and old alike, get a kick out of them.  This year, I'm using skull, tombstone and Jack O'Lantern cookie cutters.  It's easy to add features to the skull making it go from this:


Margaret's Morsels | Halloween

to this:


Margaret's Morsels | Halloween

For best results, use bread that's a few days old; fresh bread tears too easily.  The Jack O'Lantern cookie cutter came with a small triangle that is wonderful for the nose.  If you don't have anything that small, cut a triangle shape in the bread with a knife.


Margaret's Morsels | Halloween

After you cut out the nose, make the eyes.  The easiest way to do this is to use a clean small bottle top as a cookie cutter.  If you don't have one available, cut two circles for the eyes with a knife.


Margaret's Morsels | Halloween

Finally, use a knife to draw a straight line for the mouth.  Remove some of the excess crumbs so the mouth will be visible.

Instead of regular chips and dip, serve Halloween shaped tortilla chips with Zombie Bits.  The chips are flour tortillas that have been cut with Halloween cookie cutters before being baked.  The dip may sound disgusting, but it's actually queso dip.  


Margaret's Morsels | Halloween Queso Dip


Cut the tortillas with 3-inch cookie cutters.  Place the pieces on a baking sheet and sprinkle with salt.  Bake at 400° for 6 to 10 minutes.  The time depends on the thickness of the tortillas as well as the shape of the chips. Don't underbake the chips or they'll be chewy instead of crispy.  If some chips bake faster than others, remove them to a cooling rack while the other chips finish baking.


Margaret's Morsels | Halloween

Over the last few years, Halloween molds -- especially ones that resemble body parts -- have become more commonplace.  I fill a brain mold with two packages of gelatin for a disgusting looking congealed salad.  Once the gelatin is firm and transferred to a serving platter, decorate the brain and platter with gummy words for an extra dose of disgust.


Margaret's Morsels | Halloween Gelatin Brain Mold


In addition to food, I like to include some whimsical touches.  Instead of regular ice cubes, I make ice cubes using Halloween themed silicone ice cube trays.


Margaret's Morsels | Halloween Ice Cube Tray


If I'm serving soft drinks, I make the ice cubes out of water.  If I'm serving punch, I make extra punch and freeze it as ice cubes.  This keeps the punch from getting diluted when served.

One of my favorite things to do is coat drinking glasses with fake blood. Combine corn syrup and red food coloring in a small bowl.  Dip the rims of the glasses in the mixture and stand them upright letting the "blood" ooze down the glasses.  Put the glasses on paper towels or a baking sheet to catch any drips.  This needs to be done eight hours ahead of time so the blood has time to dry.


Margaret's Morsels | Halloween

Got a bone to pick because I'm not including any dessert ideas?  Check back later this week for the treats!


© Margaret's Morsels


October 23, 2011

My 100th Blog!!!

Pin It
In elementary school, the 100th day of school is a big deal.  Students usually celebrate the day by bringing in 100 of a particular item.  Since this is my 100th blog, I thought I'd celebrate with 100 words.

Thank you so much for reading and following "Margaret's Morsels!!!!!"  I've had a lot of fun writing it and sharing my favorite recipes.  I really appreciate all the comments and emails.  I hope more people will participate for a real sense of community.

As long as people keep reading, I'll keep sharing cooking tips, techniques and recipes one dish at a time.


© Margaret's Morsels

October 21, 2011

Nuts About Coconut Variation

Pin It

Margaret's Morsels | Hoagy Cake


Last year, per a reader's request, I posted a recipe for coconut cake.  I wrote that the icing could be made as coconut or chocolate.  I recently made the cake for a church potluck dinner and wanted to show what the cake looks like with chocolate icing.  


Margaret's Morsels | Hoagy Cake
  
The chocolate icing is prepared just like the coconut icing, except the coconut is omitted.  Cocoa powder is sifted with the powdered sugar to remove any lumps.  My family loves chocolate, so I add 3 tablespoons of cocoa.  If you want an icing that's not as rich, use 2 tablespoons of cocoa instead.  If you missed the coconut cake blog, click here for the recipe.


© Margaret's Morsels