Showing posts with label party food. Show all posts

October 25, 2012

Repurposed Recipes for Halloween

Pin It
Margaret's Morsels | Halloween

You don't need special ingredients to make Halloween party food.  Give everyday food a Halloween makeover by repurposing the recipe.  Most of the recipes I'm sharing today can be made ahead of time.  This makes things a lot less hectic the day of the party, because most of the work has already been done.

When I wrote about Sausage Balls, I described this simple three ingredient recipe as a "no brainer."  This term is definitely appropriate because on Halloween this appetizer turns into brains.  The brains can be baked up to five days ahead of time and reheated in the microwave or oven.  If you reheat them in the oven, you may need to cover the pan with foil to keep the tops from getting too brown.  If you want to make them look more disgusting, slightly squish the warm brains with your fingers.


Margaret's Morsels | Halloween Brain Sausage Balls

Baked Mozzarella Cheese Sticks turn into fingers with the addition of sliced almonds for fingernails.  Unfortunately, you can't add lines for the knuckles because the cheese will ooze out when it's baked.  The cheese sticks need to be assembled and refrigerated at least four to six hours ahead of time.  If you're short on time, they can be assembled and refrigerated the night before.  Unlike the other recipes, fingers are best served hot from the oven.


Margaret's Morsels | Halloween Baked Mozzarella Cheese Fingers

While the fingers are baking, whip up a batch of fake blood dipping sauce with this homemade pizza sauce recipe.  This easy to prepare sauce only uses five ingredients and cooks in five minutes.  One batch is enough for 18 fingers.

For years, I've used Nutter Butter cookies to make ghost cookies for Halloween.  This year, I decided to turn these store bought cookies into monster toes.  I used a package of spooky green candy melts instead of the usual white.  Monster toes aren't pretty so you don't have to worry if the toes aren't covered perfectly with the candy melts.


Margaret's Morsels | Halloween Monster Toes

The toenails are made with small pieces of black licorice.  The pieces are too thick to use out of the package so I cut them in half.


Margaret's Morsels | Halloween Monster Toes

If you want to add an extra ick factor, put a chocolate chip on the toe to mimic a wart.  Normally, when I decorate with chocolate chips, I turn them upside down so the point doesn't show.  To make the wart more disgusting, I put the chocolate chip with the point right side up.  The cookies can be made a few days ahead of time and stored in an airtight container.


Margaret's Morsels | Halloween Monster Toes

A festive touch for Halloween is to coat drinking glasses with fake blood made from a mixture of corn syrup and food coloring.


Margaret's Morsels | Halloween Fake Blood Rimmed Drinking Glasses

Instead of liquid food coloring, I use gel icing -- a concentrated paste -- which is sold in small jars in a variety of colors.  It produces richer, more vibrant colors and, because it's concentrated, a little dab will do!  The most important thing to remember when using gel icing is to use a clean toothpick or knife every time you remove some icing from the jar.  This keeps the contents from getting contaminated with frosting or, in this case, diluted with water.  Once the rim is coated, stand the glass upright on a paper towel or piece of wax paper, letting the excess drip down the glass. It takes at least eight hours for the glasses to dry.  To ensure they dry in time, I coat the glasses a day ahead of time.

With the glasses decorated, you need something to put in them.  I turn my mother's Christmas Kool-Aid Punch into Ghoul-Aid Punch, by substituting two packages of orange Kool-Aid for the cherry and lemonade called for in the recipe.


Margaret's Morsels | Halloween Ghoul-Aid Punch

The punch can be made a few days ahead of time, but don't add the 7-Up until it's served.  To make the punch more festive, I add some orange gel icing.  


Margaret's Morsels | Halloween Ghoul-Aid Punch
The punch on the left doesn't 
have orange gel icing.

To keep with the holiday theme, I make ice cubes using silicone Halloween ice cube trays.  


Margaret's Morsels | Halloween Shaped Ice Cubes

I don't use water to make the ice cubes; water will dilute the punch as the ice cubes melt.  If you make the punch ahead of time, you can use some of it for ice cubes.  You can do the same thing with pineapple juice, since it's also an ingredient in the punch.  A 6 ounce can of pineapple juice was just enough to make one tray of ice cubes.


Margaret's Morsels | Halloween Shaped Ice Cubes

If you don't want to fool with ice cubes, an easy way to keep the punch cold is to add orange or pineapple sherbet to the punch bowl.

The repurposed foods mentioned today don't make a well rounded meal. For more ideas, check out the Halloween blog I posted in 2010.  I posted two Halloween blogs last year and they can be viewed here and here.  For the recipes mentioned today, click on the bold words to go to the appropriate page.  Whatever you serve, may your Halloween food be ghoulishly delicious!


© Margaret's Morsels

July 9, 2012

The Top Ten Countdown: Number 5

Pin It
Margaret's Morsels | Sausage Balls

The fifth most popular recipe on Margaret's Morsels is Sausage Balls. These are usually served as an appetizer, but they're also good as an entree.

© Margaret's Morsels

July 6, 2012

The Top Ten Countdown: Number 8

Pin It
Margaret's Morsels | Halloween

The eighth most popular recipe on Margaret's Morsels is Halloween for Little Ghouls.  This blog has ideas to make fun Halloween food for kids or the young at heart.


© Margaret's Morsels

April 24, 2012

National Pigs in a Blanket Day

Pin It


Margaret's Morsels | Little Corn Dogs

Today is National Pigs in a Blanket Day.  Here's my version of this well known party favorite that I posted in 2010.  Bon Appetit!  


© Margaret's Morsels

October 29, 2011

Ghoulish Goodies: The Treats

Pin It
Margaret's Morsels | Halloween

I shared Halloween tricks on Wednesday.  Today, I want to share the treats.  I gave a hint about one of the treats -- bones -- in my last blog. Bones might look like a trick, but when they're made with pretzels, marshmallows and white chocolate, they're a treat!


Margaret's Morsels | Halloween Bones


To make these edible bones, start by breaking thin pretzel sticks into various sizes, but don't make them too short.  Insert the flat side of a miniature marshmallow into each end of the pretzel.


Margaret's Morsels | Halloween

Melt one 12 ounce package of white chocolate chips in a microwave, double boiler or, my preferred method, a 1 1/2-quart crock-pot.  Using a fork, dip the bones in the chocolate -- they don't have to look perfect, but make sure to cover all the ingredients -- letting the excess chocolate drip off.  Place the bones on waxed paper to dry and then store in an airtight container.

I made a congealed salad in a large brain shape mold for one of the tricks. For the treats, I use smaller molds made specifically for candy.  Candy molds are inexpensive and come in a variety of shapes and sizes for almost any occasion.  The mold I used for a Halloween treat served two purposes.  One, it was candy that looked like a bat.  Two, the bat was on top of a party pick that could be used to garnish another dessert.


Margaret's Morsels | Halloween

Candy melts -- what you use to fill the molds -- come in a rainbow of colors so you can use more than one color in a mold.  I've used multiple colors a few times but, to be honest, I don't have the time or patience so I stick with one color.

No matter which method you choose to melt the candy melts -- microwave, double boiler or crock-pot -- do not cover the container.  If you do, condensation falls into the container which hinders the melting process. The candy coating retains its shape so you need to stir it periodically to help the melting process.

Using a spoon -- I use an iced teaspoon -- fill the cavities to the top with the melted candy melts.  Once all the cavities are filled, tap the tray on the counter a couple of times to distribute the chocolate and remove any air bubbles.  Using the dull edge of a table knife, scrape any excess chocolate off the tray.  Removing the excess chocolate gives the finished candy a nicer look.  Put the tray in the freezer for 10 minutes until the candy is firm.


Margaret's Morsels | Halloween
Ready to go in the freezer.

To remove the candy from the molds, turn the tray upside down over waxed paper.  Sometimes the candy will fall out on its own.  If not, tap the bottom of the mold to help loosen the stubborn pieces.  If some of the candy breaks, put the pieces back in the crock-pot and melt them again. Store the finished candy in a food storage bag or airtight container.

Cupcakes baked in festive paper liners are always fun to serve at a party. They aren't as messy as cake and you can bake exactly as many as you need.  If you want something similar to cupcakes, but a little fancier, make mini Mason jar cakes instead.

It's fun to decorate cupcakes or Mason jar cakes with colored frosting.  I've found that store bought cream cheese frosting is just as good and a lot easier than making frosting from scratch.  I use a gel icing color to tint the frosting.  Gel icing color is much thicker than liquid food coloring and doesn't dilute the frosting.  Gel icing color also produces a deeper, richer color than liquid food coloring.  To use the gel, insert a clean toothpick into the gel.


Margaret's Morsels | Halloween

Wipe the toothpick with the gel into the frosting, stirring with a spatula to incorporate the color.


Margaret's Morsels | Halloween

Repeat the process using a clean toothpick until the frosting reaches the desired color.


Margaret's Morsels | Halloween

The cupcakes and Mason jar cakes can be left plain or decorated with sprinkles or colored sugar.  I used the bat party picks in the cupcakes and garnished the Mason jar cakes with a variety of Halloween sprinkles.


Margaret's Morsels | Halloween

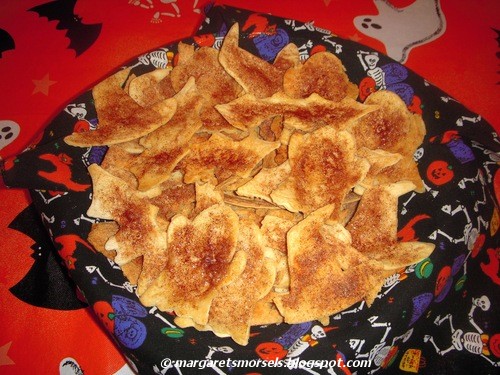
I have one more treat to share.  Instead of sprinkling Halloween shaped tortilla chips with salt, brush them with melted butter and sprinkle cinnamon sugar on top.  Bake just like you would the salted tortilla chips.


Margaret's Morsels | Halloween

May your Halloween be frightfully fun and your treats delightfully delicious!!!


© Margaret's Morsels

October 26, 2011

Ghoulish Goodies: The Tricks

Pin It
Margaret's Morsels | Halloween

Halloween was never a favorite holiday of mine until I became a mother. When our son was two, my husband came home from work to find decorations in the yard, window clings on the front door and Halloween decor inside the house.  The holiday spirit extended into the kitchen with a variety of Halloween themed foods.

Last year, I posted Halloween ideas and recipes for young kids or the young at heart.  Today, I want to share some ideas that work for the older crowd too.  This isn't a menu, but rather ideas you can mix and match for your own holiday feast.

Although I like to alter the holiday menu from year to year, I always serve Halloween shaped sandwiches as the entree.  People, young and old alike, get a kick out of them.  This year, I'm using skull, tombstone and Jack O'Lantern cookie cutters.  It's easy to add features to the skull making it go from this:


Margaret's Morsels | Halloween


to this:


Margaret's Morsels | Halloween

For best results, use bread that's a few days old; fresh bread tears too easily.  The Jack O'Lantern cookie cutter came with a small triangle that is wonderful for the nose.  If you don't have anything that small, cut a triangle shape in the bread with a knife.


Margaret's Morsels | Halloween

After you cut out the nose, make the eyes.  The easiest way to do this is to use a clean small bottle top as a cookie cutter.  If you don't have one available, cut two circles for the eyes with a knife.


Margaret's Morsels | Halloween

Finally, use a knife to draw a straight line for the mouth.  Remove some of the excess crumbs so the mouth will be visible.

Instead of regular chips and dip, serve Halloween shaped tortilla chips with Zombie Bits.  The chips are flour tortillas that have been cut with Halloween cookie cutters before being baked.  The dip may sound disgusting, but it's actually queso dip.  


Margaret's Morsels | Halloween Queso Dip


Cut the tortillas with 3-inch cookie cutters.  Place the pieces on a baking sheet and sprinkle with salt.  Bake at 400° for 6 to 10 minutes.  The time depends on the thickness of the tortillas as well as the shape of the chips. Don't underbake the chips or they'll be chewy instead of crispy.  If some chips bake faster than others, remove them to a cooling rack while the other chips finish baking.


Margaret's Morsels | Halloween

Over the last few years, Halloween molds -- especially ones that resemble body parts -- have become more commonplace.  I fill a brain mold with two packages of gelatin for a disgusting looking congealed salad.  Once the gelatin is firm and transferred to a serving platter, decorate the brain and platter with gummy words for an extra dose of disgust.


Margaret's Morsels | Halloween Gelatin Brain Mold


In addition to food, I like to include some whimsical touches.  Instead of regular ice cubes, I make ice cubes using Halloween themed silicone ice cube trays.


Margaret's Morsels | Halloween Ice Cube Tray


If I'm serving soft drinks, I make the ice cubes out of water.  If I'm serving punch, I make extra punch and freeze it as ice cubes.  This keeps the punch from getting diluted when served.

One of my favorite things to do is coat drinking glasses with fake blood. Combine corn syrup and red food coloring in a small bowl.  Dip the rims of the glasses in the mixture and stand them upright letting the "blood" ooze down the glasses.  Put the glasses on paper towels or a baking sheet to catch any drips.  This needs to be done eight hours ahead of time so the blood has time to dry.


Margaret's Morsels | Halloween

Got a bone to pick because I'm not including any dessert ideas?  Check back later this week for the treats!


© Margaret's Morsels


October 19, 2010

Halloween Treats for Little Ghouls

Pin It
Margaret's Morsels | Halloween

When my son was young, he would host a Halloween party for his friends. The kids were more interested in playing games and having fun than they were about the food being served.  I wanted the parties to be festive so I gave everyday food a Halloween makeover.  Since Halloween is right around the corner, I thought I'd share three of these makeovers geared for young kids or the young at heart.


For the entree, I made two kinds of sandwiches -- using two kinds of bread -- so the kids could choose their favorite filling and bread.  Instead of cutting the sandwiches diagonally, I used large Halloween cookie cutters to cut the sandwiches into pumpkin, ghost and bat shapes.


Margaret's Morsels | Halloween


I also gave my Fruit Kabob recipe a Halloween twist.  I put the pineapple chunks, maraschino cherries and mini marshmallows on Halloween party picks.  The kids loved these.  One guest wanted to collect one of each different party pick and ate kabobs until his collection was complete!  If you don't have party picks, you can use regular toothpicks.  Make sure you drain the fruit thoroughly so the kabobs aren't soggy.  I drain the fruit on a double layer of paper towels to make sure it gets dry.

Margaret's Morsels | Halloween

Halloween party picks.


For dessert, I made ghost cookies.  The cookies start with a package of Nutter Butter cookies.  You dip the cookies in melted white almond bark and add mini chocolate chips for the eyes and mouth.  You can make as many or as few as you need.

Whenever I melt almond bark -- also known as candy coating or bark coating -- I use a 1 1/2-quart crock-pot.  It takes longer to melt, but it remains smooth and you don't have to remelt it like you do when you use a microwave.  A crock-pot keeps the temperature consistent, something that can be tricky if you melt the coating in a saucepan on the stove.  No matter which method you use -- crock-pot, microwave or stove top -- do not cover the container.  If you do, the condensations falls into the almond bark which hinders melting.

Margaret's Morsels | Halloween
The melted almond bark.

To make the dipping process easier, I bought this Wilton candy dipping set:


Margaret's Morsels | Halloween
I use the tool on the left.

The set is inexpensive and a good investment, especially if you make dipped candies or cookies.  However, you can use a dinner fork instead.

To make the cookies, push one cookie at a time under the melted almond bark for a few seconds.  Turn the cookie over a time or two to make sure the entire surface gets covered.  Lift the cookie out of the almond bark and tap the fork against the container.  This helps the excess coating fall off plus it pops any bubbles that are on the surface of the coating.  Put the cookie on wax paper and, while the coating is still soft, add two mini chocolate chips for the eyes and one for the mouth.  Once the cookies are dry, store them at room temperature in an airtight container.


Margaret's Morsels | Halloween


I hope my son will host a Halloween party next year so I can prepare bloodshot eyeballs, severed finger sandwiches and a brain gelatin mold. This year, I think I'll serve Halloween sandwiches, fruit kabobs and ghost cookies for a walk down memory lane.

© Margaret's Morsels