Showing posts with label sausage balls. Show all posts

October 25, 2012

Repurposed Recipes for Halloween

Pin It
Margaret's Morsels | Halloween

You don't need special ingredients to make Halloween party food.  Give everyday food a Halloween makeover by repurposing the recipe.  Most of the recipes I'm sharing today can be made ahead of time.  This makes things a lot less hectic the day of the party, because most of the work has already been done.

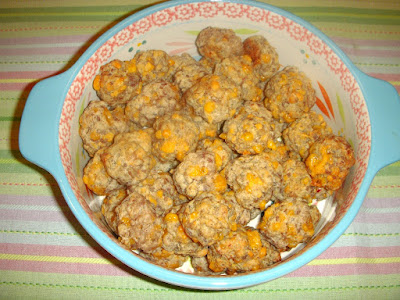
When I wrote about Sausage Balls, I described this simple three ingredient recipe as a "no brainer."  This term is definitely appropriate because on Halloween this appetizer turns into brains.  The brains can be baked up to five days ahead of time and reheated in the microwave or oven.  If you reheat them in the oven, you may need to cover the pan with foil to keep the tops from getting too brown.  If you want to make them look more disgusting, slightly squish the warm brains with your fingers.


Margaret's Morsels | Halloween Brain Sausage Balls

Baked Mozzarella Cheese Sticks turn into fingers with the addition of sliced almonds for fingernails.  Unfortunately, you can't add lines for the knuckles because the cheese will ooze out when it's baked.  The cheese sticks need to be assembled and refrigerated at least four to six hours ahead of time.  If you're short on time, they can be assembled and refrigerated the night before.  Unlike the other recipes, fingers are best served hot from the oven.


Margaret's Morsels | Halloween Baked Mozzarella Cheese Fingers

While the fingers are baking, whip up a batch of fake blood dipping sauce with this homemade pizza sauce recipe.  This easy to prepare sauce only uses five ingredients and cooks in five minutes.  One batch is enough for 18 fingers.

For years, I've used Nutter Butter cookies to make ghost cookies for Halloween.  This year, I decided to turn these store bought cookies into monster toes.  I used a package of spooky green candy melts instead of the usual white.  Monster toes aren't pretty so you don't have to worry if the toes aren't covered perfectly with the candy melts.


Margaret's Morsels | Halloween Monster Toes

The toenails are made with small pieces of black licorice.  The pieces are too thick to use out of the package so I cut them in half.


Margaret's Morsels | Halloween Monster Toes

If you want to add an extra ick factor, put a chocolate chip on the toe to mimic a wart.  Normally, when I decorate with chocolate chips, I turn them upside down so the point doesn't show.  To make the wart more disgusting, I put the chocolate chip with the point right side up.  The cookies can be made a few days ahead of time and stored in an airtight container.


Margaret's Morsels | Halloween Monster Toes

A festive touch for Halloween is to coat drinking glasses with fake blood made from a mixture of corn syrup and food coloring.


Margaret's Morsels | Halloween Fake Blood Rimmed Drinking Glasses

Instead of liquid food coloring, I use gel icing -- a concentrated paste -- which is sold in small jars in a variety of colors.  It produces richer, more vibrant colors and, because it's concentrated, a little dab will do!  The most important thing to remember when using gel icing is to use a clean toothpick or knife every time you remove some icing from the jar.  This keeps the contents from getting contaminated with frosting or, in this case, diluted with water.  Once the rim is coated, stand the glass upright on a paper towel or piece of wax paper, letting the excess drip down the glass. It takes at least eight hours for the glasses to dry.  To ensure they dry in time, I coat the glasses a day ahead of time.

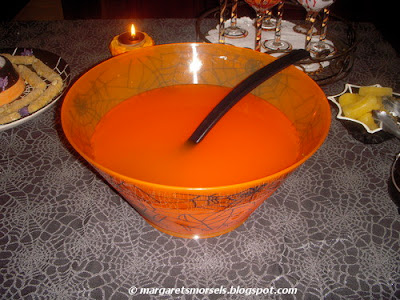
With the glasses decorated, you need something to put in them.  I turn my mother's Christmas Kool-Aid Punch into Ghoul-Aid Punch, by substituting two packages of orange Kool-Aid for the cherry and lemonade called for in the recipe.


Margaret's Morsels | Halloween Ghoul-Aid Punch

The punch can be made a few days ahead of time, but don't add the 7-Up until it's served.  To make the punch more festive, I add some orange gel icing.  


Margaret's Morsels | Halloween Ghoul-Aid Punch
The punch on the left doesn't 
have orange gel icing.

To keep with the holiday theme, I make ice cubes using silicone Halloween ice cube trays.  


Margaret's Morsels | Halloween Shaped Ice Cubes

I don't use water to make the ice cubes; water will dilute the punch as the ice cubes melt.  If you make the punch ahead of time, you can use some of it for ice cubes.  You can do the same thing with pineapple juice, since it's also an ingredient in the punch.  A 6 ounce can of pineapple juice was just enough to make one tray of ice cubes.


Margaret's Morsels | Halloween Shaped Ice Cubes

If you don't want to fool with ice cubes, an easy way to keep the punch cold is to add orange or pineapple sherbet to the punch bowl.

The repurposed foods mentioned today don't make a well rounded meal. For more ideas, check out the Halloween blog I posted in 2010.  I posted two Halloween blogs last year and they can be viewed here and here.  For the recipes mentioned today, click on the bold words to go to the appropriate page.  Whatever you serve, may your Halloween food be ghoulishly delicious!


© Margaret's Morsels

July 9, 2012

The Top Ten Countdown: Number 5

Pin It
Margaret's Morsels | Sausage Balls

The fifth most popular recipe on Margaret's Morsels is Sausage Balls. These are usually served as an appetizer, but they're also good as an entree.

© Margaret's Morsels

February 1, 2011

Super Bowl Edition Morselette

Pin It
This Sunday, millions of people will be glued to their televisions watching the Pittsburgh Steelers and the Green Bay Packers battle it out on the gridiron at Super Bowl XLV.  Whether you're hosting a party or just fixing food to munch on during the big game, you might want to check out these awesome appetizers from previous blogs.


Margaret's Morsels | Little Corn Dogs

You're sure to score points with any of these recipes!

© Margaret's Morsels


January 13, 2011

Appetizer, Entree or Both?

Pin It
Margaret's Morsels | Sausage Balls

There's something about sausage balls and winter that go together. Maybe it's the spiciness of the sausage along with a hot food that warms the body. Whatever it is, sausage balls sure are good on a cold day.


The recipe for sausage balls is, as it is said, a "no brainer."  You only need three ingredients:  sausage, cheese and a baking mix such as Bisquick.  I use regular sausage, sharp Cheddar cheese and Heart Smart Bisquick. You could use hot or sage sausage, mild Cheddar cheese and regular Bisquick.  To make a sausage ball that's out of the ordinary, use ground Italian sausage and Mozzarella cheese.


Although sausage balls aren't difficult to make, it does take time to mix all the ingredients together.  Don't even try to mix everything with a spoon or mixer.  The only way to mix the ingredients is with your hands.  It requires some effort, but there are a couple of ways to make the job easier.


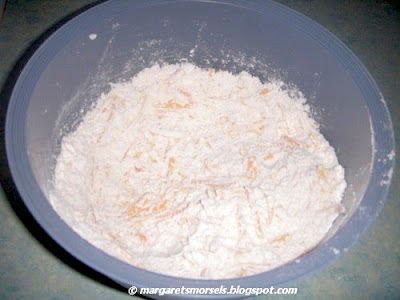
First, let the ingredients warm up at room temperature 15 to 20 minutes before you combine them.  Second, mix the Bisquick and cheese together before you add the sausage.


Margaret's Morsels | Sausage Balls
The Bisquick and cheese mixed together.


Margaret's Morsels | Sausage Balls

Margaret's Morsels | Sausage Balls
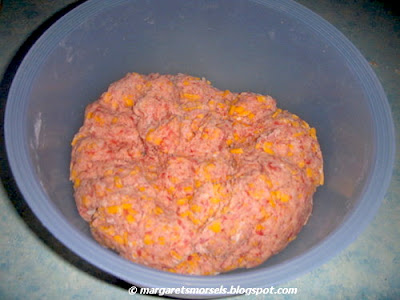
This is what you'll end up with after all the mixing.

Once everything is thoroughly combined, shape the mixture into 1-inch balls.  A 1 tablespoon cookie scoop is the perfect size for sausage balls and is faster than shaping the balls by hand.


Margaret's Morsels | Sausage Balls
This is what I use to shape the sausage balls.

Put the sausage balls on a rimmed baking sheet such as a cookie sheet. You don't need to spray the baking sheet with nonstick cooking spray. There's enough grease in the sausage to keep the sausage balls from sticking.  If one should stick, run a fork under it and it should release easily from the baking sheet.  Once the sausage balls are cooked, place them on a wire rack to cool.

Margaret's Morsels | Sausage Balls


Sausage balls can be frozen either cooked or uncooked.  Place the cooked and completely cooled or the uncooked sausage balls in a single layer on a baking sheet.  Put the baking sheet in the freezer until the balls are completely frozen.  This will prevent the sausage balls from sticking together.  Once the sausage balls are frozen, store them in the freezer in a resealable plastic freezer bag.

When you're ready to heat frozen sausage balls that have already been cooked, you can heat them one of two ways.  Remove the desired amount from the freezer, put them on a baking sheet and reheat them at 350° for 10 to 15 minutes or until heated through.  If they get too brown, cover the pan with foil while they finish reheating.  Or, put the frozen sausage balls on a microwave-safe container and heat them on High in the microwave for 10 seconds per sausage ball.  If your microwave is less than 1100 watts, you might need to add a few seconds for each sausage ball.

Uncooked sausage balls take longer to heat because they haven't been cooked yet.  Put the frozen sausage balls on a baking sheet and heat them at 350° for 25 to 30 minutes or until thoroughly cooked.

If you don't want to freeze them, cooked sausage balls can be stored in the refrigerator up to 5 days.  You can reheat them in the oven or microwave as directed above.

Sausage balls are usually served as an appetizer, but they also make a great entree too.  They are especially good with scrambled eggs and baked Tater Tots.  Not only is this good for breakfast, it also makes a great supper.  My husband isn't a big fan of eating breakfast for supper, but he makes an exception for this meal.  This from the man who eats leftover supper  -- salmon, pork chops, roast beef -- for breakfast!  


Margaret's Morsels | Sausage Balls

Sausage Balls
Yields 53

1 lb. uncooked sausage
1 cup shredded Cheddar cheese
2 cups Bisquick

Combine ingredients.  Roll into 1-inch balls and place on an ungreased baking sheet.  Bake at 350° for 15 minutes.

© Margaret's Morsels