February 27, 2012

Poached not Baked

Pin It
Margaret's Morsels | Poached Cinnamon Apples

I've previously shared recipes for foods that are baked rather than fried. Today, I want to share an apple recipe that's poached rather than baked.  If you made the No Bake Turkey Cookies I posted last year, this is a chance to use the rest of the cinnamon candies.

My mom never fixed baked apples.  She always poached them on top of the stove in a sugar syrup made with red cinnamon candies and water.

Poaching is a cooking method where food is submerged -- either partially or completely -- in a liquid and simmered until done.  Poached eggs are probably the best known poached food, but fish, chicken and fruit can also be poached.

There's two things to remember when you poach food.  One, don't let the liquid boil.  If you boil the liquid, you're boiling rather than poaching the food.  Two, use the right size pan.  The pan should be big enough to hold the food and liquid, but no bigger.  If you use a pan that's too big, you'll need to add more liquid.  Since the food absorbs the flavor of the liquid it's cooked in, adding more liquid dilutes the flavor.

When you cook with apples, use an all-purpose or cooking apple.  They retain their shape and don't get mushy when cooked.  Granny Smith, Rome, Empire, Golden Delicious and McIntosh are all good choices.  I've recently discovered Honeycrisp, an all-purpose apple that is both sweet and tart, and used it the last time I fixed these apples.  They were delicious poached!

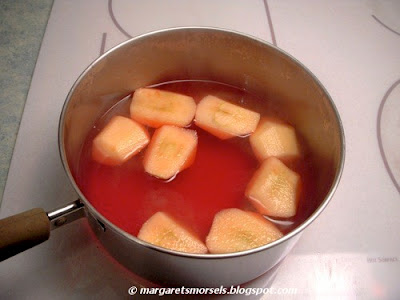
My mom used a 9 ounce package of red cinnamon candies, but I only use about 1 1/4 to 1 1/2 cups.  Put the candies and water in a saucepan and bring to a boil over medium-high heat.  Once the candies are dissolved, turn the heat down to low and add the apples which have been sliced into eighths.


Margaret's Morsels | Poached Cinnamon Apples
This pan can hold 11 apple slices.


Depending on the number of apples you cook, you may need to poach them in batches.  Simmer the apples, turning them occasionally, until they are tender when pierced with a sharp knife, about 8 to 12 minutes.  When you're finished with a batch, use a slotted spoon to remove the apples from the liquid and put them in a serving bowl.


Margaret's Morsels | Poached Cinnamon Apples

Once all the apples are poached, check the viscosity of the remaining sugar syrup.  If it's thick enough, pour it over the apples.  If it's thin, reduce it by bringing it to a boil until it thickens.  Reducing not only thickens the syrup, it also intensifies the flavor.


Margaret's Morsels | Poached Cinnamon Apples

I like the combination of apples and pork so I serve these with sauteed pork chops.

Margaret's Morsels | Poached Cinnamon Apples

The apples can also be served as a dessert.  No matter which way you serve them, the apples add a burst of color to any meal.

Poached Cinnamon Apples
4 Servings

1 1/4 to 1 1/2 cups red cinnamon candies
2 cups water
5 all-purpose or cooking apples, peeled, cored and cut into eighths

Dissolve the cinnamon candies in water over medium-high heat.  Reduce heat to low.  Working in batches, simmer the apples uncovered, turning occasionally, until they are tender when pierced with a sharp knife, 8 to 12 minutes.  Use a slotted spoon to remove the apples to a serving bowl. When all the apples are cooked, reduce the syrup, if necessary, by boiling it until it's thick.  Pour the syrup over the apples and serve.


© Margaret's Morsels

February 24, 2012

Thank You, Merci, Danke, Grazi, Gracias!!!!

Pin It
Thank you for the condolences on the death of my sister-in-law.  I chose to keep the comments private, but I read and appreciate each and every one. Thank you from the bottom of my heart.


© Margaret's Morsels

February 12, 2012

In Remembrance

Pin It
I wrote a blog yesterday that I'd planned to post today, but my heart's not in it.  You know it's going to be a bad day when you get an early morning phone call at an hour when nobody calls with good news.  One of my sisters-in-law died unexpectedly during the night leaving behind her husband -- my brother -- and their 12 year old son.  Cooking, writing and blogging aren't as important to me as being there for two people I love whose hearts are broken.  RIP, Cindy, 1962-2012.


© Margaret's Morsels
February 7, 2012

A Crafty Edible Valentine

Pin It
Margaret's Morsels | Candy Cane Lollipops

When my son was in preschool, I'd help him make heart shaped Valentine cards for his classmates using two candy canes.  You can take the idea a step further and put the candy canes on a lollipop stick, use melted chocolate to hold everything together and decorate it with Valentine sprinkles.

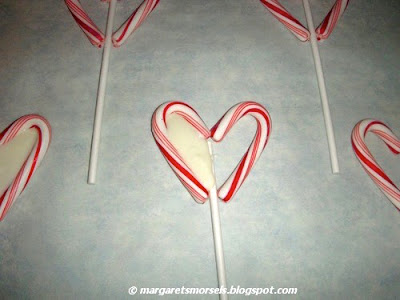
Start by putting two mini candy canes together in a heart shape on a piece of parchment paper.  Leave enough space at the bottom of the candy canes to insert a lollipop stick. 


Margaret's Morsels | Candy Cane Lollipops
Stagger the candy canes so there's
room for the lollipop sticks.

Center the lollipop stick at the top of the candy canes where the two pieces meet.  Once the stick is centered on the top, slide the bottom of the candy canes over until they touch the lollipop stick.


Margaret's Morsels | Candy Cane Lollipops

Normally when I melt chocolate, I use a 1 1/2-quart crock-pot so I don't have to keep remelting the chocolate.  However, I'm usually coating cookies or chocolate covered cherries or making candy molds, all of which are more time consuming.  Filling the candy cane hearts with melted chocolate is quick so I use the microwave to melt the chocolate.

Spoon the chocolate into the heart shaped opening -- I fill one side at a time -- being careful not to overfill.  If any chocolate gets on the candy canes, gently wipe it off with a paper towel.


Margaret's Morsels | Candy Cane Lollipops

Let the chocolate set a minute or two and then decorate the top with Valentine sprinkles.


Margaret's Morsels | Candy Cane Lollipops

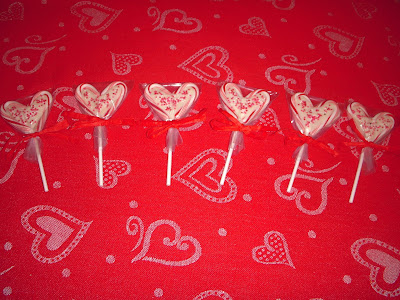
Let the lollipops dry completely on the parchment paper.  Once they're dry, put them in lollipop treat bags and tie the bags closed with ribbon or, what I like to use, raffia.


Margaret's Morsels | Candy Cane Lollipops

Candy canes are the essential ingredient for this recipe.  If you don't have any, keep the idea in mind for next year.  I'll even post a reminder blog in December so you can stock up on candy canes.  If you're lucky enough to have some candy canes on hand, the recipe is quick and easy to make and, unlike a card, is edible. 


Candy Cane Lollipops
6 Servings

12 mini candy canes
1/2 cup white chocolate chips
1 1/2 tsp. vegetable oil
Valentine sprinkles

Put the candy canes in a heart shape on parchment paper.  Insert a lollipop stick, making sure to slide the bottom part of the candy canes over so they touch the stick.  Melt the chocolate chips and oil in a microwave until melted, stirring at 15 second intervals.  Spoon the chocolate mixture into the heart shape opening and decorate the top with sprinkles.  Let dry completely.  Place each lollipop into a lollipop size treat bag and tie closed with ribbon or raffia.


© Margaret's Morsels


February 2, 2012

A Cook's Tools: Cooking School

Pin It
A few days ago, I shared a list of prep tools I compiled at the request of a friend whose getting married.  She wanted to know what items she should include on her bridal registry.  Today, I want to share my list of cooking must haves.  These are the items I rely on once the measuring, chopping, peeling, juicing, pounding, grating, straining, mixing, whisking, rolling and cutting have been done.  Once again, I'm including links to recipes that use those items.  The list isn't all inclusive but, like the prep tools, this is what I rely on when I'm cooking for three or twenty three.


The Eyes Have It:


Margaret's Morsels | Cooking School

Saucepan:  I have this in a one and two quart size.  The one quart is the perfect size for boiling three eggs, cooking a serving of grits or oatmeal or heating a can of soup.  If you cook for several people, you might want to add a three quart saucepan.  Make sure to buy saucepans with lids.

Dutch Oven:  This covered pot is good for stewing and braising.  I also use it to cook potatoes, pasta and boil a dozen eggs.

Stockpot:  I use this whenever I cook chicken breasts or make a double batch of soup.  It's also the only container I have big enough to mix up a batch of Cornbread Dressing.


Margaret's Morsels | Cooking School

Skillet:  It's a good idea to have a large 10 or 12-inch skillet with a lid and a smaller 6 or 8-inch skillet.  The large skillet is great for browning ground beef or pork chops and cooking a one dish dinner.  The smaller skillet is handy for small jobs such as omelets, scrambled eggs and sauteing chopped vegetables.

Baker's Dozen:


Margaret's Morsels | Cooking School

Roasting Pan:  Although this isn't something I use very often, it's the only pan I have that's big enough to roast a turkey.  Some roasting pans come with a wire rack to hold the meat.  When you put the pan in the oven, you may need to lower the oven rack to keep the top of the meat from being too close to the heating element.


Margaret's Morsels | Cooking School

Pizza Pan:  I use this for more than pizza.  It's great for chicken nuggets, French fries and biscuits.


Margaret's Morsels | Cooking School

Muffin Pan:  These come in sizes ranging from miniature to jumbo.  I have a 6 cup, 12 cup and two mini muffin pans.  The 6 cup is ideal for muffin mixes that only make 6 servings.  I use the 12 cup for muffins, cloverleaf rolls and Baked Salmon Patties.  The mini pans are good for muffins as well as mini quiche or other bite size appetizers.


Margaret's Morsels | Cooking School


Cookie Sheet:  I have these in three sizes.  The quarter sheet pan, the smallest one in the picture, is the perfect size for a batch of Chocolate Oatmeal Cookies.  I also use it to bake Little Corn Dogs and Baked Mozzarella Cheese Sticks.

The cookie sheet pictured in the middle is a standard size cookie sheet. It's a good idea to have two of these.  That way, you can have one pan ready to go in the oven as soon as the other pan comes out.  You can buy cookie sheets without rims, but I prefer rimmed ones.  That way, I can also use them for bar cookies.

The last cookie sheet pictured is known as a sheet or jelly roll pan.  It's larger than a regular cookie sheet and is used for sheet cakes and jelly rolls.


Margaret's Morsels | Cooking School

Layer Cake Pan:  You'll need at least two of these for making a layer cake. I have these in both the 8 and 9-inch size.  The 9-inch pan makes a thinner and wider cake.  


Margaret's Morsels | Cooking School

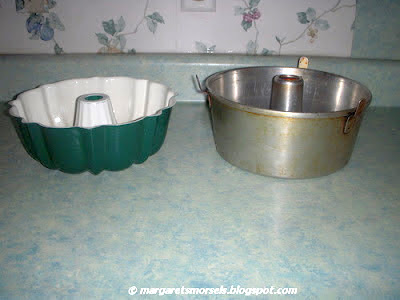
Bundt Pan:  This fluted pan is for cakes other than angel food or sponge cake.  To keep the cake from tearing up when it's removed from the pan, be sure to thoroughly grease every crevice.

Tube Pan:  This pan is used for angel food and sponge cakes.  Some tube pans -- like the one pictured -- have feet so the pan can be turned upside down for cooling.  If the pan is large enough, you can use it to bake other cakes too.

Margaret's Morsels | Cooking School

Square Cake Pan:  Just like layer cake pans, these are available in 8 and 9-inch sizes.  They're good for things other than cake.  I use mine to bake cornbread, meat loaf and Loaded Mashed Potato Casserole.

9 x 13-Inch Pan:  I like to bake cakes in this pan that need to be frosted. That way, I can bake, frost and store all in the same pan.  Cakes baked in this pan can also be removed and sliced into layers before being filled and frosted.  This pan isn't limited to just cake.  I use it for potato casserole, goulash and Stuffed Breast of Turkey.

Loaf Pan:  This is good for baking bread as well as meat loaf.


Margaret's Morsels | Cooking School

Spring-Form Pan:  This pan has a clamp that, when opened, removes the collar which allows for easy cutting.  It's especially good for cheesecake.


Margaret's Morsels | Cooking School

Pie Crust Shield:  This sits on top of the pie crust and shields the edges from getting too brown.  It's available for regular and deep-dish pie pans.


Margaret's Morsels | Cooking School

Wire Cooling Rack:  Once you've baked cakes, cookies and bread, they need to be removed from the pan.  The wire rack is elevated which allows air to circulate so the item can cool.  It's a good idea to have two or three of these racks, especially if you do a lot of baking.

Dishing It Up:


Margaret's Morsels | Cooking School


For easy cleanup, I like to cook and serve out of the same dish whenever possible.  For that reason, I have a variety of glass bakeware in various shapes and sizes.  One advantage of glass is it can be used in the oven as well as the microwave.  I use the round casserole dish to bake Sweet Potato Souffle a day or two before Thanksgiving.  I let the souffle cool and then store the covered casserole dish in the refrigerator.  When it's time to heat the souffle, I put the casserole dish in the microwave and reheat it while the double ovens cook the other food.


Margaret's Morsels | Cooking School

The square dish is the perfect size when I halve the recipe for Green Bean Bundles.  I use the deep-dish pie plate when I make Chicken Pot Pie. The rectangular dish is just the right size for four servings of Marinated Baked Chicken.  

What a Crock!


Margaret's Morsels | Cooking School

I absolutely love crock-pot cooking!  I have three crock-pots -- small, medium and large -- but each one is good for different things.  The small crock-pot is the perfect size for melting almond bark.  The  medium size crock-pot is the one I use most often for entrees like French Dip Sandwiches and Barbecue Chicken.  I use the large crock-pot when I cook pot roast with vegetables or make double batches of chili or spaghetti sauce.  A crock-pot needs to be at least half full so keep that in mind when selecting a crock-pot size.

If you don't have all the items I've mentioned, don't feel as though you need to go out and buy them.  The tools you need in your kitchen depend on how much cooking you do and what kinds of food you cook.  If you eat a lot of steamed vegetables, you'd probably find it useful to have a metal steamer basket.  If you love to bake and decorate cakes, you might want to purchase different shaped cake pans and lots of decorating tips.  If you're like me and like to make congealed salad, you might want to invest in some Jell-O molds.

Stocking a kitchen is a gradual process that evolves over the years.  I've been cooking over 20 years and I still find gadgets to buy that make work in the kitchen easier.  Just last year, I bought a pineapple slicer that makes slicing and cutting pineapple a breeze.  No matter what you're looking for, chances are -- to paraphrase a popular phrase  -- there's a tool for that!


© Margaret's Morsels