March 26, 2013

24 Carat Cake

Pin It
Margaret's Morsels | Carrot Cake

The last two years, I've shared pictures and directions for making a bunny cake.  This cake is a cherished Easter tradition at my house.  This year, I thought I'd share the recipe for the Easter cake I made before I had kids. Just like the bunny cake, this recipe also came from a high school home ec class.  Unlike the bunny cake which starts with a cake mix, this cake is made from scratch.

If you haven't already guessed, the blog title is a play on words for the best carrot cake I've ever eaten.  It's different from most carrot cake recipes I've seen.  One, it doesn't use pineapple.  Two, it uses brown sugar instead of white.  Three, instead of being flavored only with cinnamon, it also uses nutmeg and cloves.  Speaking of spices, check your spices ahead of time to make sure they're good.  If they have little or no aroma, throw them out and buy new ones.  If you can't smell them, you won't be able to taste them either.

Before you start mixing anything, do the chopping, grating, sifting and measuring.  Once you've done all this, making the cake is, well, a piece of cake!

Finely chop some of the walnuts and coarsely chop the rest.

Margaret's Morsels | Carrot Cake

Grate the carrots.  This is fast and easy to do if you have a food processor. If you're like me and don't have one, grate the carrots by hand, making sure you don't grate them into long strips.

Margaret's Morsels | Carrot Cake

Sift some flour and then measure out three cups.  Sift the flour again with the baking powder and salt.  Sifting removes any lumps, helps blend ingredients and incorporates air which makes the ingredients lighter.

Measure the remaining ingredients.  Unlike white sugar which is spooned into a measuring cup and leveled off, brown sugar needs to be packed into the measuring cup.  When it's removed, the brown sugar will retain the shape of the cup.

Margaret's Morsels | Carrot Cake

Once all the prep work is done, it only takes a few minutes to mix up the cake batter.  Use a mixer to combine the brown sugar, eggs, oil and spices. Add the flour mixture and milk alternately, beginning and ending with the flour mixture.  Stir in the carrots and coarsely chopped walnuts.

Grease three 9-inch round cake pans.  Instead of flouring the pans, divide the finely chopped walnuts between the three pans.  The walnuts take the place of the flour and add some texture to the layers.  It will also play a role when it comes time to assemble and frost the cake.

Margaret's Morsels | Carrot Cake

Divide the batter evenly between the three pans.  I use a large cookie scoop to put equal amounts of batter in each pan.

Margaret's Morsels | Carrot Cake

Bake at 350° for 25 to 30 minutes or until done.  If you bake all three pans at the same time, rotate them once to ensure even baking.  Take the pans out of the oven and let them cool for 10 minutes on a wire rack.  Remove the cakes from the pans and cool completely on a wire rack.

Margaret's Morsels | Carrot Cake

Since this post is so long, I'm going to split it up into two parts.  Check back later this week for directions on assembling, frosting and decorating this 24 carat cake.

Carrot Cake
10 to 12 Servings

1 1/2 cups walnuts, divided
3 cups sifted all-purpose flour
3 tsp. baking powder
1 tsp. salt
2 cups brown sugar, packed
4 eggs
1 cup vegetable or canola oil
1 1/2 tsp. cinnamon
1 tsp. nutmeg
1/4 tsp. cloves
3 Tbsp. milk
3 cups grated carrots

Coarsely chop 1 cup walnuts; set aside.  Finely chop the remaining walnuts.  Grease 3 (9-inch) round cake pans.  Coat each pan with approximately 2 1/2 tablespoons of the finely chopped walnuts.

Combine the brown sugar, eggs, oil and spices in a large bowl; beat with a mixer until combined.  Resift the flour with baking powder and salt.  Add half the flour mixture to the creamed mixture, beating until combined.  Add the milk all at once, beating until combined.  Add the remaining flour mixture and beat until combined.  Stir in the carrots and remaining walnuts.

Divide the batter evenly between the three pans.  Bake at 350° for 25 to 30 minutes or until done.  Cool pans on wire racks 10 minutes.  Remove cakes from the pans and cool completely on wire racks.


© Margaret's Morsels

March 24, 2013

A Different Way to Dye Easter Eggs

Pin It
Margaret's Morsels | Gel Icing Color Easter Eggs

Last year, I posted a blog about an easy way to dye Easter eggs using Wilton gel icing color.  Since Easter's next Sunday, I wanted to share the information again.  Here's the link in case you missed it last year.  In the meantime, I'm working on two new Easter blogs that I'll post later this week.


© Margaret's Morsels

March 1, 2013

Not Your Usual Steak

Pin It
Margaret's Morsels | Salisbury Steak


If potatoes are the workhorse of the produce department, ground beef is its equivalent in the meat department.  Ground beef can be used for sandwiches, meat loaf, chili, soup, spaghetti sauce, casseroles, pizza, meatballs and even as a filler in bean dishes to name a few.  One of my favorite things to make with ground beef is Salisbury steak.

Salisbury steak -- named for its creator, Dr. J.H. Salisbury -- isn't a steak in the normal sense of the word, but a mixture of ground beef, onion and seasonings that's shaped into patties and either fried or broiled.  It's typically served with gravy.

For many years, I used a recipe that called for the meat to be grilled and the gravy to be made separately on the stove top.  It was good, but I had to time things carefully in order for the meat and gravy to be done at the same time.  Several years ago, a coworker gave me a recipe for Salisbury steak that calls for the meat and gravy to be cooked together in the oven.  

The original recipe called for 1/3 cup bread crumbs.  This left the cooked meat patty with an extremely soft texture which made me think it wasn't cooked through, even though it was.  I increased the bread crumbs to 2/3 cup and, although the texture was firmer, it wasn't as good as I'd hoped.  I finally added a full cup of bread crumbs and the texture was perfect.  If you prefer a meat patty that's not as firm, reduce the bread crumbs, but don't use less than 1/3 cup.  The bread crumbs help bind the ingredients together.

Combine 1/4 cup cream of mushroom soup with ground beef, bread crumbs, onion, egg, salt and pepper in a large bowl, mixing with your hands only until combined.  Don't overmix or the finished product will be tough.

Margaret's Morsels | Salisbury Steak

Shape the mixture into four patties.  I make them round, but if you want them to resemble a steak, elongate the patties into an oval shape.  Place the patties in a greased baking dish.

Margaret's Morsels | Salisbury Steak

Combine the remaining soup with Worcestershire sauce, water and mushrooms.  Spread the mixture evenly over the patties.

Margaret's Morsels | Salisbury Steak

Put the pan in the oven and bake for one hour.

I like to serve Salisbury steak with macaroni and cheese which is baked at the same temperature as the meat.

Salisbury steak will never be mistaken for T-bone, New York Strip or Porterhouse, but it's an inexpensive and easy way to elevate ground beef from ho hum to wow!  Not only that, cleanup is minimal with this tasty one dish recipe.


Salisbury Steak
4 Servings

1 (10 3/4 oz.) can cream of mushroom soup, divided (undiluted)
1 lb. ground beef
1 cup Italian seasoned dry bread crumbs
1/2 cup chopped onion
1 egg, beaten
1 tsp. salt
pepper to taste
1 Tbsp. Worcestershire sauce
2 Tbsp. water
1 (8 oz.) can mushroom stems and pieces, drained

Combine 1/4 cup soup, ground beef, bread crumbs, onion, egg, salt and pepper in a large bowl; don't overmix.  Shape into 4 patties and place in a greased 9-inch baking pan.  Combine the remaining soup with Worcestershire sauce, water and mushrooms; spread the mixture evenly over the patties.  Bake uncovered at 350° for 60 minutes.

© Margaret's Morsels


February 14, 2013

Chocolate for Valentine's Day

Pin It
Margaret's Morsels | Chocolate Dream Pie

Valentine's Day is synonymous with chocolate, but that doesn't have to mean candy.  As Forrest Gump eloquently said in the movie, "Life is like a box of chocolates.  You never know what you're gonna get."  Unlike a box of candy, there won't be any unwanted pieces when it comes to chocolate pie, especially one with a delectable chocolate filling on top of a chocolate crumb crust.  If you think you don't have the skills to make a pie, think again!  Chocolate Dream Pie doesn't require any cooking, only uses four ingredients and half of them are chocolate!

The pie starts by combining Dream Whip and milk.  Dream Whip, a powdered whipped topping mix, is a tastier alternative to Cool Whip and much faster to prepare than whipped cream.  In several recipes I've posted, I suggested, for better results, not using low-fat or nonfat ingredients. When using Dream Whip, it's actually better to use the lower fat alternatives.  I found this out the hard way.

The first time I ever made this pie, I assumed it would be firmer if I used whole milk.  While I was mixing the ingredients, I glanced at the Dream Whip box and read the following sentence:  "For best results, use 2% reduced fat milk, 1% low-fat or fat-free milk."  This works out good since we drink 1% milk.

Margaret's Morsels | Chocolate Dream Pie

Combine the Dream Whip and milk with an electric mixer on low speed just until blended.  Increase the speed to high and beat four minutes until the mixture thickens and forms peaks on the beaters.

Margaret's Morsels | Chocolate Dream Pie

Add some more milk and a box of instant chocolate pudding and pie filling. Be sure to use regular chocolate pudding and not sugar-free.  Sugar-free pudding doesn't have the same consistency and won't set up like regular pudding.  You have two choices when it comes to beating the pudding into the Dream Whip mixture.

The original recipe called for beating the pudding two minutes.  This makes a pie that's light and fluffy, but not as aesthetically pleasing as one that's beaten until the pudding is smooth, about seven minutes.  The pies are delicious either way so the decision comes down to personal preference.

Margaret's Morsels | Chocolate Dream Pie
The pie on the left was mixed for seven minutes.
The one on the right, two minutes.

Spread the filling in a chocolate crumb crust and refrigerate at least four hours.

I like the pie plain, but my husband likes it garnished with whipped cream. If you want to garnish the garnish, sprinkle mini chocolate chips, chocolate curls or cocoa powder over the whipped cream.

Margaret's Morsels | Chocolate Dream Pie

If you want to add a pop of color, add a maraschino cherry with a stem on top.

Margaret's Morsels | Chocolate Dream Pie

A festive touch for Valentine's Day is to garnish the whipped cream with some candy conversation hearts 

Margaret's Morsels | Chocolate Dream Pie

or other Valentine candy.

Margaret's Morsels | Chocolate Dream Pie

I'm late posting this recipe so you might not have time to make the pie today.  Next year, think outside the heart shaped box and surprise your Valentine with a Chocolate Dream Pie instead.  It won't get thrown away like some pieces of candy!  


Chocolate Dream Pie
6 to 8 Servings

1 envelope Dream Whip whipped topping mix
1 1/2 cups milk, divided
1 (4 serving size) pkg. chocolate instant pudding and pie filling (not sugar-free)
1 (6 oz.) chocolate pie crust

Mix Dream Whip and 1 cup milk in a large bowl with an electric mixer on low speed until blended.  Beat on high speed 4 minutes until topping thickens and forms peaks.  Add remaining milk and pudding mix; blend. Beat at high speed 2 minutes for a light and fluffy filling or 7 minutes for a smooth filling.  Spoon into pie crust.  Cover and refrigerate at least 4 hours before serving. Store in the refrigerator.

© Margaret's Morsels


February 8, 2013

Fabulous Fudge

Pin It
Margaret's Morsels | Peanut Butter Fudge

Valentine's Day is less than a week away.  If you want to do something different this year, leave the box of chocolates at the store and make your Valentine some homemade candy instead.  Making candy doesn't have to be hard.  It doesn't have to be chocolate either!

My mother made the best peanut butter fudge.  Her recipe called for cooking part of the ingredients until they reached the soft-ball stage.  The remaining ingredients were stirred in and the mixture was spread in a square 9-inch pan.  The result was perfect fudge every time.  She made it look so easy!  I've never had success with her recipe, even though I've used a candy thermometer and a digital thermometer to know when the mixture was at the soft-ball stage.  Fortunately, I found a recipe that rivals my mother's fudge, but is much easier to make.

Before you begin, measure all the ingredients and line a 13 x 9 x 2-inch pan with foil.  A quick and easy way to line the pan is to turn it upside down and shape the foil around the pan.

Margaret's Morsels | Peanut Butter Fudge

Remove the foil, turn the pan right side up and put the foil in the pan.

Margaret's Morsels | Peanut Butter Fudge

The fudge gets its smooth texture from cream cheese.  My family is used to eating Neufchatel 1/3 less fat cream cheese so that's what I use.  The fudge will be firmer, though, if you use regular cream cheese.  You can use whichever one you prefer, but don't use fat-free cream cheese.  The fat in the cream cheese helps make the fudge firm.

Put cream cheese, peanut butter and peanut butter chips in a microwave-safe bowl. 

Margaret's Morsels | Peanut Butter Fudge

Microwave on High 45 seconds.  Remove from the microwave and stir. Continue to microwave in 15 second intervals, stirring each time, until the ingredients are melted.

Margaret's Morsels | Peanut Butter Fudge

The original recipe didn't call for any flavoring, but I think the fudge tastes better with the addition of pure vanilla extract.  Pure vanilla extract is expensive, but it's so much better than imitation vanilla.  Imitation vanilla is made from artificial flavorings and leaves a bitter aftertaste.  If you don't have the real thing, leave the vanilla out; the fudge will still be good.

Add powdered sugar, one cup at a time, using your hands to knead it into the peanut butter mixture.  Once all the powdered sugar has been incorporated, press the mixture evenly into the foil-lined pan.

Margaret's Morsels | Peanut Butter Fudge

You may think the pan is too big, but it's not.  The fudge is rich so you want the pieces to be thin rather than thick.  Let set at room temperature until firm, about 2 hours.  Cover the pan with foil and refrigerate overnight.

The next day, use the foil to lift the fudge out of the pan.

Margaret's Morsels | Peanut Butter Fudge

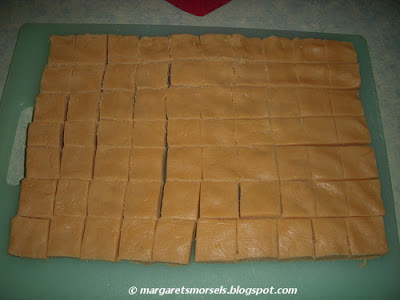
Peel the foil off and put the fudge on a cutting board.  To make the pieces look nicer, I trim the edges off before cutting the fudge into 1 1/4-inch pieces.

Margaret's Morsels | Peanut Butter Fudge

If it's just not Valentine's Day without chocolate, check back next week for the chocolate dessert I'm making for my family.


Peanut Butter Fudge
70 (1 1/4-inch) Pieces

1 (8 oz.) pkg. cream cheese (regular or Neufchatel)
1/2 cup creamy peanut butter
1 cup peanut butter chips
1 Tbsp. vanilla
4 cups powdered sugar

Line a 13 x 9 x 2-inch pan with foil so that foil extends over the sides of the pan.  Put the cream cheese, peanut butter and peanut butter chips in a microwave-safe bowl.  Microwave on High for 45 seconds.  Remove from the microwave and stir.  Microwave in 15 second intervals, stirring each time, until the mixture is melted.  Stir in the vanilla; blend well.  Add powdered sugar, 1 cup at a time, using your hands to knead it into the peanut butter mixture.  After the powdered sugar has been incorporated, press the mixture evenly into the foil-lined pan.  Let stand at room temperature until set, about 2 hours.  Cover the pan with foil and refrigerate.  The next day, use the foil to lift the fudge out of the pan. Remove the foil, place the fudge on a cutting board and cut into squares. Store in the refrigerator.

© Margaret's Morsels


February 1, 2013

Macaroni and Cheese with a Twist

Pin It
Margaret's Morsels | Queso Macaroni

Last year, on a trip out of town, my husband, son and I stopped to eat dinner at a family owned restaurant.  Being a creature of habit, I ordered a vegetable plate.  I don't remember what two of the vegetables were, but I vividly remember the third one:  macaroni and cheese.  It definitely had a twist to it and it wasn't the pasta!  Two differences were clearly visible. One, the sauce was made with white -- not yellow -- cheese.  Two, the ingredients weren't baked in the oven.

My son also had macaroni and cheese and agreed it was delicious.  We started talking about how to duplicate the dish at home when Bill, the cook and owner of the restaurant, came to our table to see if we needed anything.  When I complimented him on the macaroni and cheese, he confirmed that my two observations about the dish were correct. 

He used queso blanco -- a creamy, soft, unaged white cheese -- instead of Cheddar.  Rather than baking the ingredients, he stirred the cheese sauce into the cooked macaroni.  He proceeded to give me the recipe which made an enormous amount of macaroni and cheese.  It took some experimenting, but I was able to reduce the ingredients and make the dish using an eight ounce package of macaroni.

The sauce starts with a roux -- a mixture of equal parts fat and flour -- that is cooked until the mixture makes a smooth paste.

Margaret's Morsels | Queso Macaroni

Milk is gradually added to the roux.  Through trial and error, I discovered that 1 1/4 cups milk makes a sauce that's the perfect consistency, not only when it's served, but when leftovers are reheated in the microwave.  The mixture is cooked until it's thickened, but not too thick.  The cheese will also act as a thickener.

Margaret's Morsels | Queso Macaroni
Before the cheese is added

The pan is removed from the heat and the queso blanco is stirred into the mixture.

Margaret's Morsels | Queso Macaroni
 After the cheese is added

The sauce is poured over the macaroni and then stirred.

Margaret's Morsels | Queso Macaroni

Queso macaroni is a nice alternative to baked macaroni and cheese. The cheese may be different, but the finished product goes well with any entree that you'd normally serve with macaroni and cheese.  My son thinks it's especially good with corn dog casserole.  As far as he's concerned, those two foods are a match made in culinary heaven.

Margaret's Morsels | Queso Macaroni


Queso Macaroni
8 Servings

1 (8 oz.) pkg. elbow macaroni
3 Tbsp. butter or margarine
3 Tbsp. all-purpose flour
1/2 tsp. salt
dash of pepper
1 1/4 cups milk
2 cups shredded queso blanco cheese

Cook macaroni according to package directions; drain and set aside.  In a saucepan over medium-low heat, melt the butter.  Add flour, salt and pepper, stirring to make a smooth paste.  Gradually add milk, stirring constantly until heated and thickened.  Remove pan from heat; stir in the cheese until smooth.  Pour sauce over macaroni; stir to combine.

© Margaret's Morsels

January 18, 2013

Low and Slow Cooking

Pin It
Margaret's Morsels | Crock-Pot Good and Easy Stew

Until I started writing this blog, I had no idea there were days that celebrated various foods.   Some, like National Peanut Butter Cookie Day and National Pigs in a Blanket Day, are observed once a year (June 12 and April 24 respectively).  Others have a whole month devoted to them. For instance, January is National Slow Cooking Month.  I love cooking with a slow cooker, also known as a crock-pot, and post a recipe every January in honor of this time saving appliance.

Over the last 2 1/2 years, I've shared a number of slow cooker recipes: Chicken a la King; Chili; Queso Dip; Barbecue Chicken; French Dip Sandwiches; Pot Roast with Vegetables.  Today, I want to share my favorite stew recipe.  It's different from a lot of stew recipes in that the only vegetable it uses is mushrooms.  This is ideal for me since I don't like meat in vegetable soup and I don't like vegetables in my stew!

Stew meat -- boneless precut cubes usually from tougher cuts of meat -- is combined with dry onion soup mix, beef broth, mushroom stems and pieces and a can of undiluted cream of mushroom soup.  Put the mixture in the slow cooker, cover with the lid and turn to low.  I cook the stew eight hours, but it can be cooked as long as 12 hours.   

Margaret's Morsels | Crock-Pot Good and Easy Stew
Ready to be cooked.


Margaret's Morsels | Crock-Pot Good and Easy Stew
Cooked eight hours.

The broth is thin so I thicken it with a slurry at the end of the cooking time. Slurry is a fancy name for a thin paste made from equal parts water and starch -- cornstarch or flour -- used as a thickener.  I prefer cornstarch for several reasons.  One, it has twice the thickening power of flour.  One tablespoon of cornstarch is equal to two tablespoons of flour.  Two, cornstarch keeps the broth clear; flour turns it opaque.  Three, cornstarch only needs to be mixed with cold water, unlike flour which has to be cooked to lose the raw taste.

You can whisk the cornstarch into the water or, what I do, combine the ingredients in a small bowl with a lid and shake until the cornstarch is dissolved.

Margaret's Morsels | Crock-Pot Good and Easy Stew
 Slurry made from cornstarch and water.

If I have time, I stir the mixture into the slow cooker and let the stew cook another hour.  If not, I put the slow cooker liner on the stove top, stir in the slurry and cook until the broth is thickened.  Not all slow cooker liners cans be used on the stove top so read the directions that came with your slow cooker before you attempt this.

Margaret's Morsels | Crock-Pot Good and Easy Stew
 The thickened stew.

I serve the stew with noodles and a vegetable.  I serve English peas in the winter and coleslaw in the summer.  The stew is also good with mashed potatoes in place of the noodles.

Margaret's Morsels | Crock-Pot Good and Easy Stew

There's nothing better than coming home to the aroma of a fully cooked meal.  With a slow cooker, that can be a reality all year long!

Good and Easy Stew
8 Servings

2 1/2 lb. stew meat
1 (1.15 oz.) envelope dry onion soup mix
1/2 cup beef broth
1 (10 3/4 oz.) can cream of mushroom soup (undiluted)
1 (8 oz.) can mushroom stems and pieces, drained

Combine the ingredients.  Place in a slow cooker, cover and cook on low for 8 to 12 hours.  If desired, thicken gravy.  Serve over noodles or mashed potatoes.


© Margaret's Morsels