January 29, 2012

A Cook's Tools: Prep School

Pin It
Margaret's Morsels | Prep School

Cooking can be a lot of fun -- and produce tasty results -- but it's also a lot of work.  Like any chore, cooking is easier when you have the right tools.

A friend that's getting married asked me what kitchen items she should include on her bridal registry.  She's a novice cook and is overwhelmed by the vast array of merchandise to choose from in the store.  I emailed her a list of suggestions and thought others might find it useful too.

Whether you're purchasing things for your first home, looking for tools to make cooking easier or new ways to use tools you already own, I thought I'd share my list of kitchen must haves with links to recipes that use those items.  This list only includes tools used to prep food.  It isn't all inclusive, but these are the tools I rely on when I'm cooking for three or twenty three.

The Basics:


Margaret's Morsels | Prep School

Measuring Spoons:  If you do a lot of cooking, it's a good idea to have two sets.  That way, you don't have to stop and wash them.  The metal set has spoons ranging from 1/4 teaspoon to 1 tablespoon.  The green set goes from 1/8 teaspoon to 1 1/2 tablespoons.

Dry Measuring Cups:  These cups are designed for dry ingredients such as flour, sugar and shortening.  The blue set is a standard set with sizes ranging from 1/4 to 1 cup.  The orange set includes the standard cups plus 2/3 and 3/4 cup.  The metal cup is a 1/8 cup that comes in handy when I need 2 tablespoons of an ingredient.

Liquid Measuring Cups:  These cups are designed for wet ingredients. They range in size from 1 to 8 cups and have a pour spout.  They're also useful for melting butter, margarine or shortening in the microwave.  I have these in 1, 2 and 4 cup sizes.  

Temperature's Rising:


Margaret's Morsels | Prep School

Digital Thermometer:  This is one of my favorite kitchen finds in a long time.  Unlike instant read thermometers, this thermometer can be programmed to beep when the food reaches the desired temperature.  I always use it when I cook Marinated Pork Tenderloin.  


Meat Thermo Fork:  This is what I use when I grill steak.  The tines are inserted into the cooked meat and a red light indicates which degree of doneness the meat has reached.  The thermometer ranges from very rare (113°) to poultry (185°).

The Cutting Edge:


Margaret's Morsels | Prep School

Paring Knife:  I use this to peel apples, cut tomatoes, slice cheese and for other jobs that don't require a big knife.

Kitchen Shears:  Unlike regular scissors, kitchen shears have one serrated blade and one regular blade.  They make easy work of jobs that would be difficult to do with a knife.  Use shears to cut dried herbs, dried beef, uncooked bacon and canned whole tomatoes into small pieces. Spraying the shears with nonstick cooking spray makes chopping dried fruit a breeze.

Santoku Knife:  I bought this several years ago and I absolutely love it!  It's shorter than a chef's knife and has a straighter blade which doesn't allow for a "rocking" motion like a chef's knife.  The grooves on the blade prevent food from sticking when being cut.


Margaret's Morsels | Prep School
The Santoku knife is the one on the bottom.

Chef's Knife:  An all-purpose knife for chopping, slicing, dicing and mincing.  Blades run from six to 14-inches in length with 8-inches being the most common size.

Bread Knife:  This knife has a serrated edge which makes it ideal for slicing a loaf of bread without tearing it up.  If you can find a loaf of unsliced cinnamon bread, use this knife to slice it for French Toast Souffle.


Knife Sharpener:  Over time, knives lose their edge.  Unless you want to pay a professional, you'll need a way to sharpen knives at home.  There are sharpening steels and stones, but I'm not comfortable using them since the knives have to be held at a certain angle.  I use a handheld sharpener that eliminates the need to hold the knives at the correct angle.


Margaret's Morsels | Prep School

Cutting Board:  I prefer plastic over wood since plastic can be washed in the dishwasher.  I avoid glass because they can chip plus the surface is hard on the edge of a knife.

Tool Time:


Margaret's Morsels | Prep School

Vegetable Peeler:  I've had my vegetable peeler for over 20 years.  Newer models have ergonomic handles and some are shaped differently.

Ice Cream Scoop:  My vegetable peeler may be old school, but my ice cream scoop is modern.  The scoop has a nontoxic fluid in the handle that is heated by your hand.  This heating process makes scooping ice cream effortless.

Cookie Scoops:  These aren't just for cookies!  I have three -- small, medium and large -- and also use them for cake battersausage balls and chicken salad.

Tongs:  This is a must have when cooking meat.  You can turn the meat without the juices escaping.


Margaret's Morsels | Prep School

Bottle Opener/Can Opener:  Even though more and more cans have pull tops, it's still a good idea to keep these around, especially the manual kind.

Pizza Wheel:  This isn't just for cutting pizza.  Use it to make lattice strips for pies, cut bar cookies and cut bread dough.

Pastry Brush:  Useful for basting food as well as brushing a glaze or melted butter over the surface of food.

Juicer:  A quick and easy way to squeeze juice from lemons or limes. There's a larger version for oranges.

Apple Wedger:  This handy device cores and wedges an apple at the same time.  It's much faster than using a knife.

Meat Pounder:  Great for tenderizing meat and making the pieces uniform size.  

Pastry Blender:  A quick way to incorporate fat into dry ingredients.  It makes the job easier than using two knives to do the same thing.

Margaret's Morsels | Prep School

Turner:  This is ideal for turning pancakes, but you can also use it to turn French toast, grilled cheese sandwiches and remove cookies from a baking sheet to a cooling rack.

Wooden Spoon:  I don't like metal spoons, but I don't always want plastic either.  Wood is a good alternative.

Pasta Fork:  I use this to stir pasta while it's cooking.  You can also use it to transfer pasta from a serving platter to a plate.

Ladle:  Use a large ladle for big jobs -- soup or chili -- and a small ladle for small jobs like queso dip.

Slotted Spoon/Spoon:  Use the slotted spoon to retrieve food from a liquid. Use the regular spoon for stirring.

Just Grate:

Handheld Grater:  A quick and easy way to grate food.  It doesn't give you as many options as a four sided box grater, but it's easier to store.


Margaret's Morsels | Prep School

Microplane Zester:  This tool makes zesting citrus easy.  It's also good for grating cheese and nutmeg.  It grates things more finely than a handheld grater.

What's Shaking:


Margaret's Morsels | Prep School

Strainer:  Also called sieves, these come in a variety of shapes, sizes and mesh densities.  I use them to sift dry ingredients, but they're also good for draining ingredients for dishes such as potato salad.

Colander:  Good for draining pasta and potatoes, rinsing lettuce and washing grapes.  It's nice to have different sizes for large or small jobs.

All Mixed Up:


Margaret's Morsels | Prep School

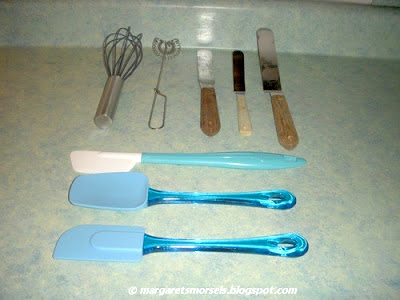
Spatula:  I try to buy heat resistant spatulas.  I especially like a "spoonula" which is a combination spoon/spatula with a curved head.  It's great for scraping edges of bowls, pans and bottles.  Try to vary the size of the spatulas.

Whisk:  An easy way to blend ingredients.  Use a large whisk to combine dry ingredients and a small whisk to beat eggs.

Metal Spatula:  It's good to have a straight spatula as well as an offset which has a bend in the blade.  An offset spatula is good for spreading icing and smoothing batter.


Margaret's Morsels | Prep School

Mixing Bowls:  A graduated set will give you the right size bowl for most any job.  If the bowls have lids, you can mix and store in the same bowl.

Roll With It:


Margaret's Morsels | Prep School

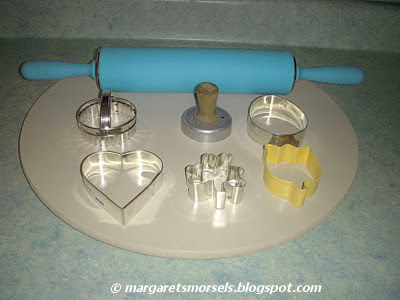
Dough Board:  This is a must if you make rolls, cookies or anything that needs to be rolled out.

Rolling Pin:  I never was a fan of rolling out dough until I bought a silicone rolling pin.  I find the dough is easier to roll out and less likely to stick than with a wooden rolling pin.

Cookie Cutters:  If you make cutout cookies, you'll need a way to cut them into shapes.  I think metal cookie cutters make sharper impressions and are easier to use than plastic cookie cutters.

All Plugged In:


Margaret's Morsels | Prep School

Electric Hand Mixer:  Although I have a stand mixer, I only use it when I do heavy duty baking.  I use my hand mixer for everything else.  If you ever have to replace your mixer, save the beaters and see if they'll work in the new mixer.  A second pair of beaters comes in handy.

Blender:  A couple of years ago, a friend gave me a Ninja Master Prep which is similar to a blender.  At the time, I didn't know how much I'd use it, but I use it a lot.  I've used it to make bread crumbs and chop vegetables for cornbread dressing, blend omelet ingredients and puree soup.

Things You Might Not Think You Need, But You Do:


Margaret's Morsels | Prep School

Salad Spinner:  I always thought this was a useless kitchen gadget until I actually used one.  Nothing dries greens faster or better than a salad spinner.  Even if you buy prepackaged, prewashed salad mix, it's still a good idea to wash it.  My salad spinner is over 20 years old and has a crank on top that you turn which spins the inner basket.  Some newer models have a cord you pull to make the basket spin.

Margaret's Morsels | Prep School

Pastry Bags:  I use these for filling deviled eggs, drizzling glaze on muffins and piping icing on cupcakes.  A resealable plastic bag works too, but I find I have better hand control with a pastry bag.  When I need some, I buy a box of 100 at a craft store making sure to use the 40% off coupon that's always in their sale ad.  A box of 100 lasts me a really long time.


Margaret's Morsels | Prep School

Bacon Wave:  This is a must have only if you cook bacon frequently.  The easiest and, in my opinion, tastiest way to cook bacon is in the microwave. This handy gadget allows the grease to drain away from the bacon as it cooks.  I use this not only when I cook bacon for breakfast, but whenever cooked bacon is called for in a recipe.

Since the list of prep tools is pretty extensive, I'll make this a two part blog. Check back later this week for my kitchen must haves for cooking and baking.


© Margaret's Morsels

January 23, 2012

National Slow Cooking Month

Pin It
Margaret's Morsels | Cooking School

January is National Slow Cooking Month.  Although I use my slow cooker several times a month, I haven't posted many slow cooker recipes.  I'm working to rectify that oversight.  In the meantime, here are slow cooker recipes I've previously shared.


Margaret's Morsels | Crock-Pot Chili

Chili:  What's better on a cold day than a bowl of piping hot chili?  Brown the ground beef, onion and celery and then let the slow cooker do the rest of the work.


Margaret's Morsels | Crock-Pot Queso Dip

Queso Dip:  Dump the ingredients in a 1 1/2-quart slow cooker, cover and heat for one hour.  Great for the big game, Cinco de Mayo or anytime you want something spicy.

Margaret's Morsels | Crock-Pot Barbecue Chicken


Barbecue Chicken:  Barbecue sauce and chicken.  It doesn't get much easier than that!


Margaret's Morsels | Crock-Pot French Dip Sandwiches

French Dip Sandwiches:  My favorite slow cooker recipe of all time!  If you don't have a beef bouillon cube, omit the water and add 2 cups of beef broth instead.

Margaret's Morsels | Crock-Pot Pot Roast

Pot Roast:  A complete meal -- meat, veggies, gravy -- made in a slow cooker.  The only thing missing is a pan of cornbread!

© Margaret's Morsels

January 18, 2012

Sauteed not Fried

Pin It
Margaret's Morsels | Sauteed Pork Chops

Last week, I posted a recipe for Baked Mozzarella Cheese Sticks.  I thought I'd stick with the healthier cooking theme and share a recipe that, instead of being baked, is sauteed.

The first time I fixed Sauteed Pork Chops for my mother, she was concerned the pork chops hadn't cooked long enough to be completely done.  After tasting them, she agreed that, not only were they done, they were delicious!

Saute means to cook food quickly in a small amount of fat over moderately high heat.  It's similar to pan frying, but uses less fat and cooks the food quicker.  The high heat serves two purposes.  One, it quickly browns the outside of the food.  Two, it allows the food to cook faster which prevents the inside from drying out.

There's four things to remember when you saute pork chops:

  • Let the pork chops sit at room temperature 30 minutes before they're cooked.  Food that's at room temperature cooks more evenly than cold food.

Margaret's Morsels | Sauteed Pork Chops

  • Pat the pork chops dry with paper towels.  Food that's wet steams rather than sautes.
  • Don't overcrowd the pan.  Overcrowding prevents food from browning.  I cook four pork chops at a time in a 12-inch skillet. If you're using a smaller pan or cooking more pork chops, use a second pan or cook the pork chops in batches, reheating the pan and adding more oil as needed.
  • Don't turn the pork chops over with a fork.  Piercing meat with a fork lets the juices escape.  Use tongs instead.
When it comes to the oil you use, it's imperative to choose one that has a high smoke point -- the temperature at which the oil begins to smoke and gives food an unpleasant flavor -- because you don't want the oil to smoke. Different oils have different smoke points.  I use canola, but other oils with high smoke points include grapeseed, peanut, safflower and soybean.

There are two schools of thought when it comes to heating the pan.  Some recipes call for the pan to be heated before the oil is added.  Other recipes, like the one I'm sharing today, call for the pan and oil to be heated at the same time.  I use whichever method is called for in the recipe.

Put the oil in the skillet and heat it over a strong medium-high heat.  I rely on my senses, specifically hearing, seeing and feeling, to know when the oil is hot enough to add the pork chops.

Listen to the sounds coming from the pan.  If you hear splattering and popping, the oil is too hot.  Look at the oil periodically while it heats.  You do not want to see smoke.  You want to see the oil go from this:


Margaret's Morsels | Sauteed Pork Chops


to this:


Margaret's Morsels | Sauteed Pork Chops

The oil will start to shimmer which indicates it's just below the smoke point. As the oil heats, periodically place your hand a few inches over the hot oil. When you can't leave your hand over the oil for very long, the oil is ready.

When you cook pork chops or any piece of meat, cook the nicest looking side -- known in the culinary world as the presentation side -- first.  In other words, when you put the meat in the skillet, put the presentation side down.  The coloring is more attractive on the presentation side which makes the food look nicer when it is plated.


The rest of the recipe is pretty straightforward.  When the oil is hot, put the pork chops -- presentation side down -- in the pan and cook one minute. Turn the pork chops over and cook the other side one minute.  Reduce the heat to medium; cover and cook the pork chops four minutes.  Turn the pork chops over; cover and cook five minutes.

If you've never sauteed pork chops before, you may be wondering how to tell if they're done.  A quick way to test is to press on the pork chop with your finger.  When fully cooked, the pork chop will feel solid.  If you're still not sure, cut into one of the pork chops and check the color of the meat. When cooked, the meat will be white.  It's ok if there's a tinge of pink, but you want to see more white than pink.


Margaret's Morsels | Sauteed Pork Chops

I serve the pork chops with either white rice or Mushroom Rice Casserole and Baked Apples.  Because the pork chops cook in less than 15 minutes, they're easy to fix for breakfast with scrambled eggs and biscuits.  I've even been known to serve them this way for supper!


Sauteed Pork Chops
4 Servings

4 (1-inch) thick center loin pork chops, patted dry
salt to taste
pepper to taste
2 Tbsp. vegetable oil

Sprinkle salt and pepper on both sides of the pork chops.  Heat oil in a large skillet over medium-high heat, swirling the skillet occasionally.  Put pork chops in the skillet and saute until browned, 1 minute.  Turn pork chops over and saute the other side until browned, 1 minute.  Reduce heat to medium.  Cover the pan with a lid and cook the pork chops 4 minutes. Turn pork chops over.  Cover and cook an additional 5 minutes.


© Margaret's Morsels

January 10, 2012

Baked not Fried: Appetizer Edition

Pin It
Margaret's Morsels | Baked Mozzarella Cheese Sticks

If eating healthier or losing weight is your resolution for 2012, you're not alone.  According to a recent survey, 57% of respondents had the same resolution.  An easy way to enjoy some of your favorite foods without breaking your resolution is to change the cooking method from fried to baked.  Last year, I showed how this could be done with salmon patties. Another recipe that easily adapts from frying to baking is Mozzarella cheese sticks.

Although the cheese sticks only take 15 minutes to bake, you can't make them on a whim.  The cheese sticks need to be assembled and refrigerated at least four hours ahead of time to allow the coating to adhere properly.

Just like the fried version, these baked cheese sticks are coated with flour, eggs and dried bread crumbs.  Dried bread crumbs aren't the same as fresh and, as such, can't be used interchangeably.

Dried bread crumbs have the added step of being dried and toasted in the oven before being processed into crumbs.  Although they can be made at home, it's easier to buy them at the grocery store.  Dried bread crumbs are available in plain or seasoned varieties.  This recipe uses dried Italian bread crumbs.

Put the coating ingredients in shallow bowls or resealable plastic bags in an assembly line. 


Margaret's Morsels | Baked Mozzarella Cheese Sticks

Whichever method you use, keep the coating from sticking to your hands by using one hand for dry ingredients and the other hand for wet ingredients.  If you notice any clumps in the bags or bowls, they can be removed and discarded.

Coat all the cheese sticks -- including the ends -- with flour and set aside.


Margaret's Morsels | Baked Mozzarella Cheese Sticks

Working with one cheese stick at a time, coat the cheese stick with the egg mixture letting the excess drain off.


Margaret's Morsels | Baked Mozzarella Cheese Sticks

Put the cheese stick back in the flour and coat it a second time including the ends.


Margaret's Morsels | Baked Mozzarella Cheese Sticks
I like to use tongs rather than my fingers.

The cheese stick goes back in the egg mixture for a second coating -- let the excess drain off -- before being thoroughly coated with bread crumbs. Just like you did with the flour, make sure to coat the ends of the cheese stick with bread crumbs.  Coating the ends keeps the cheese from oozing out when it melts. 


Margaret's Morsels | Baked Mozzarella Cheese Sticks

Put the coated cheese sticks on a piece of wax paper in a container with a lid.  When all the cheese sticks are coated, put on the lid and refrigerate for at least four hours.


Margaret's Morsels | Baked Mozzarella Cheese Sticks
Ready to be refrigerated.

When you're ready to bake the cheese sticks, transfer them to an ungreased baking sheet and let them sit at room temperature while the oven preheats.


Margaret's Morsels | Baked Mozzarella Cheese Sticks
Ready to be baked.

While the cheese sticks bake, heat some marinara or spaghetti sauce to serve on the side for dipping.

The recipe makes 12 cheese sticks, but can easily be halved.  If you have any leftovers, they can be reheated in the microwave.  My son thinks these cheese sticks are better than the fried version sold at a popular chain restaurant.  That's quite an endorsement from a 14 year old.


Baked Mozzarella Cheese Sticks
4 Servings

2 eggs
1 Tbsp. water
5 Tbsp. all-purpose flour
1 cup dried Italian bread crumbs
12 sticks string cheese
1 cup marinara or spaghetti sauce, heated

Combine eggs and water in a small bowl.  Put flour in a small bowl or resealable plastic bag; put bread crumbs in another bowl or bag.  Coat all the cheese sticks -- including the ends -- with flour and set aside.

Working with one cheese stick at a time, coat the cheese stick with the egg mixture, letting the excess drain off.  Coat the cheese stick -- including the ends -- with flour.  Coat the cheese stick a second time with the egg mixture and then thoroughly coat with bread crumbs, including the ends.

Put the assembled cheese sticks on a piece of wax paper in a storage container with a lid.  When all the cheese sticks are coated, put on the lid and refrigerate for at least four hours.  

When ready to bake, put the cheese sticks on an ungreased baking sheet and let sit at room temperature while the oven preheats.  Bake uncovered at 400° for 15 minutes or until heated through.  Use the marinara or spaghetti sauce for dipping.

Note:  The cheese sticks can be refrigerated overnight and baked the next day.  I think they're best baked four to six hours after the coating is applied.


© Margaret's Morsels