Showing posts with label cherry. Show all posts

July 11, 2013

Spotlight on Summer: Cool and Creamy

Pin It
A lot of you are new to Margaret's Morsels.  To help introduce you to the site, I thought I'd compile a list of summertime recipes from previous blogs. The list isn't all inclusive, but includes some of my favorites from five different categories.  To make it manageable, I'm making this a three part series.  Today's recipes are foods that are cool and creamy.  Click the words in bold to go to the page with the recipe. 


Margaret's Morsels | Easy Peanut Butter Chip Pie

Easy Peanut Butter Chip Pie:  This is the recipe that launched Margaret's Morsels.  The pie gets its wonderful flavor from peanut butter chips.  My son came up with the idea of adding Magic Shell topping for a delicious chocolate/peanut butter combination.  No matter how you top it, it's a cool and refreshing dessert on a hot summer day.


Margaret's Morsels | Peanut Butter Fudge

Peanut Butter Fudge:  Here's another recipe that uses peanut butter chips, but it also uses peanut butter.  This fudge doesn't require any cooking, unless you count melting ingredients in the microwave as cooking! Since the fudge is stored in the refrigerator, it makes a cool summertime treat.

Margaret's Morsels | Quick and Easy Lemon Bars

Quick and Easy Lemon Bars:  This recipe has been in Margaret's Morsels top 10 since it was first posted in 2011.  These are the only lemon bars I've ever made that turn out perfect each and every time.  Storing them in the refrigerator not only keeps them cold, but enhances the flavor.

Margaret's Morsels | Lemonade Pie

Lemonade Pie:  This is another lemon recipe posted in 2011 that currently ranks as the sixth most popular recipe on Margaret's Morsels.  The only appliance you need to make this pie is a hand mixer!


Margaret's Morsels | Chocolate Dream Pie


Chocolate Dream Pie:  This is a chocolate lover's dream recipe.  The pie only uses four ingredients and half of them are chocolate!  Just like the lemonade pie, the only appliance you need is a hand mixer. 


Margaret's Morsels | Banana Cream Supreme

Banana Cream Supreme:  This isn't a pudding and not quite a pie; it's the best of both!  This no bake dessert is assembled in a spring-form pan with a layer of bananas between the filling.  Although it's delicious in the summer, my teenage son thinks it's also good in the fall, winter and spring!


Margaret's Morsels | Cherry Pie Filling Salad

Cherry Pie Filling Salad:  This first time I ever saw this recipe, I thought it wouldn't be any good.  Boy, was I wrong!  Not only is it delicious, it's versatile and can be served from the refrigerator or freezer as either a side or dessert.


Margaret's Morsels | Vanilla Ice Cream

Vanilla Ice Cream:  This is the recipe my mom used to make.  To this day, I think it's the best vanilla ice cream ever!  The only change I've made to the recipe is to replace the raw eggs with egg substitute.

Margaret's Morsels | Peach Ice Cream


Peach Ice Cream:  This peach ice cream isn't vanilla ice cream with chopped up peaches.  It uses fresh peaches and canned peach nectar. Peaches peak in July and August so this is a great time to make this ice cream.

Margaret's Morsels | Orange Peach Soup


Orange Peach Soup:  Here's another recipe that uses fresh peaches. This chilled peach soup can be served for brunch, lunch or even supper. It makes a great first course, especially when the meal that follows is light.

Margaret's Morsels | Lime Jello Salad


Lime Jello Salad:  This has been a family favorite since a friend gave me the recipe over 20 years ago.  If you don't like lime, you can substitute other flavors of jello and fruit.


Margaret's Morsels | Fruity Orange Gelatin


Fruity Orange Gelatin:  If you prefer jello that jiggles, give this salad a try. Unlike congealed salads made with red jello, there's no mistaking the flavor of this salad.  It only uses five ingredients and three of them are orange!


Margaret's Morsels | Cherry Gelatin Fruit Salad


Cherry Gelatin Fruit Salad:  Here's another jello recipe that jiggles.  This is my most requested congealed salad recipe.  No one will ever guess it only uses four ingredients and all of them are sugar-free!

Margaret's Morsels | Sour Cream Cherry Cheesecake


Sour Cream Cherry Cheesecake:  The kitchen won't get hot when you make this cheesecake.  The crust is the only thing that needs to be baked and that only takes 10 minutes!  The rest of the cheesecake is made by doctoring up a package of cheesecake mix.  I use cherry pie filling on top, but you can use your favorite flavor.

Check back next week for part two of the series.

© Margaret's Morsels

June 19, 2013

A Bowl Full of Cherries

Pin It
Margaret's Morsels | Cherry Pie Filling Salad

I've posted a lot of recipes that came from my mother.  Today, I thought I'd share one that was given to me by my mother-in-law.  Ironically, I'd seen the recipe in a cookbook years earlier, but dismissed it thinking it wouldn't be any good.  Boy, was I wrong!

Cherry pie filling salad only uses five ingredients.  One of them -- sweetened condensed milk -- is prominently featured in the recipe and the reason I dismissed the recipe in the first place.  It's not that I don't like sweetened condensed milk -- I use it in other recipes -- but I couldn't imagine a salad made with milk.  After all, sweetened condensed milk is, as the name says, milk that has been thickened by removing the water and then sweetened with sugar.

The sweetened condensed milk 

Margaret's Morsels | Cherry Pie Filling Salad


is combined with lemon juice,

Margaret's Morsels | Cherry Pie Filling Salad


crushed pineapple

Margaret's Morsels | Cherry Pie Filling Salad


and cherry pie filling.

Margaret's Morsels | Cherry Pie Filling Salad


My mother-in-law used regular cherry pie filling, but I use lite which has fewer calories and less sodium, carbs and sugar than regular pie filling. When it's mixed with the other ingredients, you won't even be able to taste the difference.  Once these ingredients are thoroughly combined,

Margaret's Morsels | Cherry Pie Filling Salad


a carton of Cool Whip is folded into the mixture.

Margaret's Morsels | Cherry Pie Filling Salad


To make this salad a little healthier, I use Cool Whip Lite which has less fat than regular Cool Whip.  Refrigerate the salad several hours or overnight until it's thoroughly cold.

Although it's called salad and could be served as such, my mother-in-law served it as a dessert.  I serve it that way too, but with a twist.  I like to freeze it in individual paper baking cups.  If you want to freeze it, make sure to use regular or low-fat Cool Whip.  The fat in the Cool Whip helps make the salad firm when frozen.  You don't need to refrigerate the salad first if you're going to put it in the freezer.

Line a muffin tin with paper baking cups.  You'll need 30 if you want to freeze the entire salad.  Spoon the mixture into the cups, filling almost all the way to the top.

Margaret's Morsels | Cherry Pie Filling Salad


Use a spoon to smooth the top and put the pan in the freezer overnight.

Margaret's Morsels | Cherry Pie Filling Salad

The next day, remove the baking cups from the pan and store them in a covered container in the freezer.

One advantage of using low-fat Cool Whip is that, when frozen, it's not rock hard.  You can take it out of the freezer and serve it immediately without having to wait for it to soften.  If you use regular Cool Whip, remove the desired number from the freezer and let them soften a few minutes at room temperature before serving.

You can skip freezing the salad and serve it straight from the refrigerator.  I serve part of it this way and freeze the rest.  When the temperature goes from hot to scorching in the summer, these individual frozen treats are much more refreshing than a popsicle or scoop of ice cream.

Margaret's Morsels | Cherry Pie Filling Salad


Cherry Pie Filling Salad
4 to 6 Servings or 30 Servings if Frozen

1 (14 oz.) can sweetened condensed milk
1/4 cup lemon juice
1 (20 oz.) can crushed pineapple, drained
1 (21 oz.) can cherry pie filling
1 (8 oz.) carton Cool Whip, thawed*

Mix the first four ingredients.  Fold in Cool Whip.  Mix well and refrigerate. Store leftovers in the refrigerator.

To freeze, put paper baking cups in a muffin pan.  Spoon the mixture into the  cups, filling almost all the way to the top.  Use a spoon to smooth the top and put the pan in the freezer overnight.  The next day, remove the baking cups from the pan and store them in a covered container in the freezer.

*If freezing the salad, use regular or low-fat Cool Whip, not fat-free.


© Margaret's Morsels

July 30, 2012

National Cheesecake Day

Pin It
Margaret's Morsels | Sour Cream Cherry Cheesecake

In honor of National Cheesecake Day, here's the link to a Sour Cream Cherry Cheesecake recipe I posted last year.  This cheesecake tastes like the real deal, but it starts with a mix!


© Margaret's Morsels

December 23, 2011

A Holiday Tradition

Pin It
Margaret's Morsels | Kool-Aid Punch

When I recall Christmas from my childhood, I may not always remember who was at the house a particular year or what presents I received, but I vividly remember three things:  a savory cheese ball coated with chili powder; a platter of German Christmas Cookies decorated with red, green, yellow and white icing; a punch bowl surrounded by a garland of poinsettias and filled with Kool-Aid punch.  My mother only made these goodies at Christmas which made them special.

I don't follow my mother's Christmas tradition -- I only make the cheese ball and punch every few years -- except for the Christmas cookies.  I've made these cookies every Christmas for the last 18 years.  Last Christmas, when my brother and his family visited from Atlanta, for old time's sake, I made all three items just like our mother did every Christmas.

The punch uses a package of cherry Kool-Aid which gives it a beautiful red hue that's perfect for Christmas.  If you prefer a green punch, use a package of lime Kool-Aid instead of cherry.

The easiest way to make the punch is with a clean gallon milk jug.  Pour the contents of the lemonade and cherry Kool-Aid packages in the jug, along with sugar and 2 cups water.  Put the lid on the jug and shake it to combine the ingredients.


Margaret's Morsels | Kool-Aid Punch

Add a large can of pineapple juice.


Margaret's Morsels | Kool-Aid Punch

Add water to completely fill the jug.


Margaret's Morsels | Kool-Aid Punch

Put on the lid, shake the jug to combine the ingredients and refrigerate until ready to use.  I make the punch a day or two ahead of time so it gets thoroughly chilled.

If you're not using a gallon jug, stir the ingredients thoroughly whenever the recipe calls for shaking the jug to combine the ingredients.  You'll need to add 7 1/2 cups water after you add the pineapple juice.

When my mother was ready to serve the punch, she poured it into a punch bowl and added a quart of pineapple sherbet.  The sherbet gave the punch a creamy consistency and the small chunks of pineapple added some texture.  I'm not a fan of sherbet or ice cream in punch so I leave it out. However, if you like sherbet, go ahead and add it to the punch bowl.  If you're using lime Kool-Aid, add a quart of lime sherbet instead of pineapple.  After you add the sherbet, stir in a can of chilled 7-Up.

Most punch recipes call for a carbonated beverage such as Sprite, ginger ale or 7-Up.  My mother tried all three beverages over the years, but the best punch was always made with 7-Up.  We only drink diet drinks, but this is one time we'll use the real thing.  You can still make the punch with diet 7-Up, but it's not as good.

To make sure the last glass of punch tastes as good as the first, add a quart of sherbet and a can of chilled 7-Up everytime you replenish the punch bowl.  If you're not using sherbet, just add the can of 7-Up.

Now that I'm a mother, I can appreciate why my mother only made these items at Christmas.  She knew not only was it something to look forward to, but something to look back on with fond memories that last a lifetime.  


Margaret's Morsels | Kool-Aid Punch
I serve the punch in the same punch bowl
my mother always used.


Kool-Aid Punch
18 Servings

1 (2 qt.) size pkg. unsweetened lemonade Kool-Aid
1 (2 qt.) size pkg. unsweetened cherry Kool-Aid
2 cups sugar
2 cups water
1 (46 oz.) can unsweetened pineapple juice
water (enough to fill the jug or 7 1/2 cups)
pineapple sherbet
12 oz. cans 7-Up, chilled

Put the first four ingredients in a clean gallon jug; shake to combine.  Add pineapple juice.  Finish filling the jug with water; shake well.  Chill in refrigerator until ready to use.  When ready to serve, pour mixture in a punch bowl.  Add 1 quart pineapple sherbet and 1 can 7-Up; stir gently. When replenishing the punch bowl, add another quart of sherbet and can of 7-Up.


© Margaret's Morsels

April 11, 2011

A Perfect Pair

Pin It
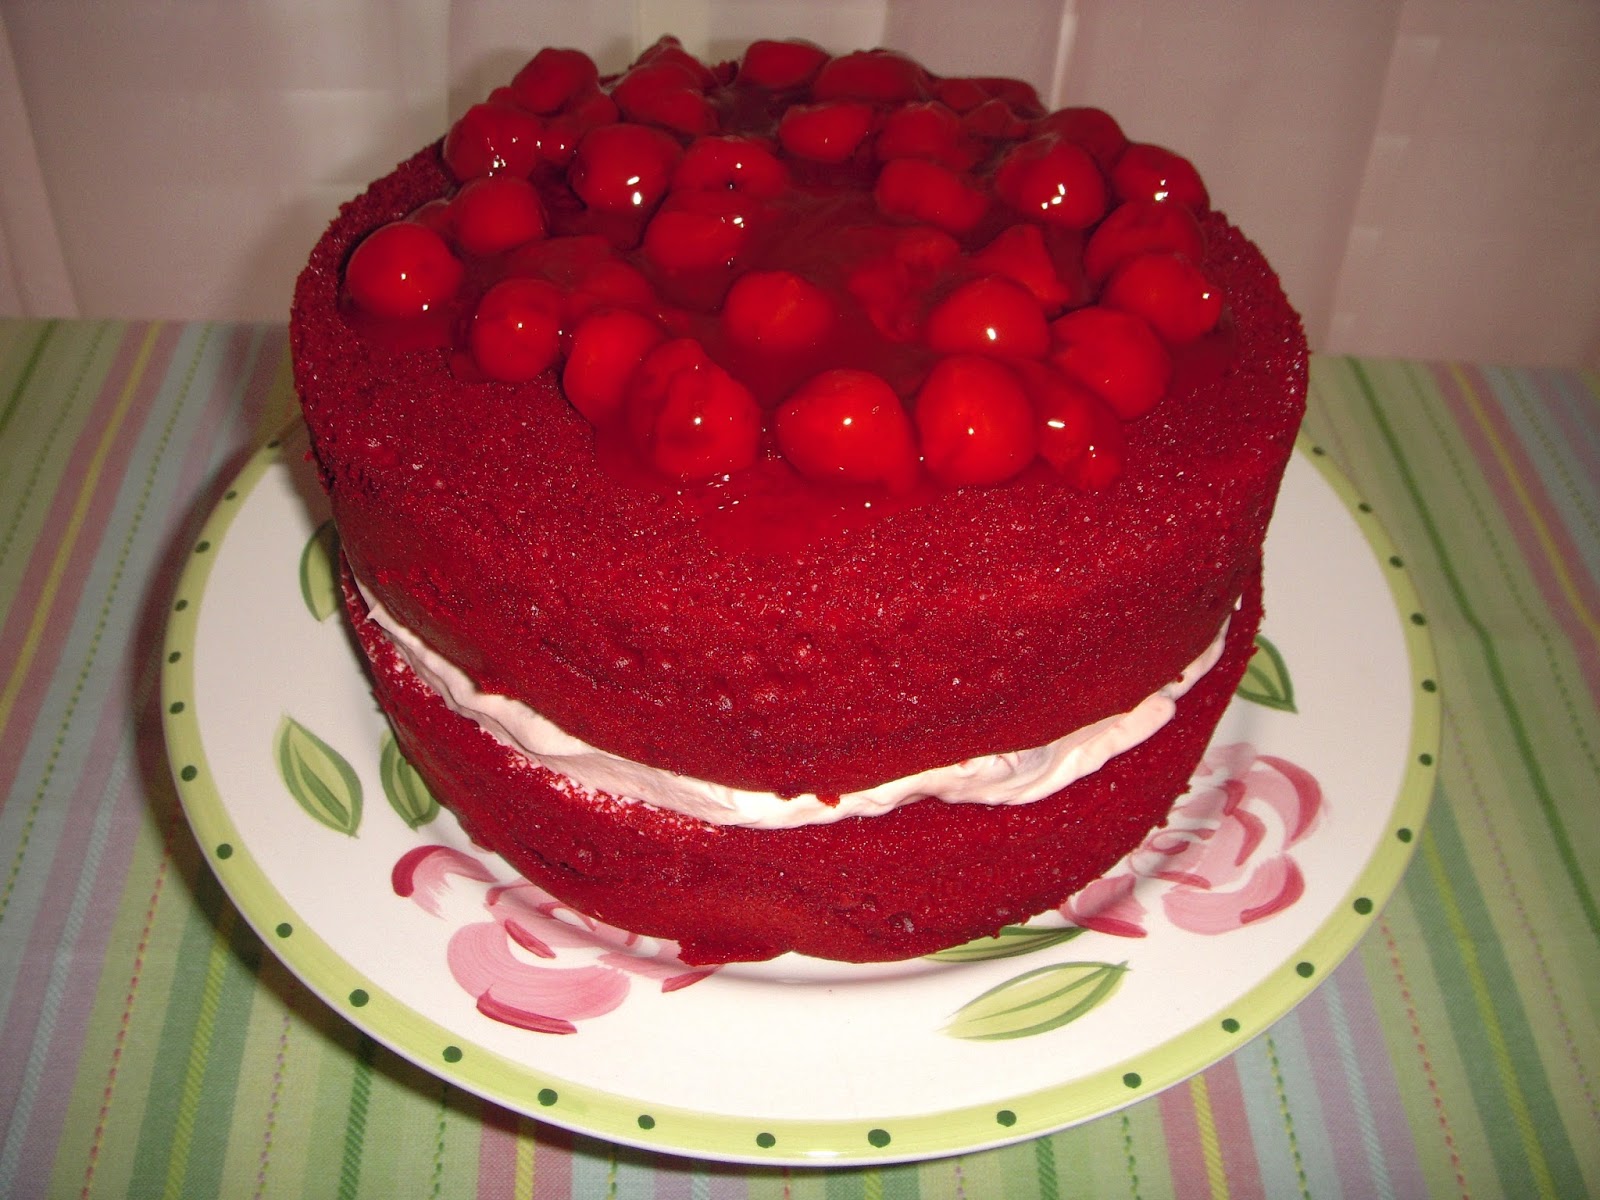
Margaret's Morsels | Cherry Chocolate Cake

My husband loves cherries, but he loves them even better when they're paired with chocolate.  Fortunately, I have a cherry chocolate cake recipe that is much easier to prepare than the Chocolate Covered Cherries I made him for Valentine's Day.


Last year, a friend from grade school posted a picture of this cake on his facebook page.  I could tell from the picture my husband would love the cake so I asked for the recipe.  I made the cake for our anniversary and, since my husband liked it so much, made it for our anniversary again this year too.


The cake starts with a box of red velvet cake mix.  If you're not familiar with red velvet cake, it's a chocolate cake similar to devil's food cake.  However, red velvet uses less cocoa and gets its color from red food coloring.  It's usually baked in layers and frosted with cream cheese icing.


Prepare the cake mix following the directions on the package and bake in two greased and floured round cake pans.  When you bake a chocolate cake, dust the greased pans with cocoa instead of flour.  The cocoa blends in with the cake and doesn't leave a white residue.


Margaret's Morsels | Cherry Chocolate Cake
The greased pans dusted with cocoa.

I prefer a thicker cake so I use two 8-inch pans.  You can use 9-inch pans, but the cake will be wider and thinner.


After the cake is completely cool, mix the cherry pie filling with the almond extract.  Half of the pie filling mixture is combined with 1 cup Cool Whip making a beautiful pale pink filling.  Spread the filling on the bottom cake layer to within 1 1/2-inches of the edge.  Don't spread it all the way to the edge or it will ooze out when you add the second layer.


Margaret's Morsels | Cherry Chocolate Cake

The second cake layer goes on top of the filling.  The remaining cherries, sans Cool Whip, are put on the top cake layer to within 1 1/2-inches of the edge.  This keeps the cherries from falling off, either on their own or when the cake is cut.  It also leaves room for you to decorate the edge with Cool Whip before serving, if desired.  


Once the cake is assembled, put it in a plastic cake keeper or on a cake plate with a lid and store it in the refrigerator.  If you cover the cake with plastic wrap or foil, the cherries will get messed up.  I bake the cake a day ahead of time so the cake and filling are cold when it's served.


When you're ready to serve the cake, you can decorate the cake edges with the remaining Cool Whip.  Not only does this garnish the cake, it helps keep the cherries in place.  If you want to dress the cake up even more, garnish each piece with sliced almonds when you serve the cake.


The red cake and pink filling make a beautiful combination.  The cake is especially pretty for a baby or bridal shower, but it also makes a lovely anniversary cake.  Don't wait for a special occasion to bake it; it's a good every day cake, especially when you love the combination of cherries and chocolate.


Cherry Chocolate Cake
8 to 12 Servings

1 (18.25 oz.) pkg. red velvet cake mix (plus ingredients to make the cake)
1 (21 oz.) can cherry pie filling
1/4 tsp. almond extract
1 (8 oz.) container Cool Whip, thawed

Prepare, bake and cool cake as directed on the package for two 8 or 9-inch pans.  Combine cherry pie filling and almond extract in a small bowl; stir.  Place bottom cake layer on a serving plate.  Combine 1 cup Cool Whip with 1/2 of the pie filling mixture; stir and spread on bottom layer. Place top cake layer on filling.  Use remaining portion of pie filling on top layer to within 1 1/2-inches of edge.  Cover and refrigerate until serving time.  If desired, decorate the edges with Cool Whip before serving. Refrigerate leftovers.


© Margaret's Morsels

March 25, 2011

Let Them Eat (Cheese) Cake

Pin It
Margaret's Morsels | Sour Cream Cherry Cheesecake

My husband isn't a fan of birthday cake.  In all the years we've been together, I only remember him asking for cake once.  He requested an ice cream cake made with white cake, vanilla ice cream and vanilla frosting.


When his birthday comes around -- like it did a few days ago -- he usually asks for cherry pie.  This year he requested a cherry dessert, but not cherry pie.  He asked for cherry cheesecake instead.


I have several cheesecake recipes, but my husband's favorite is Sour Cream Cherry Cheesecake.  Not only is it delicious, it starts with a mix so it's much faster -- and more economical -- to prepare than cheesecake made from scratch.


I'm bad about not writing down where I find a recipe.  I always think I'll remember, but my memory isn't what it used to be, especially with four boxes of untried recipes.  I'm trying to break this bad habit and indicated on the recipe it came from Sandra Lee.  Unfortunately, I don't remember if it came from her magazine, website, TV show or one of her books.  I made some changes to the method so the recipe reflects those changes.


If you've never heard of Sandra Lee, she's the author of a series of cookbooks called Semi-Homemade and hosts "Semi-Homemade Cooking" on the Food Network.  The semi-homemade philosophy is to use 70% ready made ingredients and 30% fresh ingredients to create a dish that tastes homemade.  This cheesecake recipe is a great example of semi-homemade cooking.


The recipe starts with a box of homestyle no bake cheesecake mix.  The mix includes graham cracker crumbs and a powdered cheesecake filling. Start by combining the graham cracker crumbs with melted butter -- I use margarine -- and sugar.  To keep from dirtying another bowl, I combine the ingredients in the spring-form pan and then press the mixture on the bottom of the pan.


Margaret's Morsels | Sour Cream Cherry Cheesecake

If you don't have a spring-form pan, you can use a pie plate or casserole dish, but make sure it's deep enough to hold the mixture.  I don't grease the pan because the melted butter is enough to keep the crust from sticking.


If you were following the directions on the box, the crust would be finished at this stage.  However, the recipe says to bake the crust for about 10 minutes.  Baking the crust makes the cheesecake taste homemade.

Margaret's Morsels | Sour Cream Cherry Cheesecake
The baked crust.

After the crust cools in the refrigerator for 15 minutes, it's time to mix up the filling.  The directions on the box only call for milk.  The semi-homemade recipe reduces the amount of milk and adds sour cream.  Most cheesecake recipes have sour cream either in the filling or on top so the addition gives the finished cheesecake a taste of authenticity.  I use low-fat sour cream, but you can use regular.  Don't use fat-free, though, because the cheesecake won't get firm enough to cut.

Put the filling on top of the crust.  Even though pie filling will go on top, the cheesecake is prettier if the filling is smooth.  The easiest way to do this is with an offset spatula.  An offset spatula has a bend in the blade which makes it ideal for smoothing cake batter or icing.


Margaret's Morsels | Sour Cream Cherry Cheesecake
The offset spatula is the one on the bottom.

Take the spatula and spread the filling around the cheesecake, turning the pan in a circle as you work.  The filling will end up looking something like this:

Margaret's Morsels | Sour Cream Cherry Cheesecake

The cheesecake goes in the refrigerator for several hours -- I leave it in there overnight -- to get firm.  I put the can of pie filling in the refrigerator at the same time.  That way the pie filling is cold when it's put on the cheesecake.


I use lite pie filling which isn't as flavorful as regular pie filling.  If you want to doctor up lite cherry pie filling, put it in a bowl and stir in 1/4 teaspoon almond extract and 1 tablespoon sugar.  This adds an extra burst of flavor.


Sandra Lee suggests slicing the cheesecake and spooning the pie filling over each slice.  I like to put the pie filling on top of the cheesecake a couple of hours before it's served.  If you use a spring-form pan, don't put the pie filling all the way to the edge of the pan.  If you do, the pie filling will slide off when you remove the collar.  It's best to put the filling to within 1/2-inch of the edge.


If you don't like cherries, you can substitute other flavors of pie filling or leave the cheesecake plain.  It's delicious either way.  It's good year round and is especially refreshing in the hot summer months.  It also makes a good substitute for birthday cake, but make sure you don't put candles on the top!

Margaret's Morsels | Sour Cream Cherry Cheesecake


Sour Cream Cherry Cheesecake
8 Servings

1 (11.2 oz.) pkg. homestyle no bake cheesecake mix
3/4 stick butter, melted
2 Tbsp. sugar
1 1/3 cups cold milk
1/3 cup sour cream
1 (20 oz.) can cherry pie filling

Stir the crust mix with melted butter and sugar in a 9-inch spring-form pan until crumbs are moistened.  Press crumb mixture onto bottom of the pan. Bake at 350° until crust is set and golden brown around edges, about 10 minutes.  Pat down crust.  Refrigerate crust for 15 minutes or until cooled completely.

Combine cheesecake filling mix, milk and sour cream in a large bowl.  Beat for 2 minutes or until smooth.  Pour cheesecake filling mixture over crust. Cover and refrigerate several hours or overnight to get firm.  A couple of hours before serving, spread the pie filling over the cheesecake.  Cover and refrigerate until ready to serve.  Store leftovers in the refrigerator.   

© Margaret's Morsels

August 24, 2010

Mad About Molds

Pin It
Margaret's Morsels | Cherry Gelatin Fruit Salad

I love congealed salads.  They are a cold side dish on a hot day, can be made with a variety of flavors with all kinds of additions, usually fruit and vegetables.  There is one exception.  Fresh pineapple contains an enzyme that prevents gelatin from congealing.  If you want to use pineapple, you need to use canned pineapple.


I don't know where I found the recipe for Cherry Gelatin Fruit Salad, but I've been making it for over a decade.  It is my most requested congealed salad recipe.  People are surprised when they find out it only uses four ingredients.  You can't tell when you're eating it that those four ingredients are sugar-free.


Margaret's Morsels | Cherry Gelatin Fruit Salad

I love to use decorative molds when I make congealed salads.  If you don't have a mold, you can use any food container that has a distinctive shape. I've used silicone pans, cake pans and muffin pans.  It's nice to make the congealed salad in holiday themed pans, if you have them.  It adds festivity to the holiday table.


Margaret's Morsels | Cherry Gelatin Fruit Salad
Items I've used as molds.

A nice touch is to make the salad in individual molds.  Not only does this look pretty on a serving platter, it's also good for portion control when you're feeding a lot of people.  If you know how many people are attending, you can make one mold for each person.

If you want to buy some molds, I highly recommend plastic ones that have a top and bottom lid.  After you put the mold on the serving platter and remove the second lid, the salad drops out of the mold onto the serving platter.


Margaret's Morsels | Cherry Gelatin Fruit Salad
This mold has a lid on the top and bottom.

No matter which container you use, be sure to spray it generously with nonstick cooking spray.  If you don't, you might have trouble getting the salad out of the mold or it might tear up in the process.

Right before you remove the salad from the mold, wet a paper towel and rub it on your serving platter.  The damp platter makes it easy to move the salad if it's not in the right spot.

To remove the salad from the mold, fill the kitchen sink with enough hot water to come halfway up the sides of the mold.  Put the mold in the water for 10 seconds.  Invert the serving platter over the mold and turn both upside down.  If the salad doesn't come out of the mold, run a thin blade knife around the sides to loosen the salad.  It should easily release from the pan.

Whether you mold it or serve it from a bowl, I hope you'll try this recipe.  It is quite tasty and you won't even miss the sugar!

 Cherry Gelatin Fruit Salad
8 Servings

1 cup unsweetened applesauce
1 (6 oz.) pkg. sugar-free cherry gelatin
1 (12 oz.) can diet 7-Up
1 (8 oz.) can unsweetened crushed pineapple (undrained)

In a saucepan, bring the applesauce to a boil; remove from heat.  Stir in gelatin until dissolved.  Slowly add 7-Up and pineapple.  Pour into a mold or 2-quart serving bowl.  Chill overnight.


© Margaret's Morsels