February 27, 2014

Almost Homemade

Pin It
Margaret's Morsels | Better than Garlic Bread Pull Apart Rolls


I'm always surprised when people assume I cook feasts for my family year round.  I love to cook, but the only feasts I prepare are at Easter, Thanksgiving and Christmas!  Not only would that be too much food for a family of three on a regular basis, I don't have time to cook like that every day.  As I've written before, suppertime is the most stressful time of day for me.  This is why I'm always looking for shortcuts that will allow me to spend less time in the kitchen, while still making foods my family will eat and get supper on the table at a decent hour!

In the blogs I posted for Chicken Parmesan, Chicken Alfredo and Baked Ziti, I either mention adding garlic bread to round out the meal, or have a picture of the plated dish with garlic bread on the side.  Garlic bread is a packaged food I find convenient to keep in the freezer for nights when I need a quick bread to go with a meal.  Sometimes, though, I want to serve something that tastes homemade, but doesn't require the time and effort of making something from scratch.  What my family affectionately calls "Better than Garlic Bread Pull Apart Rolls" meet all of these requirements.

The bread starts with a package of frozen rolls.  You've probably seen these in the freezer case at the grocery and wondered what to do with them.

Margaret's Morsels | Better than Garlic Bread Pull Apart Rolls

These rolls are a real time saver and can be used for monkey bread, cinnamon rolls and a myriad of other dishes.  They can even be baked as rolls!  Although I don't have to make the bread, I still need to plan ahead of time since the rolls have to be thawed overnight in the refrigerator.

A couple of hours before we're going to eat, I remove the rolls from the refrigerator.  While the margarine is melting in the microwave, I take the rolls out of the package and place them on a piece of waxed paper.

Margaret's Morsels | Better than Garlic Bread Pull Apart Rolls

You don't have to do this, but I find it faster than removing the rolls from the bag one at a time, especially if the rolls are stuck together.  Once the margarine is melted, stir in garlic powder and garlic salt.  These are the same seasonings used in equal proportions in Garlic Cheese Biscuits, but this roll recipe uses 50% more garlic powder.

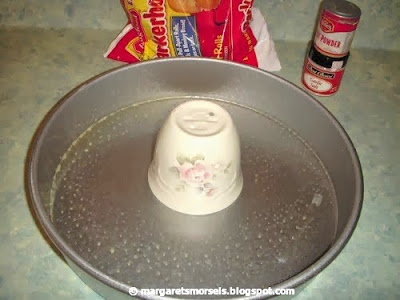
The friend that gave me the recipe bakes the rolls in a Bundt pan.  I tried that once and thought the rolls were dry.  If you're like me and love the round shape, but don't have a ring shaped pan, you can improvise and make your own.  Grease a small, ovensafe cup or bowl -- this keep the rolls from sticking to it -- and place it in the center of a 10-inch round cake pan. You now have a ring shaped pan!  If you don't want to go to that much trouble, use the 10-inch pan without the cup or bowl, or use a 9 x 5-inch loaf pan instead.

Margaret's Morsels | Better than Garlic Bread Pull Apart Rolls


Dip each roll in the melted butter mixture and place it in the greased pan, stacking the rolls in two layers.  If there's any butter mixture left, pour it over the top layer of rolls.


Margaret's Morsels | Better than Garlic Bread Pull Apart Rolls
First layer


Margaret's Morsels | Better than Garlic Bread Pull Apart Rolls
Second layer

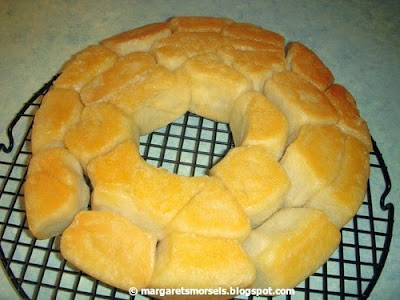
Put the pan in a warm place free from drafts, cover it with a towel and let the rolls rise an hour.  After the rolls have risen, bake them for 30 to 45 minutes, or until brown.  When the rolls are done, put the pan on a cooling rack for 10 minutes.  If the rolls come apart when you take them out of the pan, you can separate them and serve them in a bread basket.


Margaret's Morsels | Better than Garlic Bread Pull Apart Rolls


The frozen rolls make the finished product taste as though it was made from scratch.  People love these rolls and, unless they ask for the recipe, assume they're homemade.  I don't mind letting them think that since they're "almost" homemade!


Better than Garlic Bread Pull Apart Rolls
6 to 8 Servings

1 (1 lb. 9 oz.) pkg. frozen Parkerhouse style roll dough, thawed
1/4 cup butter, melted
1 tsp. garlic powder
1/2 tsp. garlic salt

Thaw dough according to package directions.  Melt butter; stir in the garlic powder and garlic salt.  Dip each roll in the butter mixture and place in a greased 10-inch round cake pan, or 9 x 5-inch loaf pan.  Put the pan in a warm place free from drafts, cover with a towel and let rise an hour.  Bake the rolls at 350° for 30 to 45 minutes, or until brown.  Put the pan on a cooling rack and let cool 10 minutes before removing bread.


© Margaret's Morsels

February 13, 2014

Chocolate Lovers Delight

Pin It
Margaret's Morsels | Chocolate Cobbler

Ever since we got married, my husband and I celebrate Valentine's Day at home.  We'd rather go out another night when restaurants aren't as crowded and in a hurry to seat the next party and prices aren't inflated because of the holiday.  To celebrate at home, I always fix something special for supper.  This year, my husband and son both asked if I would fix Grilled Peppered Steaks.  My husband would love Chocolate Covered Cherries for dessert, while our son would prefer a Peanut Butter Pie with a Magic Shell chocolate topping.  Unfortunately, my son doesn't like cherries and my husband doesn't like chocolate and peanut butter combined.  I don't have time to make both so I decided to keep it simple and just make something chocolate.

My mother found the recipe for Chocolate Cobbler in the newspaper in the early 1990's.  The name is misleading because it doesn't use fruit like most cobbler recipes, but like a cobbler it only has one crust.  I've seen the recipe called by other names including, "Pudding Cake," "Fudge Cake" and "Brownie Pudding."

Usually when I serve dessert, it's something that can be made ahead of time and served cold or at room temperature.  Chocolate Cobbler, though, is best served hot from the oven.  To make it less stressful at the end of the day when I'm cooking supper, I measure the cobbler ingredients ahead of time.  By the time supper's on the table, I've got the cobbler mixed up and ready to go in the oven.  By the time supper's over, the cobbler is ready to eat.

The cobbler starts by combining sugar, cocoa, milk, oil and self-rising flour.

Margaret's Morsels | Chocolate Cobbler


Self-rising flour is a time saver because it already has the leavener and salt added.  If you don't have self-rising flour, you can make your own.  For 1 cup self-rising flour, add 1 1/2 teaspoons baking powder and 1/2 teaspoon salt to 1 cup all-purpose flour.

Once the cobbler ingredients are combined, spread them in a greased 8 or 9-inch square pan.

Margaret's Morsels | Chocolate Cobbler


Combine cocoa and brown sugar in a bowl and sprinkle the mixture over the cobbler ingredients.

Margaret's Morsels | Chocolate Cobbler


Unlike white sugar, brown sugar needs to be firmly packed into the measuring cup.  If you need to know how to do this, or want to know why, you can read about it here.

The final ingredient is hot -- not boiling -- water.  Turn the hot water on and let it run until the faucet feels hot to the touch.  Measure the water in a liquid measuring cup and pour it slowly over the brown sugar mixture.  Do not stir the water with the other ingredients!  

Margaret's Morsels | Chocolate Cobbler


Put the pan in the oven and bake the cobbler for 45 minutes.  When you remove the cobbler from the oven, you'll see that the batter has risen to the top and made a crust.  The cocoa and brown sugar mixture melts and turns the hot water into a delicious chocolate sauce underneath the crust!

Margaret's Morsels | Chocolate Cobbler


Scoop the cobbler into a serving dish, making sure to spoon some of the sauce over the top.  The cobbler is good plain, but it's even better topped with whipped cream or a scoop of vanilla ice cream.  For a truly decadent dessert, substitute chocolate ice cream for the vanilla!

Margaret's Morsels | Chocolate Cobbler


Chocolate Cobbler is a tasty way to celebrate Valentine's Day, but it's also a great dessert to serve year round.  It's delicious, easy to mix up and, since it doesn't use eggs, chances are you've got the ingredients on hand. To be on the safe side, though, you might want to keep some ice cream in the freezer!


Chocolate Cobbler
6 Servings

1 cup self-rising flour
1/2 cup sugar
2 Tbsp. cocoa
1/2 cup milk
3 Tbsp. vegetable oil
1 cup brown sugar, firmly packed
1/4 cup cocoa
1 3/4 cups hot water (not boiling)

Combine the first 5 ingredients in a mixing bowl.  Pour into a greased 8 or 9-inch square pan.  Stir together the brown sugar and 1/4 cup cocoa; sprinkle over the batter.  Pour hot water evenly over the brown sugar mixture.  Do not stir!  Bake at 350° for 45 minutes.  While hot, scoop into serving bowls and spoon sauce over each serving.  If desired, top with whipped cream or ice cream.

© Margaret's Morsels