November 30, 2010

Craving Chili

Pin It
Margaret's Morsels | Crock-Pot Chili

Earlier in the year, I wrote about the food I make as soon as the mercury starts rising.  There's also a food I look forward to making as soon as the mercury starts falling.  Nothing is better on a cold night than a bowl of homemade chili.  I love chili and would eat it year round, but my husband doesn't share my enthusiasm.  In fact, he refuses to eat chili until the temperature is lower than 60 degrees outside.  The weather finally cooled off and I was recently able to make my first batch of chili for the season.


There are a lot of variations when it comes to chili recipes.  There is white chili, also known as chicken chili, and the more traditional red chili.  Some recipes use beans; others don't.  Some use meat; others are meatless. Some are mild; some are three alarm hot!  I've even seen chili recipes that use cinnamon or chocolate.


For the first 15 years I was married, I made chili using my mother's recipe. It was a simple, yet tasty, recipe that only used five ingredients:  ground beef, chili seasoning, chicken broth, tomato sauce and chili beans.  Over the years my tastes changed and I wanted a chili recipe that had more texture and spice.


A couple of years ago, I was looking through a cookbook and found a chili recipe that sounded so good I went out and bought the ingredients that day.  The recipe used 2 1/2 times more ingredients than my mother's recipe so I was skeptical about the outcome.  I'm glad I decided to give the recipe a try because it's the only chili I make anymore.


Margaret's Morsels | Crock-Pot Chili
For more spice, use a can of chili ready diced tomatoes.

Whenever I make chili -- or any recipe that calls for ground beef -- I use ground chuck.  It's more expensive than ground beef, but it's also more flavorful.  I always use extra lean ground chuck which, at my grocery store, contains 97% meat and 3% fat.  It isn't a nonfat food, but it definitely lowers the amount of fat consumed.  Even though there's not a lot of grease when the meat is browned, I drain the meat before adding it to the other ingredients.


After the meat, onion and celery are browned, all the ingredients are combined in a crock-pot. To prevent cross contamination, I use one spatula when I brown the meat and another one when I mix the meat with the other ingredients.  The chili needs to be stirred occasionally while it's cooking.  I try not to stir it more than once an hour since heat escapes every time you remove the lid on the crock-pot.  The more you remove the lid, the longer it will take for the chili to cook.


Like most soups and stews, chili is better a day or two after it's cooked since the flavors have had time to blend.  I reheat the chili in the crock-pot, but you can also reheat it on the stove or in the microwave.  No matter which method you choose, check and see if you need to add some water to the chili before it's heated.


I like to give new life to leftovers so I use the chili another night for taco salad.  I put salad greens on the plate, ladle the heated chili on the salad and sprinkle shredded cheese on the top.  I put the plate in the microwave a few seconds, just long enough to melt the cheese.  To dress up the plate, I put tortilla chips around the salad.


Margaret's Morsels | Crock-Pot Chili


I hope the weather will be cool -- not cold -- this fall and winter so I can satisfy my craving for chili.  If not, I'll have to perform the experiment and see if my husband will eat chili on a day when it's warmer than 60.  I think he will because he likes chili more than he's willing to admit!

Crock-Pot Chili
6 Servings

1 lb. ground beef
1/2 cup diced onion
1/4 cup diced celery
1 (15 1/2 oz.) can kidney beans (undrained)
1 (15 1/2 oz.) can pinto beans (undrained)
1 (15 oz.) can tomato sauce
1 (14 1/2 oz.) can diced tomatoes (undrained)
1/4 cup diced green chilies, drained
1 tsp. cumin
1 tsp. black pepper
2 tsp. salt
2 Tbsp. chili powder
1 cup water

Brown beef with onion and celery.  Drain.  Combine all ingredients with beef in a crock-pot.  Stir.  Cook on high heat for 3 to 4 hours, stirring occasionally.


© Margaret's Morsels


November 24, 2010

The Saturday Special

Pin It
Margaret's Morsels | Super Simple Cinnamon Rolls


Like most working parents with school age kids, weekday mornings are hectic at our house.  My husband has to be at work at one time, I have to be at work at another and our son has to be at school between the two. This leaves little time for me to prepare a sit down family breakfast during the week.  It's a different story on the weekend.

Several years ago, I started fixing a family breakfast on Saturday mornings.  My son promptly dubbed this meal, "The Saturday Special."  I usually fix bacon, eggs and biscuits.  Sometimes I make waffles, quiche or a breakfast casserole.  Once in a while, though, my family wakes up to the smell of cinnamon rolls.

My favorite cinnamon roll recipe is called Super Simple Cinnamon Rolls. The name may be a tongue twister, but the dish truly is super simple! Instead of making the dough from scratch, the recipe starts with two cans of crescent rolls.  I use Pillsbury Recipe Creations seamless dough sheets instead.  The dough sheets may cost a little more, but this is one time I'll pay extra for the sake of convenience.  If you use crescent rolls, make sure to press the crescent rolls into a rectangle and seal any perforations or holes.

The dough is easier to work with when it's cold so I leave it in the refrigerator while I mix up the filling.  If you're like me and forget to soften the butter, you can put the wrapped butter in the microwave and heat it at 10% power for 10 seconds.  This is long enough to soften the butter without it melting.

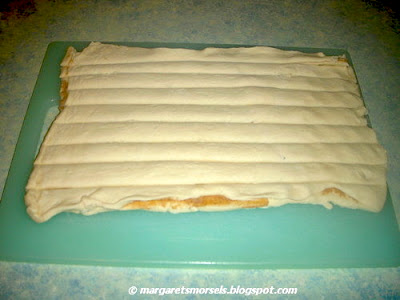
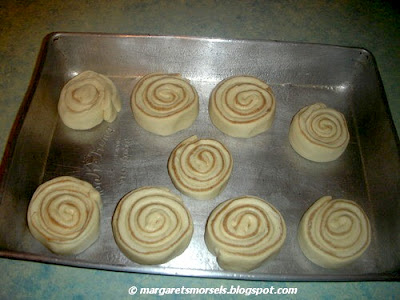
Once the filling is mixed up, I open the first can of dough and spread it on a cutting board.  The filling goes on the dough and the second can of dough is placed over the filling.  Most cinnamon roll recipes call for the dough to be rolled jellyroll style, but not this one.  The dough is cut into nine strips instead.  The easiest way to do this is with a pizza wheel.  You can get straighter lines if you roll the wheel away from you when you cut the dough.  If you don't have a pizza wheel, you can use a knife instead.  After you cut the dough into strips, roll each strip into a coil.  The rolls turn out prettier if you tuck in the sides of the dough as you roll it into a coil.
Margaret's Morsels | Super Simple Cinnamon Rolls
Cut into strips with a pizza wheel.


Margaret's Morsels | Super Simple Cinnamon Rolls
Ready to be baked.

As soon as the rolls are in the oven, I start preparing the glaze which is also super simple.  It's a powdered sugar glaze, but with a twist.  In addition to powdered sugar and milk, it also has a tablespoon of butter. The addition of the butter gives the glaze a wonderful flavor.

It's a good idea to sift the powdered sugar so there won't be any lumps in the glaze.  When adding the milk, it's best to start with the least amount called for because it's easier to add more than take away too much.  Once the glaze is mixed up, I put it in a pastry bag.  If you don't have a pastry bag, you could use a disposable resealable plastic bag instead.  If you don't want to mess with a bag, you can always apply the glaze with a spoon.

Margaret's Morsels | Super Simple Cinnamon Rolls

When the rolls come out of the oven, I put the pan on a wire rack and let the rolls cool a few minutes before adding the glaze.  It you add the glaze when the rolls first come out of the oven, it melts.  I like to swirl the glaze around the coils, but you can apply it in any pattern you like.

The aroma of cinnamon rolls will be wafting upstairs tomorrow luring my family into the kitchen.  Once they're up and have eaten breakfast, they can help me with some last minute Thanksgiving preparations.  The Saturday special isn't only for Saturday!


Super Simple Cinnamon Rolls
9 Servings

Filling:

1/3 cup packed light brown sugar
1/3 cup powdered sugar
1 tsp. cinnamon
1/4 cup butter, softened

Rolls:

2 (8 oz.) cans Pillsbury Recipe Creations seamless dough sheets or crescent rolls

Glaze:

1 cup powdered sugar
1 Tbsp. butter, softened
2 to 3 Tbsp. milk

Preheat oven to 375°.  In a small bowl, mix all filling ingredients; set aside.

Unroll one can of dough into a large rectangle.  If using crescent rolls, firmly press perforations to seal.  Spread filling over the dough.  Unroll second can of dough into a large rectangle.  If using crescent rolls, firmly press perforations to seal.  Place dough over filling, pressing dough onto filling.  Cut dough into nine 13-inch strips.  Roll from one end to the other, shaping each piece into a coil.  Place in a greased 13 x 9 x 2-inch pan. Bake 20 to 25 minutes or until golden brown.  Remove from oven and place pan on a wire rack.

In a small bowl, combine all glaze ingredients, adding enough milk to make desired drizzling consistency.  Drizzle over warm rolls.  Serve warm.

© Margaret's Morsels


November 18, 2010

Thanksgiving Morselette

Pin It
Margaret's Morsels | One Hour Buttermilk Rolls

It's hard to believe Thanksgiving is next week!  No holiday dinner would be complete if I didn't make homemade rolls.  What's the one food your family expects on the holiday table each year?  


© Margaret's Morsels

November 15, 2010

On the Side: Part Two

Pin It

Margaret's Morsels | Southern Cranberry Salad


Last week, I wrote about a Thanksgiving side that appears on my table some years, but not others.  As promised, today I'm going to write about the Thanksgiving side dish that, like the proverbial Christmas fruitcake, gets no respect at all, but is practically obligatory on the Thanksgiving table.  It's the side dish you either love or hate.  For most of my life I hated it.  You've probably guessed I'm talking about cranberries.

Why have cranberries become the brunt of so many jokes?  Probably because we've encountered them combined with a multitude of ingredients that do nothing to enhance the flavor of the cranberries.  

Each Thanksgiving, my mother made a congealed cranberry salad with cherry gelatin, fresh cranberries, celery, nuts and several kinds of fruit.  I hated it as a child and I hate it as an adult.  At the other end of the spectrum, my mother-in-law always served canned jellied cranberry sauce on Thanksgiving.  I didn't like it any better than I did my mother's cranberry salad concoction.

A couple of years ago, I found a recipe for Southern Cranberry Salad.  The recipe sounded delicious so I decided to make it for Easter.  My in-laws loved it and, surprisingly, so did I.  Seeming overnight, I became a cranberry convert.

Margaret's Morsels | Southern Cranberry Salad
This is not my mother's cranberry salad!


The adage less is more is certainly true with this recipe.  It only uses five ingredients, but they compliment each other and produce an extremely tasty salad.  Unlike my mother's recipe that used fresh cranberries, this recipe uses a can of whole berry cranberry sauce.  This means I can make the salad year round and not just October through December when fresh cranberries are in season.  This is a good thing because it's a wonderful accompaniment to an Easter ham.


Margaret's Morsels | Southern Cranberry Salad

I always use sugar-free gelatin and this recipe is no exception. Cranberries are tart so, if you want the salad to be a little sweeter, you might opt to use a package of regular gelatin instead.  Although the recipe calls for cherry gelatin, you could substitute another red gelatin if you prefer.  I think the salad would be delicious with cranberry gelatin.


This salad is an easy holiday dish because it can be made ahead of time. Sometimes I use a jello mold; other times, I put the salad in a Corning Ware casserole dish.  If I'm not unmolding the salad, I don't bother greasing the dish.  If I'm molding the salad, I follow the tips mentioned here.


Margaret's Morsels | Southern Cranberry Salad


Now that I know cranberries are delicious with the right combination of ingredients, I'm looking for new cranberry recipes.  The in-laws don't know it yet, but I'm trying a new cranberry relish recipe this year for Thanksgiving.  I hope they like it as much as they do the Southern Cranberry Salad.


Southern Cranberry Salad
8 Servings

1 (3 oz.) pkg. cherry gelatin
1 cup boiling water
1 (16 oz.) can whole berry cranberry sauce
2 (11 oz.) cans mandarin oranges, drained
1 (8 oz.) can crushed pineapple, drained

Bring water to a boil.  Remove from heat and add the cherry gelatin.  Stir the gelatin until it is completely dissolved.  Add the remaining ingredients; blend well.  Pour mixture into a greased 4-cup jello mold or a 2-quart dish. Cover and refrigerate overnight.  Refrigerate leftovers.


© Margaret's Morsels

November 10, 2010

On the Side

Pin It
Margaret's Morsels | Quick and Easy Candied Sweet Potatoes

Thanksgiving is a couple of weeks away, but it's not too early to plan the menu, especially if you're the one doing the cooking.  My Thanksgiving menu is almost identical to the one my mother served every year.  Some of the food is prepared using her recipes; the rest from recipes I've acquired over the years that have become family favorites.


One difference in our menus is my mother always served sweet potato casserole.  Some years, I don't even serve sweet potatoes.  When I do, I alternate between sweet potato casserole and Quick and Easy Candied Sweet Potatoes.


The terms sweet potatoes and yams are used interchangeably even though, technically, they are two separate vegetables.  Southerners tend to call sweet potatoes "yams."  To confuse the matter, cans of sweet potatoes are often labeled yams.  Unless you're in a specialty shop, chances are the can of yams you're buying is actually sweet potatoes.


Margaret's Morsels | Quick and Easy Candied Sweet Potatoes
The can is labeled "Sweet Potatoes* Yams in Syrup."


The recipe for Quick and Easy Candied Sweet Potatoes calls for two 15 ounce cans of sweet potatoes.  My grocery store sells a 29 ounce can considerably cheaper than two 15 ounce cans.  I save the money and use the 29 ounce can.  There's no need to change the proportions of the other ingredients for one less ounce of sweet potatoes.


Unlike sweet potato casserole which is baked in the oven, Quick and Easy Candied Sweet Potatoes are cooked on the stove.  You need two burners -- one to heat the potatoes and one for the sauce -- but I usually have more burners available than I do space in the oven!  When you heat the potatoes, don't stir them too hard or they'll fall apart.  To keep the potatoes intact after heating them, remove them from the pan with a slotted spoon, allowing the liquid to drain off.  This dish takes less than 15 minutes to prepare, so it's the last thing I cook before we sit down to eat.


Margaret's Morsels | Quick and Easy Candied Sweet Potatoes
Stir gently so the potatoes don't fall apart.


Some people -- like my husband and son -- don't like sweet potatoes, but my in-laws and I do.  If your family doesn't like sweet potatoes either, check my blog Monday for a Thanksgiving side dish that doesn't get any respect at all!


Quick and Easy Candied Sweet Potatoes
4 to 6 Servings

2 (15 oz.) cans cut sweet potatoes
5 Tbsp. butter or margarine
1/3 cup brown sugar, packed

Pour sweet potatoes and liquid into a 2-quart saucepan.  Cook until potatoes are heated through.  Drain liquid and set potatoes aside.  While sweet potatoes are heating, combine butter or margarine and brown sugar in a 1-quart saucepan; cook until hot, but not boiling.  Pour over hot sweet potatoes.  Stir just to coat.  Serve immediately.


© Margaret's Morsels

November 5, 2010

Confessions of a Tea Drinker

Pin It
Margaret's Morsels | Fruit Tea


My Southern roots run deep.  When my ancestors immigrated to America, they settled in the South.  My parents were born and bred in the South. Except for the 10 years I lived overseas when my dad was in the service and the year I lived in New York City as an adult, the rest of my life has been spent South of the Mason Dixon line.  Given my Southern heritage, it's surprising I didn't like the most quintessential Southern beverage, iced tea, until a few years ago.

Like most Southerners, my mom served ice tea at lunch and supper.  Even with this early exposure to tea, I never could acquire a taste for the beverage.  As I got older and attended more functions where tea was being served, I had opportunities to try the beverage in various forms:  sun tea, sweetened tea, unsweetened tea, tea with lemon juice, tea without lemon juice, hot tea and even instant tea.  No matter how it was prepared, I just didn't like it.

Ten years ago, I was at a function and Fruit Tea was being served.  It was a typical sultry Southern day and the tea looked inviting so I tried a glass. Much to my surprise, I absolutely loved it.  The hostess graciously shared the recipe with me and I've been making it ever since.

Why am I talking about tea now that the weather's cooler?  Two reasons. First, Southerners drink tea year round.  Second, the holidays are rapidly approaching and no family function would be complete if I didn't make Fruit Tea.

The recipe for Fruit Tea is nothing more than sweet tea with a couple of extra ingredients.  It's the addition of pineapple juice, lemon juice and ginger ale that turned me into a tea drinker!  When someone drinks the tea for the first time, I'm always asked what makes it so effervescent.  There's been a lot of guesses, but no one has ever guessed ginger ale.


Margaret's Morsels | Fruit Tea

One batch of Fruit Tea makes eight servings.  If I'm making tea for a crowd, I make several batches, but I make them one at a time.  The tea is best made the day it's being served because the pineapple pulp settles at the bottom after a day or two.  If there's any leftover tea, I strain it to remove the pulp before I drink it.  

Although I love Fruit Tea, I don't fix it on a regular basis.  I fix it several times during the year, especially in the summer, and I always make it for holiday functions.   Although I still don't drink sweet tea, I am experimenting and recently enjoyed a glass of peach tea.  Maybe I'll be adding that recipe to my collection too.


Fruit Tea
8 Servings

2 1/2 cups water
2 family size tea bags
1 cup sugar
2 (6 oz.) cans pineapple juice
1/4 cup lemon juice
3 (12 oz.) cans ginger ale

Bring water to a boil.  Pour over tea bags; cover and steep 5 minutes. Pour tea over sugar, stirring until sugar is dissolved.  Add remaining ingredients; stir well. Refrigerate.


© Margaret's Morsels


November 1, 2010

Nuts About Coconut

Pin It
Margaret's Morsels | Hoagy Cake

A reader left the comment:  "Nurses like coconut cake!!!:0).  I need a fabulous recipe!!!"  I'm always happy to share recipes, especially when I have one that I think will fulfill the request.


When I think of coconut cake, I think about the cake my mother made for birthdays and Christmas.  It was a three layer white cake made from scratch.  The icing was made with egg whites and cooked on the stove. Once the cake was completely cooled, the hot icing was spread on the cake and sprinkled liberally with coconut.  Unfortunately, my mother's recipe didn't include directions on cooking the icing so I've never made her coconut cake.


When I make a coconut cake, I use another recipe from my mother called Hoagy Cake.  A neighbor gave my mother the recipe sometime in the early 1970's.  The neighbor had no idea why it was called Hoagy Cake.  I've looked through my cooking reference books and searched online trying to find its origin, but to no avail.  If anyone knows how Hoagy Cake acquired its name, I hope you'll tell me so this 40 year old mystery can be solved!


One advantage of a Hoagy Cake is it is made in a 13 x 9-inch pan which makes it easy to transport.  Unlike some coconut cake recipes, this cake doesn't need to be refrigerated.  This makes it even easier to take somewhere plus it saves space in the refrigerator which is a good thing around the holidays.


This recipe, like my mother's coconut cake, is also made from scratch. When you compare the ingredients to other cake recipes, you notice that, although it uses 10 ingredients, it doesn't use much of any ingredient. That plus the fact our neighbor said it was an old recipe makes me wonder if it is a depression era recipe.  What it lacks in quantity, it more than makes up for in taste.

Margaret's Morsels | Hoagy Cake
The cake ingredients.


Hoagy Cake uses buttermilk rather than plain milk.  Southern cooks use buttermilk in a lot of recipes because it makes baked goods extremely tender.  If you don't have buttermilk, you can make sour milk.  To make sour milk to equal 1 cup buttermilk, put 1 tablespoon of lemon juice or white vinegar in a measuring cup.  Add enough milk to make 1 cup. Thoroughly stir the mixture and let it sit for 5 minutes.  You can use this formula to make as much or as little buttermilk as you need.  There's also a dry buttermilk powder that's sold in a can.  The dry powder only requires the addition of water.


I'm including two frosting variations:  one for coconut and one for chocolate.  My family doesn't care for coconut as much as I do so I usually make the chocolate frosting.  Whenever I make a frosting or glaze that uses powdered sugar, I always sift the powdered sugar, even if the recipe doesn't call for it.  You want the frosting or glaze to be smooth, so it's better to get any lumps out before you mix the powdered sugar with the other ingredients.


The frosting needs to be put on while the cake is still hot.  As soon as I put the cake in the oven, I measure all the frosting ingredients.  Once the cake is cooked, I put the pan on a wire rack and mix up the frosting.  This gives the cake enough time to cool a little, but still be hot when the frosting is applied.

Margaret's Morsels | Hoagy Cake
The frosting ingredients.


The neighbor that gave my mother the recipe said her husband liked the cake two ways:  hot or cold!  I have to agree with him that it's delicious either way.  The only other thing it needs is a glass of milk!


Hoagy Cake
12 Servings

1/2 cup shortening
1 1/4 cups sugar
1 egg
1 1/4 cups buttermilk
2 Tbsp. water
2 cups all-purpose flour
1 tsp. baking soda
2 tsp. baking powder
1/2 tsp. salt
1 Tbsp. vanilla

Cream shortening and sugar.  Add egg; mix well.  Add buttermilk and water; mix until well blended.  Combine dry ingredients and add to creamed mixture.  Stir in vanilla.  Bake in a greased 13 x 9-inch pan at 350° for 20 to 30 minutes or until done.

Frosting

4 Tbsp. butter or margarine
6 Tbsp. milk
1 Tbsp. light corn syrup
dash of salt
1 (1 lb.)  box powdered sugar, sifted
1 1/2 cups coconut or to taste

Combine first four ingredients in a frying pan.  Heat until butter is dissolved.  Stir in powdered sugar and coconut.  Spread on cake while cake is hot.

For Chocolate Frosting:  Omit the coconut.  Sift 3 tablespoons of cocoa with the powdered sugar.  Proceed as directed.


© Margaret's Morsels