May 23, 2012

Hats Off to the Graduate

Pin It
Margaret's Morsels | Mortarboard Cupcakes

My son graduates from middle school tomorrow.  To celebrate, I made mortarboard cupcakes like the ones I made for his kindergarten graduation eight years ago.  The cupcakes may look complicated, but they're really easy to prepare.

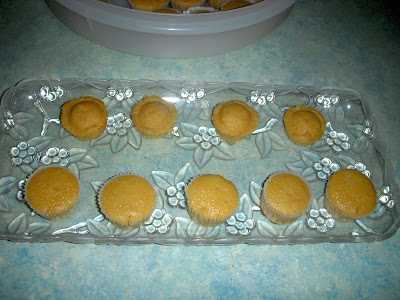
Start by preparing any flavor of packaged cake mix.  Line mini muffin pans -- it helps to have more than one -- with miniature cupcake liners.  Scoop 1 heaping tablespoon batter into each cupcake liner.  Don't skimp on the batter or your cupcakes will look like the ones on the top row instead of the ones on the bottom.


Margaret's Morsels | Mortarboard Cupcakes

I've read many explanations about what causes cupcake liners to separate from cupcakes.  The reasons run the gamut from the amount of fat used in the recipe, to the amount of wax in the cupcake liners, to the amount of time the cupcakes are left in the pan after being removed from the oven.  I have my own hypothesis:  If you don't use enough batter, the baked cupcakes don't reach the top of the liners which causes the liners to separate from the cupcakes.  This is why you need to fill the liners 1/2 to 2/3 full.

You may be wondering why you even need to use cupcake liners.  There are two reasons.  One, if you bake the cupcakes without a liner, the top of the cupcakes are rounded instead of flat.  This matters because the cupcakes will be turned upside down when assembled.


Margaret's Morsels | Mortarboard Cupcakes

Two, if you remove the liners when the cupcakes are baked, the sides will be sticky when the cupcakes are removed from the serving tray.  


Margaret's Morsels | Mortarboard Cupcakes
Cupcakes with the liners removed

Cupcake liners solve both those problems.

Bake the cupcakes 10 to 15 minutes or until done.  Put the pans on a cooling rack for 1 or 2 minutes.  Remove the cupcakes from the pans and cool completely on a cooling rack.  I bake the cupcakes a day or two ahead of time and store them in a covered container.

It's a good idea to prep the remaining ingredients before you start assembling the cupcakes.  My son's school colors are red and white so I leave the frosting white.  If you want a different color, tint the frosting with food coloring.

The tassels can be made from licorice strips or fruit roll snacks.  I've used both, but prefer Twizzlers Pull 'n' Peel licorice.  The licorice may not be as flexible as the fruit roll snacks, but it's definitely easier to cut!  Separate the licorice into strands.  


Margaret's Morsels | Mortarboard Cupcakes

Cut the strands into pieces approximately 2 1/2-inches long.


Margaret's Morsels | Mortarboard Cupcakes

It's better to err on the side of caution and cut the tassels a little long.  You can always trim them if they're too long.

You also have a choice when it comes to the candy:  Skittles or M&M's.  If the school name starts with an "S" or "M," it's cute to leave the letter facing up.  Otherwise, turn the candies upside down so the plain side is showing.

I find assembly is faster when I work on five cupcakes at a time.  Turn the cupcakes upside down so the paper liner is on top.  Spread a little frosting on the center of each liner.  The frosting keeps the cookies from moving. Don't use too much frosting; you don't want it to ooze down the sides when the cookies are added.


Margaret's Morsels | Mortarboard Cupcakes

Turn the cookies upside down and spread some frosting on the center of each cookie.  Place a cookie on top of each cupcake liner.


Margaret's Morsels | Mortarboard Cupcakes

Add the tassels and a candy piece to each cookie to complete the mortarboard.  If the tassels are too long, trim them with a pair of kitchen scissors.


Margaret's Morsels | Mortarboard Cupcakes

If you have someone graduating -- from preschool to graduate school -- a batch of these mortarboard cupcakes decorated with school colors is a tasty way to say "conGRADulations!"


Mortarboard Cupcakes
60 Servings

1 (18 1/4 oz.) pkg. cake mix (any flavor)
1 (16 oz.) can frosting
food coloring (optional)
1 (21 oz.) pkg. Twizzlers Pull 'n' Peel licorice, separated into strands and cut into 2 1/2-inch pieces or 1 (4.5 oz.) pkg. fruit roll snacks, cut into 1/2-inch strips then cut into 2 1/2-inch pieces
60 Lorna Doone shortbread cookies
60 Skittles or M&M's

Prepare cake mix according to package directions.  Line mini muffin pans with miniature cupcake liners.  Fill liners with 1 heaping tablespoon of batter.  Bake at 350° for 10 to 15 minutes or until toothpick inserted in center comes out clean.  Remove from oven and cool in pan for 1 or 2 minutes.  Remove cupcakes and cool completely on a wire rack.

Tint frosting with food coloring, if desired.  Cut licorice or fruit roll snacks into pieces approximately 2 1/2-inches long.

Turn cupcakes upside down so the cupcake liner is on top.  Spread a little frosting on the center of each liner.  Turn cookies upside down and spread frosting on the center of each cookie; place a cookie on top of each cupcake liner.  Add the tassels and a candy piece.  Store in a covered container. 


© Margaret's Morsels

May 18, 2012

A Well Stocked Pantry

Pin It


When I was in my early 20's and living on my own, I didn't mind going to the grocery.  It was relatively easy because I wasn't cooking for a family. After I got married and started cooking for two, then three and as many as 23 on holidays, grocery shopping became a chore.  Like most chores, I don't care for this one either!  To make the best of the situation, I got in the habit of planning a weeks worth of meals and going to the grocery once a week. The advantages of this are twofold.

One, I'm not constantly running to the grocery to pick up a forgotten ingredient.  Two, when my day doesn't turn out as planned, I can easily alter the menu and still have dinner on the table for my family.  By keeping a variety of nonperishable ingredients on hand that can be used alone or combined with fresh, refrigerated or frozen food, I can prepare an impromptu meal.  These pantry items can be grouped into categories.


Baking:


This includes three kinds of flour -- all-purpose, bread, Wondra -- and sugar  -- granulated, brown, confectioners -- plus other dry ingredients necessary for baking cakes, cookies and breads.


Spices:


Spices have a short shelf life, about 6 months, so I only keep spices on hand that I use on a regular basis.  I try to buy small bottles unless they're spices I use regularly or are only sold in large sizes.


Beverages:


I always keep apple juice, pineapple juice and tea bags on hand.  We drink the juices plus I use them in other recipes.  The apple juice is used in baked apples; the pineapple juice goes in fruit tea.  


Liquids:


Unlike beverages, these liquids aren't for drinking.  They are sometimes used alone, like barbecue sauce, but are usually combined with other ingredients.


Milk:


This category consists of evaporated, sweetened condensed and nonfat dry milk powder.  Each one is used for a different purpose.  Evaporated milk is good for gravy and sauces while sweetened condensed milk is used in desserts.  Dry milk powder can be combined with water to make milk, but I keep it on hand for one reason:  macaroni and cheese.


Meat:


I keep canned chicken, salmon, tuna and hash plus a jar of dried beef in the pantry.  The chicken is great in chicken pot pie and the salmon makes delicious baked salmon patties.

Fruits:


Most of the canned fruit I keep on hand is eaten as a side dish or snack. The mandarin oranges and crushed pineapple are also used in congealed salads.  The pie fillings can be used for dessert, but the apple pie filling is also a key ingredient in a pork chop and apple entree.


Vegetables:


Most of the canned vegetables are heated and served as a side dish, but I keep two of them on hand for specific dishes.  The mixed vegetables are for chicken pot pie while the whole beans are used for green bean bundles.


Soup:


Most of the soups are used in other dishes, but tomato soup and grilled cheese sandwiches have been known to appear on the dinner table on busy days.  The chili is good heated in the microwave for a quick and easy lunch.


Pasta, Rice and Grains:


I keep a variety of pasta -- spaghetti, ziti, macaroni and egg noodles -- on hand for casseroles.  The egg noodles can be combined with other pantry ingredients for a quick and easy microwave tuna casserole.  The oatmeal is used more for chocolate oatmeal cookies than for breakfast, while grits are served at breakfast and occasionally dinner.  Rice is a quick, easy and inexpensive side dish, but is also good for casseroles and other main dishes.


Miscellaneous:


These are ingredients that don't really fit in any other category, but are helpful to keep on hand.  Cooking spray is a must when you do a lot of cooking.  I never make Jell-O per se, but use it for fruit and congealed salads.


Everything Else:


I keep bread mixes on hand for times I want to serve cornbread or muffins with a meal.  The Bisquick is good for sausage balls and pancakes. Sometimes I use the stuffing mix as a side dish, but most of the time I use it for easy pork chops and apples or stuffed breast of turkey.  I use Hamburger Helper on nights when I have ground beef, but don't have time to make Meat Loaf or Salisbury Steak.

When your plans fall apart faster than an ice cube in boiling water, don't turn to take out or delivery for dinner.  Turn to Plan B:  a well stocked pantry!


© Margaret's Morsels

May 9, 2012

Treat Mom to Dinner

Pin It
Margaret's Morsels | Broccoli Quiche

If you want to do something special for mom on Mother's Day, treat her to a dinner made especially for her.  You don't have to be an experienced cook to make the quiche recipe I'm sharing today.  You don't have to make the pie crust, cook the broccoli or, if you don't mind spending a little extra, grate the cheese.

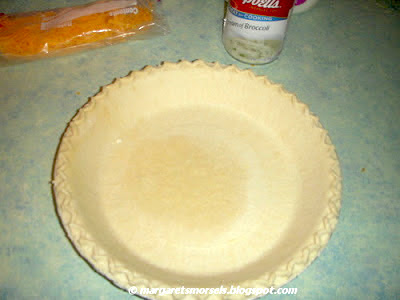
The recipe starts with a deep-dish frozen pie crust.  Make sure it's a deep-dish crust or the filling will overflow.  If you don't want anyone to know you used a frozen pie crust, remove the crust from the foil pan while it's frozen and place it in a nicer pie plate.

Remove the crust from the freezer -- transfer to another pie plate or leave in the foil pan -- and thaw at room temperature for 10 to 15 minutes.

Margaret's Morsels | Broccoli Quiche

To keep the crust from getting soggy when the quiche filling is added, the pie crust needs to be partially baked which is known as blind baking.

There are two schools of thought when it comes to blind baking.  One suggests lining the pie crust with foil and adding uncooked dried beans, rice or pie weights to help the crust retain its shape.  The other way is how my mother taught me which is to "dock" the pie crust.  In baking, dock means to prick the pie crust -- including the sides -- with a fork.

Margaret's Morsels | Broccoli Quiche

These holes allow steam to escape which keeps the crust from bubbling.  Put the pie crust on a cookie sheet and bake for 10 minutes.

Margaret's Morsels | Broccoli Quiche

While the pie crust is baking, make the filling by combining the eggs, milk and cream of broccoli soup.  Remove the pie crust from the oven and sprinkle Cheddar cheese on the bottom.

Margaret's Morsels | Broccoli Quiche

Leave the pie crust on the cookie sheet and add the filling.  The filling will completely fill the pie crust.

Margaret's Morsels | Broccoli Quiche

The quiche takes an hour to bake so you'll need to cover the edges of the pie crust with foil or, what I use, a pie crust shield.

Margaret's Morsels | Broccoli Quiche

The quiche is done when a knife inserted in the center comes out clean.  Remove the quiche from the oven and sprinkle the remaining cheese on top.

Margaret's Morsels | Broccoli Quiche

Return the quiche to the oven until the cheese melts, about 3 to 4 minutes

Margaret's Morsels | Broccoli Quiche

To round out the meal, serve a salad and some fresh fruit.  Add some flowers, a card -- maybe a present -- to make Mother's Day extra special for your mom.

Broccoli Quiche
6 to 8 Servings

1 (9-inch) deep-dish pie crust, partially baked
1 cup shredded Cheddar cheese, divided
6 eggs
1 (10 3/4 oz.) can cream of broccoli soup (undiluted)
2/3 cup milk

Preheat oven to 400°.  Thaw pie crust at room temperature for 10 to 15 minutes.  Prick the pie crust -- including the sides -- with a fork.  Place on a cookie sheet and bake for 10 minutes.  Remove from oven and reduce oven temperature to 350°.

Sprinkle 1/2 cup cheese over the bottom of the pie crust.  Combine the eggs, soup and milk in a large bowl; pour into pie crust.  Cover the edges with foil or use a pie crust shield.  Bake on a cookie sheet for 60 minutes or until a knife inserted in the center comes out clean.  Remove from oven and sprinkle with the remaining cheese.  Return to oven and bake until cheese melts, 3 to 4 minutes.  Remove from oven and let stand 5 minutes before slicing.

© Margaret's Morsels

May 4, 2012

Cinco de Mayo: Algo de Postre

Pin It
Margaret's Morsels | Baked Churros

Cinco de Mayo is tomorrow, but I haven't forgotten, as it says in the title, something for dessert, specifically churros.  This post may be last minute, but there's still plenty of time to make this tasty treat.

Churros are made from pastry dough, fried like a doughnut and rolled in cinnamon sugar.  If you've been reading my blog for a while, you've probably guessed that's not how my version is made.  There are two big differences.  First, the dough isn't homemade.  Second, the churros are baked not fried.

The original recipe called for frozen puff pastry, but I've also used canned breadsticks and seamless dough sheets.  Each version was good, but the results were different with each product.

The puff pastry was delicious hot from the oven, but wasn't as good when served at room temperature.  The breadstick dough was good served at room temperature, but the texture was chewier than a churro.  The seamless dough sheets -- canned crescent roll dough in a seamless sheet -- made churros that were tender plus they were good served straight from the oven or at room temperature.  

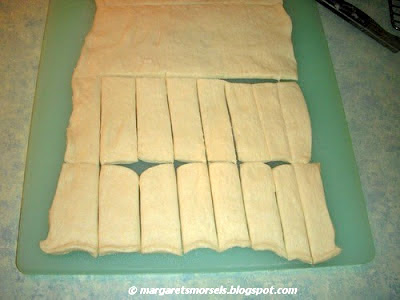
Most churros I've seen have been long, but I prefer smaller portions when it comes to dessert.  Unroll the seamless dough sheet and cut it in half.


Margaret's Morsels | Baked Churros

Cut it in half again for a total of four pieces of dough.


Margaret's Morsels | Baked Churros

Cut each piece of dough into eight strips for a total of 32 pieces.


Margaret's Morsels | Baked Churros
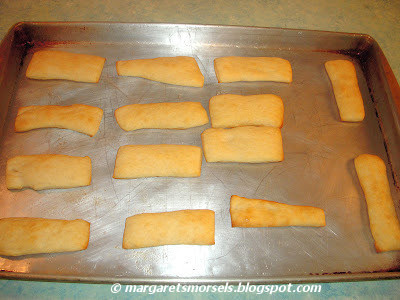
Put the dough strips on a greased baking sheet and bake 8 to 9 minutes until lightly brown.


Margaret's Morsels | Baked Churros


Brush melted butter on both sides of the churros.  Immediately coat the churros -- top and bottom -- with a mixture of cinnamon and sugar.  Don't skimp on the coating; make sure to cover the entire surface.


Margaret's Morsels | Baked Churros

Place the churros on a wire rack to dry.

Baked churros are a nice ending for a Cinco de Mayo feast.  Your guests won't even realize the churros are baked not fried!


Baked Churros
32 Servings

1/2 cup sugar
2 tsp. cinnamon
1 (8) oz. can Pillsbury Recipe Creations refrigerated seamless dough sheet
1/4 cup butter, melted


Preheat oven to 375°.  Combine sugar and cinnamon in a small bowl; set aside.  Unroll dough sheet and cut in half.  Cut in half again for a total of four pieces.  Cut each piece into eight strips.  Place strips on a lightly greased baking sheet.  Bake for 8 to 9 minutes until lightly brown.  Brush both sides of the churros with melted butter and coat with the cinnamon sugar mixture.  Place on a wire rack to dry.


© Margaret's Morsels