December 30, 2010

"Tasting" in the New Year

Pin It
Margaret's Morsels | Mom's Cheese Ball

Now that we're parents, my husband and I prefer to stay home and celebrate New Year's Eve as a family rather than go to a party.  Some years we order pizza; other years we have appetizers.  This year, we'll be ringing in the new year with an assortment of appetizers.


One of my favorite appetizers to make is my mother's cheese ball.  My mother made it every year at Christmas.  In fact, she made several and gave them away as gifts.  The recipe makes a lot so unless you like cheese balls or are giving them away, you might want to halve the recipe. When I halve the recipe, I wind up with two nice size cheese balls.


It's important to let the cream cheese and Cheddar cheese come to room temperature.  This makes it easier to combine the ingredients.  My mother always mixed the ingredients by hand, but I prefer to use a hand mixer.  I always mix the cream cheese thoroughly before I add the Cheddar cheese.

Margaret's Morsels | Mom's Cheese Ball
 The cream cheese before the Cheddar cheese is added.

The recipe calls for 1 cup chopped pecans.  I put pecans in half the mixture and leave the other half plain.  That way, if someone doesn't like or can't eat nuts, they can still partake of the cheese ball.  If you want, you could omit the nuts.  The cheese ball is good either way.


My mother always packed the cheese ball mixture into clean six ounce frozen juice cans.  When the cheese balls were firm, she pushed them out of the cans.  The cheese balls retained the shape of the cans and when sliced fit perfectly on a Ritz cracker.  I don't buy frozen juice so I came up with an alternative way to achieve this look.


The easiest way I've found is to cut an empty paper towel tube in half like this:


Margaret's Morsels | Mom's Cheese Ball


Line each tube with a piece of waxed paper and add the desired amount of the cheese ball mixture.  Fold the waxed paper over the mixture and shape it into a log, letting the paper towel tube be your guide.  When it's the shape you want, fold the waxed paper over the top and secure everything with a couple of rubber bands.  I put the tubes in a resealable plastic bag and refrigerate them overnight or for a couple of days.

Margaret's Morsels | Mom's Cheese Ball
Ready to go in the fridge.

When you're ready to serve the cheese ball, remove it from the tube and waxed paper.  It will look something like this:


Margaret's Morsels | Mom's Cheese Ball
Before

Put chili powder on a clean piece of waxed paper and coat the cheese ball thoroughly.  Make sure to coat the ends too.  Don't skimp with the chili powder.  Not only does it add some kick, it dresses up what otherwise would be a plain looking appetizer.
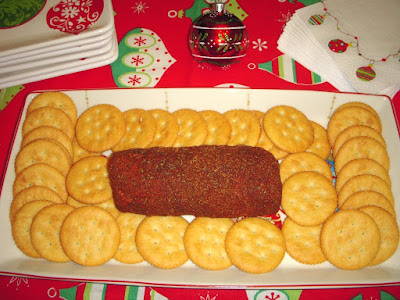
Margaret's Morsels | Mom's Cheese Ball
After

If you don't want to go to the trouble of making the cheese ball into a log shape, you can make it into a ball.  Be sure to chill it thoroughly before you add the chili powder.

My husband likes the cheese ball with Triscuits, but I like it with Ritz crackers.  It fits perfectly on a Ritz, tastes great on a Ritz and it's the same way my mother served it!

Margaret's Morsels | Mom's Cheese Ball

As 2010 comes to a close, I want to thank everyone for reading my blog, posting comments and sending me email messages.  The comments and messages inspire me and I look forward to sharing more recipes, tips and techniques in 2011. 


Mom's Cheese Ball

1 lb. cream cheese, softened
1 lb. sharp Cheddar cheese, grated
2 cloves garlic, finely minced
dash of cayenne pepper
1 cup chopped pecans
chili powder

Bring the first two ingredients to room temperature.  Combine all ingredients, except chili powder, and mix well.  Shape and refrigerate overnight or for a couple of days.  When ready to serve, coat the mixture thoroughly with chili powder.


© Margaret's Morsels


December 28, 2010

New Life for Leftover Ham

Pin It
Margaret's Morsels | Broccoli Ham Ring

The presents have been opened, the out of town company has gone home, the hustle and bustle of Christmas is over.  If you're like me, two things remain:  bills and leftovers!  I can't help with the bills, but I can share a recipe for leftover ham.


I always cook a ham for Christmas and freeze the leftovers.  Before I freeze the ham, I use some of it to make a quick and easy Broccoli Ham Ring.


The recipe consists of a filling made with ham and four other ingredients. One of the ingredients -- frozen chopped broccoli -- needs to be thawed so I combine the filling ingredients early in the day.  By the time I'm ready to cook supper, the broccoli is thawed.  The only thing left to do is arrange the filling atop refrigerated crescent rolls.


As the name implies, the finished dish is in a ring shape, but it's actually quite easy to make.  I prepare the ring on a large baking stone, but you could use a pizza pan or cookie sheet.  Just make sure whatever pan you use is big enough to accommodate the crescent rolls when they're spread out in a sunburst pattern.  If you don't have a pan big enough, you could make two rings using half of the ingredients for each ring.


A picture's worth a thousand words so I'll let these pictures be your guide in how to assemble the ring.


Margaret's Morsels | Broccoli Ham Ring
Put the dough in a circle with the points to the outside.

Margaret's Morsels | Broccoli Ham Ring
Put the filling on the wide ends of the dough.

Margaret's Morsels | Broccoli Ham Ring
Pull the points of the dough over the filling and tuck
them under the wide ends of the dough.

Some of the filling will show, but that only adds to the beauty of the dish.

I usually serve a salad -- green or congealed -- with the Broccoli Ham Ring.  Since I've got leftover Green Bean Bundles and Cranberry Orange Relish, I'll be serving those with the ham ring this time.  Those two sides were great Christmas day with the ham so they'll be good with the ham ring too.  After all, I don't want Christmas leftovers to go to waste!


Margaret's Morsels | Broccoli Ham Ring


Broccoli Ham Ring
8 Servings

1 cup chopped ham
1 cup frozen chopped broccoli, thawed
1/4 cup chopped onion
1 1/2 cups shredded Cheddar cheese
1 tsp. lemon juice
2 (8 oz.) pkg. refrigerated crescent rolls

Combine the first 5 ingredients in a large bowl; mix well.

To assemble the ring, unroll crescent dough; separate into 16 triangles. Arrange triangles in a circle on a 15-inch round baking stone with wide ends of triangles overlapping in the center and points toward the outside (there should be a 5-inch diameter opening in center of stone).  Scoop ham mixture evenly onto widest end of each triangle.  Bring points of triangle up over filling and tuck under wide ends of dough at center of ring. Filling will not be completely covered.

Bake at 350° for 25 to 30 minutes or until deep golden brown.  Cut into 8 servings.


© Margaret's Morsels

December 22, 2010

Double Duty Cooking

Pin It
                                                        
Margaret's Morsels | Green Bean Bundles

Margaret's Morsels | Macaroni and Cheese

When we bought our house, there were two items other than location and school district at the top of my wish list:  a front porch and double ovens.  I didn't get the front porch, but I got double ovens and I love them.  I don't know how I ever cooked without them!


Although I've had double ovens a number of years, I still find myself planning meals that can be cooked at the same temperature, even if not for the same length of time.  This double duty cooking comes in handy, especially during the holidays when there's a lot of cooking to be done all at once.  Since the holidays are upon us, I'm sharing two side dishes that can be cooked simultaneously.


My family expects turkey and all the trimmings at Thanksgiving so I always serve ham at Christmas.  For as long as I can remember, I've always paired ham with macaroni and cheese.  To me, those two foods go together like peanut butter and jelly, fish and chips, bacon and eggs.  In addition to macaroni and cheese, I also serve green bean bundles.  The macaroni and cheese cooks in half the time of the bean bundles so I put the bean bundles in to cook first.


Green bean bundles may sound complicated, but they're nothing more than whole green beans wrapped in bacon, covered with a sauce and baked in the oven.  You can use a whole slice of bacon on each bundle or you can slice the bacon in half.  The bundles are easier to wrap if you put the beans at the end of a piece of bacon and roll everything into a bundle.


Margaret's Morsels | Green Bean Bundles

                                                 
Margaret's Morsels | Green Bean Bundles


To save time, I wrap the bacon around the beans the night before and store them in a covered container in the refrigerator.  The remaining ingredients aren't added until the beans are ready to go in the oven.


The sauce uses a hodgepodge of ingredients, but when combined gives the beans a wonderful flavor.  You don't have to be precise; you can add more or less of an ingredient to suit your taste.  Once the sauce is on the beans, the pan goes in the oven for 45 minutes.  The bacon needs to be thoroughly cooked so you might have to cook the beans a little longer, especially if you use a whole piece of bacon to wrap the beans.  For a nicer presentation, transfer the cooked bean bundles and sauce to a serving dish after you take them out of the oven.


The other side dish, macaroni and cheese, isn't difficult and is tastier than anything you get from a box!  When you cook macaroni -- or any pasta -- you want to add enough salt to the water so it tastes like saltwater.  If the water isn't salty enough, the cooked pasta won't be either.


Most macaroni and cheese recipes use regular or canned milk.  This recipe uses nonfat dry milk instead.  The milk powder is mixed with flour, butter and water to form a sauce.


Margaret's Morsels | Macaroni and Cheese
The sauce before the cheese is added.

Part of the cheese is added to the sauce making it a cheese sauce.  It's ok if all the cheese isn't completely melted.  It will melt when you cook it in the oven.  The macaroni is added to the sauce and the mixture is cooked for 25 minutes.  After the 25 minutes are up, the remaining cheese is sprinkled on top and cooked just long enough to melt, about one minute.  This sprinkling of cheese makes the dish look prettier when it's served.


Margaret's Morsels | Macaroni and Cheese
The remaining cheese before it's melted.

If you want to get out of the kitchen faster, let your oven do double duty and cook two dishes at the same time.  However, before you buy the ingredients and prepare the food, make sure there's enough room in the oven for both pans!

Green Bean Bundles
8 Servings

4 (14.5 oz.) cans whole green beans, drained
bacon (uncooked)
2 Tbsp. butter
2 Tbsp. brown sugar
2 tsp. soy sauce
1/4 cup Worcestershire sauce
salt and pepper to taste
1/2 tsp. garlic powder

Gather green beans into bundles.  Wrap one slice bacon around each bundle; lay seam side down in baking dish.  Slice butter on top of bundles. Sprinkle remaining ingredients over bundles.  Bake at 350° for 45 minutes or until hot and the bacon is cooked.

Macaroni and Cheese
8 Servings

1 (8 oz.) pkg. elbow macaroni
2 Tbsp. nonfat dry milk
2 Tbsp. flour
1 Tbsp. butter, melted
1 1/4 cups boiling water
3 cups grated Cheddar cheese, divided
1/4 tsp. salt

Cook macaroni according to package directions; drain and set aside.  In a large bowl, mix dry milk, flour and butter.  Gradually add boiling water, beating constantly.  Add 1 1/2 cups cheese and continue beating until smooth and creamy.  Stir in macaroni, 1 cup of the remaining cheese and salt.  Transfer to a lightly greased 2-quart baking dish.  Cover with foil. Bake at 350° for 25 minutes.  Remove foil.  Sprinkle with remaining 1/2 cup cheese.  Continue baking 1 minute or until cheese melts.


© Margaret's Morsels

December 16, 2010

Gifts from the Kitchen

Pin It
Margaret's Morsels | Chocolate Covered Ritz Cracker Cookies

I love giving gifts from the kitchen, especially at the holidays.  Before I had children, recipients included family, friends, co-workers and neighbors.   After having children, the list grew to include teachers, coaches and Sunday school teachers to name a few.  Fortunately, food truly is a one size fits all gift.  You don't need to know the person's size or home decor or hobbies.  Food is the one gift that's not likely to get shoved into the back of a closet!


This year, there are 24 people on my list.  Since it's the holidays and the cookies are a gift, I want them to be special, but not time consuming like cut out cookies.  This is when I make a cookie that is so simple it doesn't even have a name.  In fact, it's a technique rather than an actual recipe! All you need are Ritz crackers, peanut butter, chocolate coating and, if desired, sprinkles.  You can make as many or as few as you need.


Start by putting the peanut butter on half of the crackers.  When you spread the peanut butter on the crackers, don't spread it all the way to the edge.  If you do, the peanut butter will ooze out when you add the second cracker.  If that happens, you can use a butter knife to go around the cracker and wipe off the excess peanut butter.  Use the remaining crackers to sandwich the "cookies" together.  To save time, you can assemble the crackers while the chocolate coating melts.  Or, you can assemble the crackers the night before and store them in an airtight container.


Margaret's Morsels | Chocolate Covered Ritz Cracker Cookies
Don't spread the peanut butter to the edge of the cracker.

When I first started making these cookies, the coating was called almond bark.  It's now called chocolate coating.  The name isn't the only thing that's changed.  The blocks of chocolate coating are in a new design and harder to break apart.  I had to use a knife to cut them into blocks for melting.  The coating now comes in a microwave-safe tray for easy melting.


Margaret's Morsels | Chocolate Covered Ritz Cracker Cookies
The new, but not necessarily improved, chocolate coating.

If the next couple of paragraphs sound familiar, it's because I'm recycling them from a previous blog -- the tips are applicable for these cookies too -- plus adding some additional information.

I always use a 1 1/2-quart crock-pot to melt chocolate coating.  It takes longer to melt, but it remains smooth and you don't have to remelt it like you do when you use a microwave.  A crock-pot keeps the temperature consistent, something that can be tricky if you melt the coating in a double boiler on the stove.  No matter which method you use -- crock-pot, microwave or stove top -- do not cover the container.  If you do, the condensation falls into the coating which hinders melting.  The chocolate coating holds its shape when it melts so you need to stir it periodically until it's smooth.  


I use this candy coating dipping set from Wilton when I coat the cookies.  If you don't have the set, you can use a dinner fork instead.


Margaret's Morsels | Chocolate Covered Ritz Cracker Cookies
I use the tool on the left.

To make the cookies, push one cookie at a time under the melted chocolate coating for a few seconds.  Turn the cookie over a time or two to make sure the entire surface gets covered.  Lift the cookie out of the chocolate coating and tap the fork against the container.  This helps the excess coating fall off plus it pops any air bubbles that are on the surface of the coating.  Put the cookie on wax paper.  I can coat three to four dozen cookies with one 16 ounce package of chocolate coating.  You might get more or less depending on how thick you coat the cookies.


Margaret's Morsels | Chocolate Covered Ritz Cracker Cookies


Once you have a row of cookies dipped and on the waxed paper, you can sprinkle them with holiday sprinkles or you can leave them plain.

Margaret's Morsels | Chocolate Covered Ritz Cracker Cookies

The easiest way to add sprinkles is to shake them out of the bottle.  This only works if your bottle has a lid with holes designed for shaking.  If you don't have a lid with holes, you'll need to put the sprinkles in a bowl and use your fingers or a small spoon to put them on the cookies.

Once the cookies are dry, remove them from the wax paper.  Some of the cookies may have excess coating on the side.  It can be easily corrected. Wipe the excess chocolate with your finger, smoothing the cookie as you do.  If the chocolate doesn't fall off easily, use the dull side of a butter knife to remove the excess, being careful not to scrape away too much coating. You can smooth the area with your finger once the excess coating is removed.  Store the cookies at room temperature in an airtight container, separating the layers with wax paper.

Margaret's Morsels | Chocolate Covered Ritz Cracker Cookies
 Before


Margaret's Morsels | Chocolate Covered Ritz Cracker Cookies
 After

Since the cookies are a gift, I like to package them festively.  I use a variety of containers, but you could use a Christmas paper plate.  I line boxes with wax paper and tins with a doily -- Christmas if I have one -- or wax paper. Since some people have peanut allergies, I write "Contains Peanut Butter" on a piece of masking tape and adhere it to the outside of the container.  If the cookies are on a tray, I put the tape on the side of the tray where it is easily visible.

Margaret's Morsels | Chocolate Covered Ritz Cracker Cookies
Different types of containers I've used.

The cookies may seem time consuming, but they are really quick.  I can make 80 -- start to finish -- in less then three hours.  If they sound good, but you don't want to make them, I saw them advertised in a catalog a few years ago for $12.95 a dozen.  They probably cost more than that now.  If you buy them from a catalog, you might want to order a couple of packages because, like potato chips, you can't eat just one!

© Margaret's Morsels


December 9, 2010

Party Food

Pin It

Margaret's Morsels | Little Corn Dogs

I always loved planning birthday parties for my son.  When he was younger, he'd choose a theme -- building, cars, Legos -- and we'd plan food and games to go with the theme.  Although the theme changed every year, one thing remained the same.  He always wanted Little Corn Dogs, also known as pigs in a blanket, on the menu.


You can buy pigs in a blanket in the freezer section at the grocery, but if you have the time they're easy to make.  All you need is canned dough and cocktail wieners.  Most recipes use a can of crescent rolls.  The recipe I liked and made for years used a can of cornbread twists instead. Unfortunately, cornbread twists are no longer on the market.  All is not lost, though, because you can recreate the taste and texture with only one additional ingredient.


I don't care for pigs in a blanket made with crescent rolls so I substitute a can of breadsticks.  After I take the breadsticks out of the can, I coat both sides with the secret ingredient:  cornmeal.  The cornmeal is what gives the finished product a wonderful texture.


Margaret's Morsels | Little Corn Dogs
I coat the dough before cutting it into thirds.

There are 12 breadsticks in a can so I cut the breadsticks into thirds.  This gives me 36 pieces which is enough for one 14 ounce package of cocktail wieners.  The easiest way to assemble them is to put the cocktail wiener on one end of the dough and roll the wiener and dough to the other end. Once the wiener is covered with dough, roll the seam back and forth on the work surface to smooth the seam and seal it completely.


Margaret's Morsels | Little Corn Dogs
Start rolling from one end to the other.

Most directions say to bake the pigs in a blanket at the temperature listed on the can of dough.  I think they brown better if they're baked at a higher temperature.  I bake them at 450° until the dough is brown, about 10 to 15 minutes.

Today is my son's birthday, but he doesn't want a party or pigs in a blanket this year.  He requested Marinated Baked Chicken for supper instead.  At least he still wants Peanut Butter Pie instead of cake for dessert.  I guess some things never change!

Little Corn Dogs

1 (11 oz.) can refrigerated breadsticks
1 (14 oz.) pkg. cocktail wieners
cornmeal (optional)

Coat breadsticks with cornmeal, if desired.  Separate breadsticks into strips.  Cut strips into thirds.  Wrap each strip around one cocktail wiener. Place seam side down on greased cookie sheet.  Bake at 450° for 10 to 15 minutes, until golden brown.


© Margaret's Morsels


December 6, 2010

Cookie Exchange

Pin It
Margaret's Morsels | Cookie Exchange


Each December, I'm invited to a cookie exchange hosted by a friend.  The idea is to make cookies and bring some to sample and the rest to exchange with the other attendees.  I thought it would be fun to have an online cookie exchange.  We can't exchange the cookies, but we can exchange the recipes!

The recipe I'm sharing is the one my mother made every year at Christmas.  After she died, I decided to carry on the tradition and make the cookies with my son.  My mother used regular sized cookie cutters, but I prefer miniature cookie cutters instead.  I'm not sure how many cookies you get with the regular cookie cutters, but you get several dozen with the miniature cookie cutters.  The miniature cookies cook faster so you'll need to reduce the amount of cooking time.  When I roll cookie dough, I dust my work surface with powdered sugar rather than flour.  If you use too much flour when you roll out the dough, the cookies will be dry.  Powdered sugar keeps the cookies from drying out plus it adds an extra touch of sweetness.  If you're making chocolate cookies, you can do the same thing with cocoa.  I'm sharing my recipe below.  Please share one of yours!


German Christmas Cookies

3 cups all-purpose flour
1 1/2 cup sugar
1 tsp. cream of tartar
1 tsp. baking soda
1/8 tsp. salt
1/2 tsp. nutmeg
1 cup shortening
3 eggs, beaten
1 1/2 tsp. vanilla

Combine flour, sugar, cream of tartar, baking soda, salt and nutmeg; cut in shortening until mixture resembles coarse meal.  Add eggs and vanilla, mixing well.  Wrap dough in plastic wrap and chill in the refrigerator.

Roll dough to 1/8-inch thickness on a lightly floured surface; cut with cookie cutters.  Bake at 400° for 6 to 8 minutes or until lightly browned. Cool completely and spread with icing.

Icing:

3 cups sifted powdered sugar
2 Tbsp. light corn syrup
2 to 3 Tbsp. milk
1 tsp. vanilla
assorted liquid food coloring

Stir together sugar and corn syrup; stir in milk and vanilla to desired spreading consistency.  Divide into several small bowls; stir drops of a different food coloring into each.  Decorate cookies as desired.  When the icing dries, store cookies in an airtight container.

© Margaret's Morsels


November 30, 2010

Craving Chili

Pin It
Margaret's Morsels | Crock-Pot Chili

Earlier in the year, I wrote about the food I make as soon as the mercury starts rising.  There's also a food I look forward to making as soon as the mercury starts falling.  Nothing is better on a cold night than a bowl of homemade chili.  I love chili and would eat it year round, but my husband doesn't share my enthusiasm.  In fact, he refuses to eat chili until the temperature is lower than 60 degrees outside.  The weather finally cooled off and I was recently able to make my first batch of chili for the season.


There are a lot of variations when it comes to chili recipes.  There is white chili, also known as chicken chili, and the more traditional red chili.  Some recipes use beans; others don't.  Some use meat; others are meatless. Some are mild; some are three alarm hot!  I've even seen chili recipes that use cinnamon or chocolate.


For the first 15 years I was married, I made chili using my mother's recipe. It was a simple, yet tasty, recipe that only used five ingredients:  ground beef, chili seasoning, chicken broth, tomato sauce and chili beans.  Over the years my tastes changed and I wanted a chili recipe that had more texture and spice.


A couple of years ago, I was looking through a cookbook and found a chili recipe that sounded so good I went out and bought the ingredients that day.  The recipe used 2 1/2 times more ingredients than my mother's recipe so I was skeptical about the outcome.  I'm glad I decided to give the recipe a try because it's the only chili I make anymore.


Margaret's Morsels | Crock-Pot Chili
For more spice, use a can of chili ready diced tomatoes.

Whenever I make chili -- or any recipe that calls for ground beef -- I use ground chuck.  It's more expensive than ground beef, but it's also more flavorful.  I always use extra lean ground chuck which, at my grocery store, contains 97% meat and 3% fat.  It isn't a nonfat food, but it definitely lowers the amount of fat consumed.  Even though there's not a lot of grease when the meat is browned, I drain the meat before adding it to the other ingredients.


After the meat, onion and celery are browned, all the ingredients are combined in a crock-pot. To prevent cross contamination, I use one spatula when I brown the meat and another one when I mix the meat with the other ingredients.  The chili needs to be stirred occasionally while it's cooking.  I try not to stir it more than once an hour since heat escapes every time you remove the lid on the crock-pot.  The more you remove the lid, the longer it will take for the chili to cook.


Like most soups and stews, chili is better a day or two after it's cooked since the flavors have had time to blend.  I reheat the chili in the crock-pot, but you can also reheat it on the stove or in the microwave.  No matter which method you choose, check and see if you need to add some water to the chili before it's heated.


I like to give new life to leftovers so I use the chili another night for taco salad.  I put salad greens on the plate, ladle the heated chili on the salad and sprinkle shredded cheese on the top.  I put the plate in the microwave a few seconds, just long enough to melt the cheese.  To dress up the plate, I put tortilla chips around the salad.


Margaret's Morsels | Crock-Pot Chili


I hope the weather will be cool -- not cold -- this fall and winter so I can satisfy my craving for chili.  If not, I'll have to perform the experiment and see if my husband will eat chili on a day when it's warmer than 60.  I think he will because he likes chili more than he's willing to admit!

Crock-Pot Chili
6 Servings

1 lb. ground beef
1/2 cup diced onion
1/4 cup diced celery
1 (15 1/2 oz.) can kidney beans (undrained)
1 (15 1/2 oz.) can pinto beans (undrained)
1 (15 oz.) can tomato sauce
1 (14 1/2 oz.) can diced tomatoes (undrained)
1/4 cup diced green chilies, drained
1 tsp. cumin
1 tsp. black pepper
2 tsp. salt
2 Tbsp. chili powder
1 cup water

Brown beef with onion and celery.  Drain.  Combine all ingredients with beef in a crock-pot.  Stir.  Cook on high heat for 3 to 4 hours, stirring occasionally.


© Margaret's Morsels


November 24, 2010

The Saturday Special

Pin It
Margaret's Morsels | Super Simple Cinnamon Rolls


Like most working parents with school age kids, weekday mornings are hectic at our house.  My husband has to be at work at one time, I have to be at work at another and our son has to be at school between the two. This leaves little time for me to prepare a sit down family breakfast during the week.  It's a different story on the weekend.

Several years ago, I started fixing a family breakfast on Saturday mornings.  My son promptly dubbed this meal, "The Saturday Special."  I usually fix bacon, eggs and biscuits.  Sometimes I make waffles, quiche or a breakfast casserole.  Once in a while, though, my family wakes up to the smell of cinnamon rolls.

My favorite cinnamon roll recipe is called Super Simple Cinnamon Rolls. The name may be a tongue twister, but the dish truly is super simple! Instead of making the dough from scratch, the recipe starts with two cans of crescent rolls.  I use Pillsbury Recipe Creations seamless dough sheets instead.  The dough sheets may cost a little more, but this is one time I'll pay extra for the sake of convenience.  If you use crescent rolls, make sure to press the crescent rolls into a rectangle and seal any perforations or holes.

The dough is easier to work with when it's cold so I leave it in the refrigerator while I mix up the filling.  If you're like me and forget to soften the butter, you can put the wrapped butter in the microwave and heat it at 10% power for 10 seconds.  This is long enough to soften the butter without it melting.

Once the filling is mixed up, I open the first can of dough and spread it on a cutting board.  The filling goes on the dough and the second can of dough is placed over the filling.  Most cinnamon roll recipes call for the dough to be rolled jellyroll style, but not this one.  The dough is cut into nine strips instead.  The easiest way to do this is with a pizza wheel.  You can get straighter lines if you roll the wheel away from you when you cut the dough.  If you don't have a pizza wheel, you can use a knife instead.  After you cut the dough into strips, roll each strip into a coil.  The rolls turn out prettier if you tuck in the sides of the dough as you roll it into a coil.
Margaret's Morsels | Super Simple Cinnamon Rolls
Cut into strips with a pizza wheel.


Margaret's Morsels | Super Simple Cinnamon Rolls
Ready to be baked.

As soon as the rolls are in the oven, I start preparing the glaze which is also super simple.  It's a powdered sugar glaze, but with a twist.  In addition to powdered sugar and milk, it also has a tablespoon of butter. The addition of the butter gives the glaze a wonderful flavor.

It's a good idea to sift the powdered sugar so there won't be any lumps in the glaze.  When adding the milk, it's best to start with the least amount called for because it's easier to add more than take away too much.  Once the glaze is mixed up, I put it in a pastry bag.  If you don't have a pastry bag, you could use a disposable resealable plastic bag instead.  If you don't want to mess with a bag, you can always apply the glaze with a spoon.

Margaret's Morsels | Super Simple Cinnamon Rolls

When the rolls come out of the oven, I put the pan on a wire rack and let the rolls cool a few minutes before adding the glaze.  It you add the glaze when the rolls first come out of the oven, it melts.  I like to swirl the glaze around the coils, but you can apply it in any pattern you like.

The aroma of cinnamon rolls will be wafting upstairs tomorrow luring my family into the kitchen.  Once they're up and have eaten breakfast, they can help me with some last minute Thanksgiving preparations.  The Saturday special isn't only for Saturday!


Super Simple Cinnamon Rolls
9 Servings

Filling:

1/3 cup packed light brown sugar
1/3 cup powdered sugar
1 tsp. cinnamon
1/4 cup butter, softened

Rolls:

2 (8 oz.) cans Pillsbury Recipe Creations seamless dough sheets or crescent rolls

Glaze:

1 cup powdered sugar
1 Tbsp. butter, softened
2 to 3 Tbsp. milk

Preheat oven to 375°.  In a small bowl, mix all filling ingredients; set aside.

Unroll one can of dough into a large rectangle.  If using crescent rolls, firmly press perforations to seal.  Spread filling over the dough.  Unroll second can of dough into a large rectangle.  If using crescent rolls, firmly press perforations to seal.  Place dough over filling, pressing dough onto filling.  Cut dough into nine 13-inch strips.  Roll from one end to the other, shaping each piece into a coil.  Place in a greased 13 x 9 x 2-inch pan. Bake 20 to 25 minutes or until golden brown.  Remove from oven and place pan on a wire rack.

In a small bowl, combine all glaze ingredients, adding enough milk to make desired drizzling consistency.  Drizzle over warm rolls.  Serve warm.

© Margaret's Morsels