December 29, 2011

Store Bought or Homemade?

Pin It

There are a lot of recipes on the web that are supposed to replicate dishes served in restaurants.  There are also recipes for grocery store products such as Ritz crackers, Bisquick and sweetened condensed milk to name a few.

As someone who loves to cook, I like to think homemade is better than store bought.  However, I'm wondering if recipes for grocery store products are any good and, more importantly, are they worth the time and effort. Has anyone ever made any copycat grocery store recipes?  If so, were they as good as the original?  Would you make them again? 


© Margaret's Morsels

December 23, 2011

A Holiday Tradition

Pin It
Margaret's Morsels | Kool-Aid Punch

When I recall Christmas from my childhood, I may not always remember who was at the house a particular year or what presents I received, but I vividly remember three things:  a savory cheese ball coated with chili powder; a platter of German Christmas Cookies decorated with red, green, yellow and white icing; a punch bowl surrounded by a garland of poinsettias and filled with Kool-Aid punch.  My mother only made these goodies at Christmas which made them special.

I don't follow my mother's Christmas tradition -- I only make the cheese ball and punch every few years -- except for the Christmas cookies.  I've made these cookies every Christmas for the last 18 years.  Last Christmas, when my brother and his family visited from Atlanta, for old time's sake, I made all three items just like our mother did every Christmas.

The punch uses a package of cherry Kool-Aid which gives it a beautiful red hue that's perfect for Christmas.  If you prefer a green punch, use a package of lime Kool-Aid instead of cherry.

The easiest way to make the punch is with a clean gallon milk jug.  Pour the contents of the lemonade and cherry Kool-Aid packages in the jug, along with sugar and 2 cups water.  Put the lid on the jug and shake it to combine the ingredients.


Margaret's Morsels | Kool-Aid Punch

Add a large can of pineapple juice.


Margaret's Morsels | Kool-Aid Punch

Add water to completely fill the jug.


Margaret's Morsels | Kool-Aid Punch

Put on the lid, shake the jug to combine the ingredients and refrigerate until ready to use.  I make the punch a day or two ahead of time so it gets thoroughly chilled.

If you're not using a gallon jug, stir the ingredients thoroughly whenever the recipe calls for shaking the jug to combine the ingredients.  You'll need to add 7 1/2 cups water after you add the pineapple juice.

When my mother was ready to serve the punch, she poured it into a punch bowl and added a quart of pineapple sherbet.  The sherbet gave the punch a creamy consistency and the small chunks of pineapple added some texture.  I'm not a fan of sherbet or ice cream in punch so I leave it out. However, if you like sherbet, go ahead and add it to the punch bowl.  If you're using lime Kool-Aid, add a quart of lime sherbet instead of pineapple.  After you add the sherbet, stir in a can of chilled 7-Up.

Most punch recipes call for a carbonated beverage such as Sprite, ginger ale or 7-Up.  My mother tried all three beverages over the years, but the best punch was always made with 7-Up.  We only drink diet drinks, but this is one time we'll use the real thing.  You can still make the punch with diet 7-Up, but it's not as good.

To make sure the last glass of punch tastes as good as the first, add a quart of sherbet and a can of chilled 7-Up everytime you replenish the punch bowl.  If you're not using sherbet, just add the can of 7-Up.

Now that I'm a mother, I can appreciate why my mother only made these items at Christmas.  She knew not only was it something to look forward to, but something to look back on with fond memories that last a lifetime.  


Margaret's Morsels | Kool-Aid Punch
I serve the punch in the same punch bowl
my mother always used.


Kool-Aid Punch
18 Servings

1 (2 qt.) size pkg. unsweetened lemonade Kool-Aid
1 (2 qt.) size pkg. unsweetened cherry Kool-Aid
2 cups sugar
2 cups water
1 (46 oz.) can unsweetened pineapple juice
water (enough to fill the jug or 7 1/2 cups)
pineapple sherbet
12 oz. cans 7-Up, chilled

Put the first four ingredients in a clean gallon jug; shake to combine.  Add pineapple juice.  Finish filling the jug with water; shake well.  Chill in refrigerator until ready to use.  When ready to serve, pour mixture in a punch bowl.  Add 1 quart pineapple sherbet and 1 can 7-Up; stir gently. When replenishing the punch bowl, add another quart of sherbet and can of 7-Up.


© Margaret's Morsels

December 20, 2011

No Bake Snowman Cookies

Pin It
Margaret's Morsels | No Bake Snowman Cookies

I love giving gifts from the kitchen.  For years, I made chocolate covered Ritz cracker and peanut butter cookies to give people at Christmas. This year, I wanted to make something different and made the snowman cookies pictured above.  So many people asked me how I made them, I decided it would make a good topic for "Margaret's Morsels."

Previously, I wrote about using Nutter Butter cookies to make ghost cookies.  The snowman cookies start the same way, but with a few additional items added to make them look like a snowman.  The additional items need to be added while the coating is still wet.  Since you need to work quickly, it's a good idea to line up the ingredients in an assembly line.

Start by coating the Nutter Butters with melted white almond bark.  If you're not sure how to do that, click here to read how it's done.


Margaret's Morsels | No Bake Snowman Cookies

Put the cookies on a piece of wax paper.  While the coating is still wet, add two mini chocolate chips for the eyes,


Margaret's Morsels | No Bake Snowman Cookies

an orange Tic Tac for the nose


Margaret's Morsels | No Bake Snowman Cookies

and two mini M&M's for the buttons.

Margaret's Morsels | No Bake Snowman Cookies

For aesthetic reasons, I turn the pointed side of the chocolate chips down. I also turn the M&M's over so the "m" doesn't show.

Let the cookies dry completely.  If there's excess coating on the edges, you can break it off or, if it's stubborn, scrape it off with the dull side of a table knife.  Store the cookies in an airtight container.

You may be wondering why the scarves aren't on the cookies yet.  The first time I made these, I put the scarves on as soon as the cookies were dry. The next morning, I discovered half the scarves broke overnight.  Since then, I add the scarves when I'm ready to give away or serve the cookies.

The scarves are made from thin string licorice.  The only brand I could find, Twizzlers Peel and Pull, separates into thin strands.


Margaret's Morsels | No Bake Snowman Cookies

Tie a strand around each snowman, trimming any excess licorice with a pair of kitchen shears.


Margaret's Morsels | No Bake Snowman Cookies

If you prefer, you can use tubes of decorator icing to pipe on the eyes, noses, buttons and scarves.  Make sure to let the coating dry completely before you decorate the cookies.

The nice thing about snowman cookies is they're not limited to Christmas. You can make them all winter long.  I doubt many people would complain if you did!


© Margaret's Morsels

December 17, 2011

The Scent of Christmas

Pin It
Margaret's Morsels | Molasses Sugar Cookies

Nothing smells like Christmas more than the scent of a live Christmas tree. Unfortunately, we have an artificial tree so the only scent of Christmas at our house comes from the kitchen.  For me, the aroma of the spices in Molasses Sugar Cookies epitomizes Christmas.

One of my pet peeves is when I take molasses cookies to functions and people refer to them as "Gingersnaps."  Both cookies use molasses and ginger, but that is the extent of their similarity.  Gingersnaps are crisp cookies; molasses cookies are soft.  In addition to ginger, molasses cookies also use cinnamon and cloves.


Margaret's Morsels | Molasses Sugar Cookies
Molasses cookies are on the top row.
Gingersnaps are on the bottom row.

Molasses comes in light and dark varieties.  Light molasses is sweeter while dark molasses has more flavor and gives baked goods a darker color.   I prefer light molasses, but the two varieties can be interchanged so use whichever you prefer or have on hand.

If you don't use spices much during the year, it's a good idea to check them before you start baking.  If the spices have little or no aroma, throw them out.  If you can't smell them, you won't be able to taste them either.

The recipe is straightforward, but it does have a step not usually found in most cookie recipes.  The dry ingredients need to be sifted.  Sifting removes any lumps, helps blend ingredients and incorporates air which makes the ingredients lighter.

Over the years, friends have asked me how to tell if flour should be sifted before or after measuring.  If a recipe calls for 2 cups sifted flour, it means to sift the flour before it's measured.  If a recipe calls for 2 cups flour, sifted, it means to measure the flour before it's sifted.

Once the flour has been sifted and measured, I combine the remaining dry ingredients and sift them directly into the flour.  I use a fork or wire whisk to blend all the dry ingredients together.


Margaret's Morsels | Molasses Sugar Cookies

The dough is sticky so chill it in the refrigerator for an hour.  This makes it easier to handle and shape into balls.  Keep the dough refrigerated between batches.


Roll the balls in granulated sugar


Margaret's Morsels | Molasses Sugar Cookies

and place 2-inches apart -- they spread -- on a cookie sheet.


Margaret's Morsels | Molasses Sugar Cookies

When the cookies are done, leave them on the cookie sheet for about a minute and then transfer to a wire rack to cool completely.

The cookies are great for a Christmas cookie swap because the recipe makes four dozen cookies.  I also have it on good authority that Santa Claus likes finding a plate of these cookies and a glass of milk on Christmas Eve.


Molasses Sugar Cookies
4 Dozen

3/4 cup shortening
1 cup sugar
1/4 cup molasses
1 egg
2 cups sifted all-purpose flour
2 tsp. baking soda
1/2 tsp. cloves
1/2 tsp. ginger
1 tsp. cinnamon
1/2 tsp. salt
additional granulated sugar

Melt shortening and let cool.  Add sugar, molasses and egg; beat well.  Sift together flour, baking soda, cloves, ginger, cinnamon and salt; add to first mixture.  Mix well.  Chill dough in the refrigerator for an hour.  Form dough in 1-inch balls.  Roll balls in additional granulated sugar and place 2-inches apart on ungreased cookie sheets.  Bake at 375° for 8 to 10 minutes.


© Margaret's Morsels

December 12, 2011

Cookie Recipe Roundup

Pin It
Tis the season for holiday baking, cookie swaps and giving gifts from the kitchen.  Today, I want to share my previous cookie blogs, in case anyone's looking for a tried and true cookie recipe.  Later this week I'll be posting a cookie recipe that makes the house smell like Christmas.

Margaret's Morsels | Quick and Easy Lemon Bars

Quick and Easy Lemon Bars:  My most viewed blog to date.  The recipe definitely lives up to its name.  The cookies start with a package of lemon supreme cake mix.


German Christmas Cookies:  My mother made these cookies every year at Christmas.  I've carried on the tradition and make the cookies for my family.  I'm not sure what makes them German; they're more of a teacake.

Margaret's Morsels | Three Ingredient Peanut Butter Cookies

Award Winning Peanut Butter Cookies:  This recipe only uses three ingredients and it's gluten free!  The recipe can easily be doubled or tripled.


Margaret's Morsels | Chocolate Covered Ritz Cracker Cookies

Chocolate Covered Ritz Crackers and Peanut Butter:  What's better with peanut butter than chocolate?  These cookies may be simple, but people absolutely love them.  They make great gifts for the holidays.

Margaret's Morsels | Mexican Sugar Cookies

Mexican Sugar Cookies:  If you like cinnamon, you'll love these delicate, melt in your mouth cookies.  They're similar to Snickerdoodles, but with a double dose of cinnamon.

Margaret's Morsels | Chocolate Oatmeal Cookies

Chocolate Oatmeal Cookies:  Another cookie with the wonderful combination of chocolate and peanut butter.  The cookies can be dropped onto wax paper with a spoon or cut into squares.


© Margaret's Morsels


December 5, 2011

Soup's On

Pin It
Margaret's Morsels | Vegetable Soup

According to the recently retired food pyramid, we should eat 3 to 5 servings of vegetables a day.  A bowl of vegetable soup is a tasty way to get your vegetables.

I've tried several recipes for vegetable soup, but my favorite is my mother's recipe.  It's easy to prepare and can be adjusted to use ingredients you have on hand.

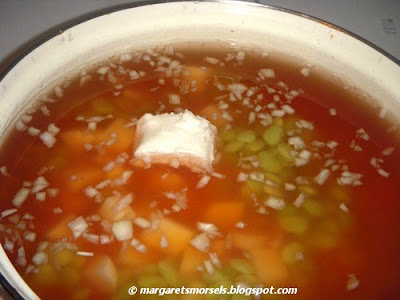
Unlike recipes that rely on beef or chicken broth, the liquid in this recipe comes from a can of crushed tomatoes.  The only other liquid added is water.  An easy way to get all the tomato juice out of the can is fill the can with water and add the contents to the pot.  Make sure to add enough water to cover the ingredients.

The recipe uses two whole potatoes diced into cubes.  If you want to speed up the cooking process, substitute canned potatoes.  Canned potatoes have already been cooked so adjust the cooking time accordingly.


Margaret's Morsels | Vegetable Soup
Two potatoes diced into cubes.

My mother insisted the secret to her vegetable soup was using a lot of chopped onion.  I'm not a big fan of onion so I only use half an onion -- more if the onion is small -- and the soup has always been delicious.  The original recipe called for two or three chopped onions so, if you like onions, add more or, like me, use less.


Margaret's Morsels | Vegetable Soup

My mother always added okra to her soup.  My husband doesn't like okra so I leave it out.  He doesn't like lima beans either, but I still add them, reducing the amount called for in the recipe.


Margaret's Morsels | Vegetable Soup

My mother always added a can of drained whole kernel corn, but I prefer a bag of frozen corn.  I think frozen corn tastes fresher.  Instead of adding the frozen corn at the beginning of the cooking process, I add it the last 30 minutes of cooking.  I add the whole 12 ounce bag, but you can add less, or like the okra, leave it out entirely.

Other vegetables -- canned, fresh or frozen -- can be added to suit your taste.  If the vegetables have already been cooked, they only need to be reheated so add them towards the end of the cooking time.

My mother added basil and salt to her soup.  I add salt and, when I remember it, freshly ground pepper.  Canned vegetables have a lot of salt so you may not need to add any additional salt.  Make sure whatever seasonings you choose aren't overpowering and go well with the vegetables you're using.

For reasons unknown to me, my mother always added one tablespoon of shortening.  Shortening has no flavor so I know she didn't add it to improve the taste of the soup.  Fat, such as shortening, is important in baking because it makes the finished product tender.  I don't know if that theory applies to vegetables in the soup.  I've made the soup with and without the shortening and, for whatever reason, it's definitely better with the shortening.


Margaret's Morsels | Vegetable Soup

If you want a heartier soup or want to stretch the number of servings, add some cooked meat.  My mother sometimes added leftover pot roast.  A friend adds browned ground beef to her vegetable soup.  Macaroni is another good filler.  Add the uncooked macaroni the last 20 minutes and cook until done.

Whether you follow the recipe or tweak it to use ingredients you like or have on hand, vegetable soup is a good start on your 3 to 5 servings of vegetables a day.

Vegetable Soup
6 to 8 Servings

1 (28 oz.) can crushed tomatoes
2 potatoes, diced into cubes
diced onion to taste
okra to taste
1 (10 oz.) pkg. frozen baby lima beans
water (enough to cover the ingredients)
1 Tbsp. shortening
salt to taste
1 (12 oz.) pkg. frozen whole kernel corn
cooked meat (optional)
uncooked macaroni (optional)

Combine the first eight ingredients in a large pot.  Cook uncovered on medium heat for 1 hour 20 minutes.  Thirty minutes before the end of cooking time, add the frozen corn.  Add meat and macaroni, if desired, the last  20 minutes of cooking.  Cook until the meat is heated and the macaroni cooked.


© Margaret's Morsels


November 22, 2011

No Bake Turkey Cookies

Pin It
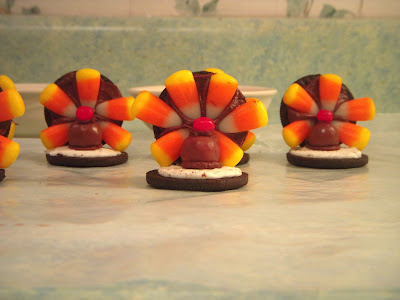
Margaret's Morsels | No Bake Turkey Cookies

I was looking through my recipe box the other day and came across the recipe for No Bake Turkey Cookies.  The last time I made these cookies, my son and his cousins were young kids.  A wave of nostalgia swept over me so I went to the store and bought the ingredients.

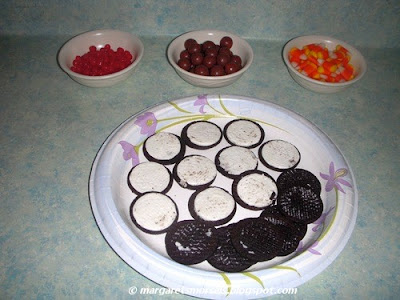
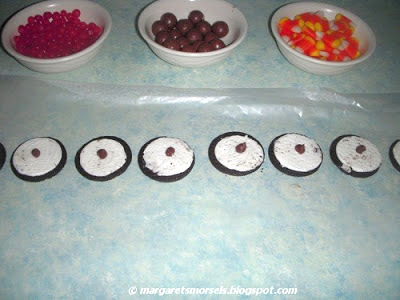
You start with these:


Margaret's Morsels | No Bake Turkey Cookies


and end up with these:


Margaret's Morsels | No Bake Turkey Cookies

The easiest way to make the cookies is to set everything up in an assembly line.  Put the malted milk balls in one bowl, red cinnamon candies in another and candy corn in yet another.  Take the cookies apart and separate the cream filled side from the plain side.


Margaret's Morsels | No Bake Turkey Cookies

Normally, when I work with frosting, I use a pastry bag.  Unfortunately, that doesn't work with this recipe.  Since a pastry bag is open on one end, it's difficult to keep the bag closed while assembling the pieces periodically. You can use a knife or, what I prefer, a decorating set.


Margaret's Morsels | No Bake Turkey Cookies

A decorating set is similar to a cookie press.  It has a tube that can be filled, in this case, with frosting.  Instead of having interchangeable discs like a cookie press, the tube has a coupler -- a device that lets you easily and quickly change tips -- with a pastry tip attached.  After the tube is filled with frosting and the handle attached, the frosting can be piped using as little or as much as you need.  I find this much easier to use than a knife, especially when I only need a dollop of frosting.

If you're making a large number of cookies, it's a good idea to make them in batches so the frosting doesn't dry before the cookies are assembled.  I work in batches of 10.

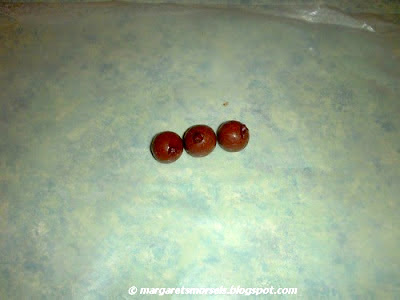
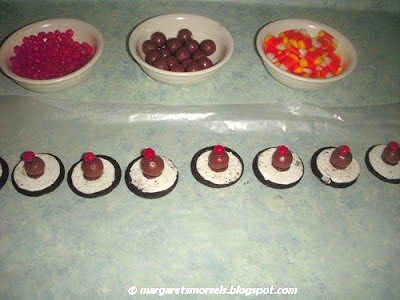
Line up the malted milk balls -- the turkey body -- and add a dollop of frosting to each one.


Margaret's Morsels | No Bake Turkey Cookies

Before the frosting dries, press a red cinnamon candy -- the turkey head -- into the frosting.


Margaret's Morsels | No Bake Turkey Cookies

While those pieces set up, add a dollop of frosting on the cream filled side of the cookies.


Margaret's Morsels | No Bake Turkey Cookies

Place a malted milk ball on top of the frosting, pressing down lightly so it adheres to the cookie.


Margaret's Morsels | No Bake Turkey Cookies

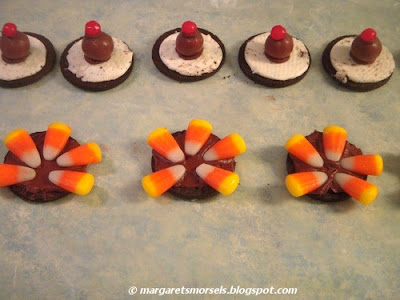
Spread frosting on the inside half of each cookie that does not have the cream filling.


Margaret's Morsels | No Bake Turkey Cookies

After the frosting is on the cookies, attach several pieces of candy corn for the tail.  I use five pieces per cookie, but add more if you have room or think it looks better.


Margaret's Morsels | No Bake Turkey Cookies

While the tails dry, add a dollop of frosting in the center of each turkey body.


Margaret's Morsels | No Bake Turkey Cookies

Attach the tail to the turkey body by pressing it against the frosting.


Margaret's Morsels | No Bake Turkey Cookies

Store the completed cookies in the refrigerator so the frosting doesn't get soft and the pieces fall off.

Kids love to help make these cookies and, more importantly, it's something they remember doing when they get older.  The cookies may not be gourmet or look picture perfect but, to me, making memories is what it's all about.


No Bake Turkey Cookies

cream filled chocolate sandwich cookies (one per turkey)
malted milk balls (one per turkey)
red cinnamon candies (one per turkey)
1 (16 oz.) container ready to spread chocolate frosting
1 (13 oz.) pkg. candy corn

Separate the cookies, leaving cream filling on one side; set cookie halves without filling aside.

Put a dollop of frosting on each malted milk ball -- turkey body -- and attach a red cinnamon candy -- turkey head.  Put a dollop of frosting in the center of each cookie half with cream filling.  Press the turkey body into the frosting.

Spread chocolate frosting on the inside of each cookie half that does not have cream filling.  Arrange candy corn -- turkey tail -- on the frosting.  Put a dollop of frosting behind the turkey body and attach the turkey tail.  Store cookies in the refrigerator.


© Margaret's Morsels

November 18, 2011

Countdown to Thanksgiving

Pin It
Margaret's Morsels | Sweet Potato Souffle


Thanksgiving is less than a week away.  If you're looking for a good recipe for a side dish, I've got a great one to share.  Not only is it easy to prepare, it can be made ahead of time.

Last year, I posted a recipe for Quick and Easy Candied Sweet Potatoes.  Today, I want to share a recipe for Sweet Potato Souffle, which is a fancy name for sweet potato casserole.  The name isn't the only thing that's different.  Unlike many sweet potato casseroles, this one doesn't use nuts or marshmallows on top.  In fact, it doesn't have a topping at all.

Sweet potatoes are available year round, but they're most plentiful September through December.  Choose potatoes with smooth skin and no bruises or blemishes.  Small to medium size sweet potatoes are best because they're tender and sweeter and not as stringy as large sweet potatoes.


The cooking process starts out the same as potato salad, except you don't add salt to the water.  Peel the potatoes and cut them into cubes. Put the cubes in a saucepan and cover with cold water; bring the water to a boil.  Reduce the heat to medium-low and cook for 20 to 30 minutes or until the potatoes are tender.  The cooking time depends on the size and thickness of the cubes.

Drain off the water and mash the potatoes with an electric mixer.  If the potatoes are stringy, the strings should stick to the beaters.  Don't scrape the leftover mixture on the beaters into the bowl.  If you notice any strings in the mashed mixture, remove them before adding the remaining ingredients.


Margaret's Morsels | Sweet Potato Souffle
Notice the strings on the beaters.

If you're short on time, you can skip the previous steps and substitute a 24 ounce package of Ore-Ida Steam n' Mash cut sweet potatoes, following the cooking directions on the package.  I've prepared the casserole with the Ore-Ida potatoes and no one could tell the difference.


Margaret's Morsels | Sweet Potato Souffle

Mix the potatoes and remaining ingredients with an electric mixer until smooth.  Spoon the mixture into a lightly greased 2-quart casserole dish.  I use a round Corning Ware dish which is sometimes referred to as a souffle dish.  Bake the casserole for 30 minutes until heated through and bubbly.

To save time, prepare the dish a day or two ahead of time.  Cool the casserole completely, leaving it in the dish it was baked in, and cover with foil before refrigerating.  By leaving the casserole in the dish you baked it in, when you reheat it no one will know it wasn't prepared that day.

To reheat the casserole, remove the foil and heat in the microwave until heated through, about 20 minutes.  If there's room in the oven, you can reheat the dish in there.  Leave the dish covered with foil and reheat it from 350° to 450° with whatever else you already have cooking in the oven. Adjust the heating time according to the temperature of the oven.  The higher the temperature, the less time it takes to reheat.

You're probably wondering if you can put nuts or marshmallows on top like other sweet potato casseroles.  I don't see why you couldn't, but I don't recommend it.  The casserole is light and airy and best eaten and enjoyed in its unadulterated form.  


Sweet Potato Souffle
6 to 8 Servings

6 small sweet potatoes (about 3 lb.)*
3/4 cup sugar
3 eggs, lightly beaten
1/2 cup butter or margarine, melted
3 Tbsp. milk
2 tsp. nutmeg
2 tsp. vanilla

Peel sweet potatoes and cut into cubes.  Cover with cold water and bring to a boil.  Reduce heat to medium-low and cook for 20 to 30 minutes or until the potatoes are tender.  Drain water and mash the potatoes with an electric mixer.  Combine sweet potatoes and remaining ingredients, mixing with an electric mixer until smooth.  Spoon mixture into a lightly greased 2-quart baking dish.  Bake at 350° for 30 minutes or until bubbly. 

*One 24 ounce package Ore-Ida Steam n' Mash cut sweet potatoes can be substituted.  Prepare potatoes following package directions.  Proceed as directed.


© Margaret's Morsels

November 15, 2011

Stuffing or Dressing?

Pin It
Margaret's Morsels | Cornbread Dressing

For many people, the centerpiece of the Thanksgiving table is a succulent roast turkey.  For others, the most highly anticipated dish is the dressing. There are two schools of thought when it comes to this versatile side dish: stuffing or dressing.  Some people say they're the same, but they're not.

The most obvious difference is stuffing is, well, stuffed in the turkey and baked.  Dressing, on the other hand, is baked separately in a pan.  Stuffing tends to be more common north of the Mason-Dixon line and dressing more common in the South.  People in some parts of the country use white or wheat bread as the base whereas Southerners use cornbread.

A typical recipe for Southern dressing includes cornbread, white bread -- usually biscuits -- celery, onion, chicken broth, poultry seasoning, sage, salt, pepper, eggs and, if you cook the vegetables, butter.  Additional ingredients vary depending on which region of the country you reside. Common additions include oysters, rice, sausage, turkey giblets, dried cherries, cranberries, pecans and almonds.

For years, I made cornbread dressing using my mother's recipe.  Although the dressing was good, it was never as good as what my mother always prepared.  A couple of years ago, one of my nieces made the best cornbread dressing I'd ever tasted.  She shared the recipe with me and it has since become a staple on my holiday table.  The recipe makes a lot so be sure to use a big mixing bowl.  I don't have a mixing bowl big enough so I mix everything in my biggest stockpot.


Margaret's Morsels | Cornbread Dressing


The recipe uses the ingredients listed above for Southern dressing, but with two notable differences.  First, the recipe uses cornbread and Mexican cornbread.  The Mexican cornbread adds additional flavor without any additional work.  Second, in addition to chicken stock, the recipe also uses milk.

To save time, I bake the cornbread and biscuits the day before and store them in a covered container.  When I'm ready to assemble the dressing, I use a food processor to chop the cornbread and biscuits into very fine crumbs.  If you don't have a food processor, grate the bread into crumbs using a hand or box grater.  No matter which method you use, you want the crumbs to look like this:


Margaret's Morsels | Cornbread Dressing
Crumbs made with the cornbread.

If you've got a food processor, use it to chop the onions and celery too. They also need to be chopped very fine which, of course, you can also do with a knife.


Margaret's Morsels | Cornbread Dressing

Once everything is chopped, cooked and combined, add milk to the dressing until it's the consistency of a thick cake batter.  Don't add too much milk; you don't want the dressing to be soupy.


Margaret's Morsels | Cornbread Dressing
The dressing after the milk has been added.

When all the ingredients are combined, there's enough dressing to fill a 13 x 9 x 2-inch pan and a 9-inch pan.  Bake the dressing 45 minutes covered with foil; remove the foil and bake an additional 15 minutes to brown the top.


Margaret's Morsels | Cornbread Dressing

The house smells so good while the dressing bakes.  To dressing aficionados, the dressing makes the house smell like Thanksgiving more so than the turkey!

Cornbread Dressing
8 to 12 Servings

1 (6.5 oz.) pkg. yellow cornbread mix
1 (6 oz.) pkg. Mexican cornbread mix
15 biscuits (canned, frozen or homemade)
1 stick butter
3 onions, finely chopped
6 celery stalks, finely chopped
6 eggs, beaten
2 tsp. salt
pepper to taste
2 tsp. poultry seasoning
4 tsp. sage
1 (32 oz.) box chicken broth
1 (14 oz.) can chicken broth
milk

Cook cornbread and biscuits; cool.  Chop into very fine crumbs using a food processor.  Mix to evenly distribute.  Chop onions and celery in a food processor.  Melt butter and cook onions and celery for about 15 minutes until wilted.

Add eggs to the bread crumbs.  Stir in salt, pepper, poultry seasoning and sage.  Stir well; mixture will be very thick.  Stir in cooked vegetables.  Add chicken broth, adding additional broth, if necessary.  Add milk so the mixture is the consistency of thick cake batter. 

Pour mixture into a greased 13 x 9 x 2-inch pan and a greased 9-inch square pan.  Cover each pan with foil and bake at 350° for 45 minutes. Remove foil and bake for 15 minutes to brown the top. 


© Margaret's Morsels