November 22, 2011

No Bake Turkey Cookies

Pin It
Margaret's Morsels | No Bake Turkey Cookies

I was looking through my recipe box the other day and came across the recipe for No Bake Turkey Cookies.  The last time I made these cookies, my son and his cousins were young kids.  A wave of nostalgia swept over me so I went to the store and bought the ingredients.

You start with these:


Margaret's Morsels | No Bake Turkey Cookies


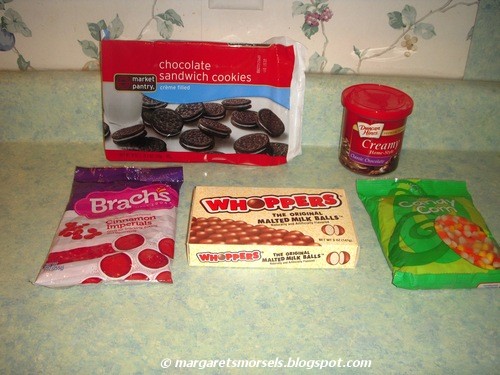
and end up with these:


Margaret's Morsels | No Bake Turkey Cookies

The easiest way to make the cookies is to set everything up in an assembly line.  Put the malted milk balls in one bowl, red cinnamon candies in another and candy corn in yet another.  Take the cookies apart and separate the cream filled side from the plain side.


Margaret's Morsels | No Bake Turkey Cookies

Normally, when I work with frosting, I use a pastry bag.  Unfortunately, that doesn't work with this recipe.  Since a pastry bag is open on one end, it's difficult to keep the bag closed while assembling the pieces periodically. You can use a knife or, what I prefer, a decorating set.


Margaret's Morsels | No Bake Turkey Cookies

A decorating set is similar to a cookie press.  It has a tube that can be filled, in this case, with frosting.  Instead of having interchangeable discs like a cookie press, the tube has a coupler -- a device that lets you easily and quickly change tips -- with a pastry tip attached.  After the tube is filled with frosting and the handle attached, the frosting can be piped using as little or as much as you need.  I find this much easier to use than a knife, especially when I only need a dollop of frosting.

If you're making a large number of cookies, it's a good idea to make them in batches so the frosting doesn't dry before the cookies are assembled.  I work in batches of 10.

Line up the malted milk balls -- the turkey body -- and add a dollop of frosting to each one.


Margaret's Morsels | No Bake Turkey Cookies

Before the frosting dries, press a red cinnamon candy -- the turkey head -- into the frosting.


Margaret's Morsels | No Bake Turkey Cookies

While those pieces set up, add a dollop of frosting on the cream filled side of the cookies.


Margaret's Morsels | No Bake Turkey Cookies

Place a malted milk ball on top of the frosting, pressing down lightly so it adheres to the cookie.


Margaret's Morsels | No Bake Turkey Cookies

Spread frosting on the inside half of each cookie that does not have the cream filling.


Margaret's Morsels | No Bake Turkey Cookies

After the frosting is on the cookies, attach several pieces of candy corn for the tail.  I use five pieces per cookie, but add more if you have room or think it looks better.


Margaret's Morsels | No Bake Turkey Cookies

While the tails dry, add a dollop of frosting in the center of each turkey body.


Margaret's Morsels | No Bake Turkey Cookies

Attach the tail to the turkey body by pressing it against the frosting.


Margaret's Morsels | No Bake Turkey Cookies

Store the completed cookies in the refrigerator so the frosting doesn't get soft and the pieces fall off.

Kids love to help make these cookies and, more importantly, it's something they remember doing when they get older.  The cookies may not be gourmet or look picture perfect but, to me, making memories is what it's all about.


No Bake Turkey Cookies

cream filled chocolate sandwich cookies (one per turkey)
malted milk balls (one per turkey)
red cinnamon candies (one per turkey)
1 (16 oz.) container ready to spread chocolate frosting
1 (13 oz.) pkg. candy corn

Separate the cookies, leaving cream filling on one side; set cookie halves without filling aside.

Put a dollop of frosting on each malted milk ball -- turkey body -- and attach a red cinnamon candy -- turkey head.  Put a dollop of frosting in the center of each cookie half with cream filling.  Press the turkey body into the frosting.

Spread chocolate frosting on the inside of each cookie half that does not have cream filling.  Arrange candy corn -- turkey tail -- on the frosting.  Put a dollop of frosting behind the turkey body and attach the turkey tail.  Store cookies in the refrigerator.


© Margaret's Morsels

November 18, 2011

Countdown to Thanksgiving

Pin It
Margaret's Morsels | Sweet Potato Souffle


Thanksgiving is less than a week away.  If you're looking for a good recipe for a side dish, I've got a great one to share.  Not only is it easy to prepare, it can be made ahead of time.

Last year, I posted a recipe for Quick and Easy Candied Sweet Potatoes.  Today, I want to share a recipe for Sweet Potato Souffle, which is a fancy name for sweet potato casserole.  The name isn't the only thing that's different.  Unlike many sweet potato casseroles, this one doesn't use nuts or marshmallows on top.  In fact, it doesn't have a topping at all.

Sweet potatoes are available year round, but they're most plentiful September through December.  Choose potatoes with smooth skin and no bruises or blemishes.  Small to medium size sweet potatoes are best because they're tender and sweeter and not as stringy as large sweet potatoes.


The cooking process starts out the same as potato salad, except you don't add salt to the water.  Peel the potatoes and cut them into cubes. Put the cubes in a saucepan and cover with cold water; bring the water to a boil.  Reduce the heat to medium-low and cook for 20 to 30 minutes or until the potatoes are tender.  The cooking time depends on the size and thickness of the cubes.

Drain off the water and mash the potatoes with an electric mixer.  If the potatoes are stringy, the strings should stick to the beaters.  Don't scrape the leftover mixture on the beaters into the bowl.  If you notice any strings in the mashed mixture, remove them before adding the remaining ingredients.


Margaret's Morsels | Sweet Potato Souffle
Notice the strings on the beaters.

If you're short on time, you can skip the previous steps and substitute a 24 ounce package of Ore-Ida Steam n' Mash cut sweet potatoes, following the cooking directions on the package.  I've prepared the casserole with the Ore-Ida potatoes and no one could tell the difference.


Margaret's Morsels | Sweet Potato Souffle

Mix the potatoes and remaining ingredients with an electric mixer until smooth.  Spoon the mixture into a lightly greased 2-quart casserole dish.  I use a round Corning Ware dish which is sometimes referred to as a souffle dish.  Bake the casserole for 30 minutes until heated through and bubbly.

To save time, prepare the dish a day or two ahead of time.  Cool the casserole completely, leaving it in the dish it was baked in, and cover with foil before refrigerating.  By leaving the casserole in the dish you baked it in, when you reheat it no one will know it wasn't prepared that day.

To reheat the casserole, remove the foil and heat in the microwave until heated through, about 20 minutes.  If there's room in the oven, you can reheat the dish in there.  Leave the dish covered with foil and reheat it from 350° to 450° with whatever else you already have cooking in the oven. Adjust the heating time according to the temperature of the oven.  The higher the temperature, the less time it takes to reheat.

You're probably wondering if you can put nuts or marshmallows on top like other sweet potato casseroles.  I don't see why you couldn't, but I don't recommend it.  The casserole is light and airy and best eaten and enjoyed in its unadulterated form.  


Sweet Potato Souffle
6 to 8 Servings

6 small sweet potatoes (about 3 lb.)*
3/4 cup sugar
3 eggs, lightly beaten
1/2 cup butter or margarine, melted
3 Tbsp. milk
2 tsp. nutmeg
2 tsp. vanilla

Peel sweet potatoes and cut into cubes.  Cover with cold water and bring to a boil.  Reduce heat to medium-low and cook for 20 to 30 minutes or until the potatoes are tender.  Drain water and mash the potatoes with an electric mixer.  Combine sweet potatoes and remaining ingredients, mixing with an electric mixer until smooth.  Spoon mixture into a lightly greased 2-quart baking dish.  Bake at 350° for 30 minutes or until bubbly. 

*One 24 ounce package Ore-Ida Steam n' Mash cut sweet potatoes can be substituted.  Prepare potatoes following package directions.  Proceed as directed.


© Margaret's Morsels

November 15, 2011

Stuffing or Dressing?

Pin It
Margaret's Morsels | Cornbread Dressing

For many people, the centerpiece of the Thanksgiving table is a succulent roast turkey.  For others, the most highly anticipated dish is the dressing. There are two schools of thought when it comes to this versatile side dish: stuffing or dressing.  Some people say they're the same, but they're not.

The most obvious difference is stuffing is, well, stuffed in the turkey and baked.  Dressing, on the other hand, is baked separately in a pan.  Stuffing tends to be more common north of the Mason-Dixon line and dressing more common in the South.  People in some parts of the country use white or wheat bread as the base whereas Southerners use cornbread.

A typical recipe for Southern dressing includes cornbread, white bread -- usually biscuits -- celery, onion, chicken broth, poultry seasoning, sage, salt, pepper, eggs and, if you cook the vegetables, butter.  Additional ingredients vary depending on which region of the country you reside. Common additions include oysters, rice, sausage, turkey giblets, dried cherries, cranberries, pecans and almonds.

For years, I made cornbread dressing using my mother's recipe.  Although the dressing was good, it was never as good as what my mother always prepared.  A couple of years ago, one of my nieces made the best cornbread dressing I'd ever tasted.  She shared the recipe with me and it has since become a staple on my holiday table.  The recipe makes a lot so be sure to use a big mixing bowl.  I don't have a mixing bowl big enough so I mix everything in my biggest stockpot.


Margaret's Morsels | Cornbread Dressing


The recipe uses the ingredients listed above for Southern dressing, but with two notable differences.  First, the recipe uses cornbread and Mexican cornbread.  The Mexican cornbread adds additional flavor without any additional work.  Second, in addition to chicken stock, the recipe also uses milk.

To save time, I bake the cornbread and biscuits the day before and store them in a covered container.  When I'm ready to assemble the dressing, I use a food processor to chop the cornbread and biscuits into very fine crumbs.  If you don't have a food processor, grate the bread into crumbs using a hand or box grater.  No matter which method you use, you want the crumbs to look like this:


Margaret's Morsels | Cornbread Dressing
Crumbs made with the cornbread.

If you've got a food processor, use it to chop the onions and celery too. They also need to be chopped very fine which, of course, you can also do with a knife.


Margaret's Morsels | Cornbread Dressing

Once everything is chopped, cooked and combined, add milk to the dressing until it's the consistency of a thick cake batter.  Don't add too much milk; you don't want the dressing to be soupy.


Margaret's Morsels | Cornbread Dressing
The dressing after the milk has been added.

When all the ingredients are combined, there's enough dressing to fill a 13 x 9 x 2-inch pan and a 9-inch pan.  Bake the dressing 45 minutes covered with foil; remove the foil and bake an additional 15 minutes to brown the top.


Margaret's Morsels | Cornbread Dressing

The house smells so good while the dressing bakes.  To dressing aficionados, the dressing makes the house smell like Thanksgiving more so than the turkey!


Cornbread Dressing
8 to 12 Servings

1 (6.5 oz.) pkg. yellow cornbread mix
1 (6 oz.) pkg. Mexican cornbread mix
15 biscuits (canned, frozen or homemade)
1 stick butter
3 onions, finely chopped
6 celery stalks, finely chopped
6 eggs, beaten
2 tsp. salt
pepper to taste
2 tsp. poultry seasoning
4 tsp. sage
1 (32 oz.) box chicken broth
1 (14 oz.) can chicken broth
milk

Cook cornbread and biscuits; cool.  Chop into very fine crumbs using a food processor.  Mix to evenly distribute.  Chop onions and celery in a food processor.  Melt butter and cook onions and celery for about 15 minutes until wilted.

Add eggs to the bread crumbs.  Stir in salt, pepper, poultry seasoning and sage.  Stir well; mixture will be very thick.  Stir in cooked vegetables.  Add chicken broth, adding additional broth, if necessary.  Add milk so the mixture is the consistency of thick cake batter. 

Pour mixture into a greased 13 x 9 x 2-inch pan and a greased 9-inch square pan.  Cover each pan with foil and bake at 350° for 45 minutes. Remove foil and bake for 15 minutes to brown the top. 


© Margaret's Morsels

November 10, 2011

Assemble Today, Bake Tomorrow

Pin It
Margaret's Morsels | French Toast Souffle

It's nice to have a wide variety of recipes to choose from:  family favorites handed down through the generations; crock-pot recipes that cook all day; recipes that can be prepared in 30 minutes or less; recipes for comfort food that nourish the body and soothe the soul; recipes that can be assembled the night before and baked the next day.  The last category is a real timesaver, especially when you want to serve a nice breakfast.

Although not a souffle in the traditional sense, French Toast Souffle is a light airy dish that elevates French toast from ordinary to extraordinary. Although the word "souffle" may sound intimidating, this recipe is really easy to prepare.  You don't even need a souffle dish.  It's baked in a 13 x 9 x 2-inch baking dish.

Start by cooking a combination of brown sugar, butter and corn syrup in a saucepan.  If you've never worked with cooked sugar before, take it from me, it's hot.  I have the scar to prove it!  Don't touch the mixture with your hands and try to avoid splatters.  Pour the mixture in the baking dish, spreading it to cover the bottom completely.  It hardens fast so work quickly.


Margaret's Morsels | French Toast Souffle


The original recipe used a loaf of cinnamon bread cut into 1-inch thick slices.  I've never been able to find unsliced cinnamon bread so I substitute a loaf of sliced cinnamon bread.  Since the slices are thin, I use two slices for each serving.  Stack the bread on top of the brown sugar mixture, inserting a toothpick in each serving to hold the two slices together.

The remaining ingredients -- eggs, half and half, vanilla and salt -- are combined and poured over the bread.  For additional flavor, a dash of cinnamon can be added to the mixture, if desired.  Cover the pan and put it in the refrigerator overnight.

The next morning, remove the pan from the refrigerator and let it stand at room temperature while the oven preheats.


Margaret's Morsels | French Toast Souffle
This is what it looks like after being
refrigerated overnight.

It takes 40 to 45 minutes for the souffle to cook, but it's worth the wait! When cooked, the brown sugar mixture melts and becomes a delicious sauce that can be spooned over the French toast in place of syrup.


Margaret's Morsels | French Toast Souffle

Add some bacon and fresh fruit and you've got a meal that everyone will think you spent hours preparing!


French Toast Souffle
6 Servings

1 cup packed brown sugar
1/2 cup butter
2 Tbsp. light corn syrup
12 pieces sliced cinnamon bread 
8 eggs, beaten
3 cups half and half or light cream
2 tsp. vanilla
1/2 tsp. salt
dash of cinnamon (optional)

In a medium saucepan, combine the brown sugar, butter and corn syrup; cook and stir until the mixture comes to a boil.  Boil uncovered 1 minute. Pour into a 13 x 9 x 2-inch baking dish, spreading to cover the bottom evenly.  Arrange bread, two slices per serving, on top of the brown sugar mixture, inserting a toothpick to hold the slices together.  In a bowl, combine the remaining ingredients; pour over bread slices.  Cover and refrigerate overnight.

Preheat the oven to 350°.  Let the baking dish stand at room temperature while the oven preheats.  Bake uncovered for 40 to 45 minutes, or until the top is browned and puffed and a knife inserted near the center comes out clean.  Remove toothpicks before serving.  Refrigerate leftovers.


© Margaret's Morsels


November 4, 2011

Awesome Apples

Pin It

Margaret's Morsels | Baked Apples

I love this time of year.  Days are cool and nights are crisp, leaves turn to vivid shades of yellow, orange and red and newly harvested apples are arriving at the grocery store.

Although available year round, apples have a season just like other fruits and vegetables.  Fall is apple season.  Apples that aren't sold right away go into storage and are sold throughout the year.  Compare apples sold in the summer to ones sold in the fall.  You'll be able to see and taste the difference.

Baked apples are wonderful year round, but they're especially delicious made with apples fresh from the orchard.  Start by selecting all-purpose or baking apples -- they retain their shape and don't turn mushy when baked -- that are firm and free of bruises and blemishes.  Although I use a combination of apples when I bake a pie, I stick with one variety -- Rome -- for baked apples.  You'll also get good results with Empire, Golden Delicious, Granny Smith or McIntosh apples.

Unlike apples that are baked whole, this recipe uses sliced apples.  This reduces the cooking time and puts the finished dish on the table in less than 30 minutes.  I use an apple wedger to core and slice each apple into eight equal pieces.


Margaret's Morsels | Baked Apples

If you don't have one of these handy gadgets, slice the apples as close to the same size as possible to ensure even coooking.  Toss the apples with lemon juice to prevent them from turning brown and place them -- this is important -- cut side down in a baking dish.


Margaret's Morsels | Baked Apples

The remaining ingredients are heated and poured over the sliced apples. The apples are baked for 10 minutes and then turned over, cut side up. This is easy to do since all the apples are turned the same way at the beginning of the cooking process.


Margaret's Morsels | Baked Apples
Turned over after cooking 10 minutes.

Continue baking until the apples are tender, about 8 to 10 more minutes.  I test the apples with the tip of a knife.  If the apples aren't tender, I bake them a few more minutes.

Margaret's Morsels | Baked Apples

I like to serve baked apples as a side dish with sauteed pork chops.  They can also be served warm as a dessert with a scoop of ice cream, if desired.   


Margaret's Morsels | Baked Apples


Whether you fix baked apples, apple pie or eat apples straight from the refrigerator, they're most flavorful and juicy when they're in season.

Baked Apples
4 Servings

3 large Rome apples, peeled, cored and sliced into eighths
2 Tbsp. lemon juice
2/3 cup apple juice
2/3 cup light brown sugar
2 Tbsp. butter or margarine
1/4 tsp. ground cinnamon

In a large glass dish, toss apples with lemon juice.  Rearrange apples cut side down; set aside.  In a small saucepan, combine the remaining ingredients.  Cook over medium-high heat until the sugar dissolves and butter melts.  Pour the mixture over the apples.  Bake at 400° for 10 minutes; turn apples over.  Bake until tender, about 8 to 10 more minutes. Serve warm.


© Margaret's Morsels