June 23, 2011

Jello without the Jiggle

Pin It
Margaret's Morsels | Lime Jello Salad

Every year on the fourth Sunday in June, my father-in-law's relatives have a family reunion at a state park two hours from our house.  The first couple of years I attended, I prepared and took an entree.  Unfortunately, no matter what kind of container I put the food in or how well I wrapped it, the food was lukewarm after the long drive.

After some trial and error, my husband and I came up with the perfect solution.  We stop and buy a bucket of chicken at a restaurant 15 minutes from the park.  I prepare a dessert that can withstand the drive and a side dish that is kept in the cooler until it's time to eat.

I vary the dessert from year to year, but I always take the same side dish:  Lime Jello Salad.   It's an easy dish to transport and can easily be doubled.  Although it uses jello, it's not a congealed salad.

The recipe is a combination of lime jello, cottage cheese, crushed pineapple and Cool Whip.  I use sugar-free jello and lite Cool Whip, but you can use regular versions or a combination of the ingredients.

Margaret's Morsels | Lime Jello Salad

Start by combining the dry jello with the cottage cheese.

Margaret's Morsels | Lime Jello Salad

Once it's thoroughly combined, stir in the drained pineapple and fold in the Cool Whip.  If you want a brighter green, add a few drops of green food coloring.

The recipe is versatile and can be made with other flavors of jello and fruit.  It's delicious made with orange jello instead of lime and a can of drained mandarin oranges.

Lime jello salad makes a cold side dish good on a hot summer day, but it's good year round.  It makes a festive green dish for St. Patrick's Day and, according to my husband and son, is much better than corned beef and cabbage.

Lime Jello Salad
6 Servings

1 (12 oz.) carton cottage cheese
1 (3 oz.) pkg. lime jello
1 (20 oz.) can crushed pineapple, drained
1 (8 oz.) carton Cool Whip, thawed
green food coloring (optional)

Mix cottage cheese with dry jello.  Add pineapple; mix well.  Fold in Cool Whip.  Add a few drops of green food coloring, if desired.  Keep refrigerated.

© Margaret's Morsels

June 20, 2011

Dressing it Up

Pin It
Margaret's Morsels | French Dressing

When I was a child, the only salad dressing I liked was French dressing.  As I got older, I developed a more sophisticated palate.  I now eat a variety of dressings, including honey mustard, Italian and roasted red pepper to name a few.  I still like French dressing, but it is not one of my husband's favorites.  Unless we have company, a bottle of French dressing sits in the refrigerator for a long time.

To solve the problem of leftover French dressing, I decided to make my own.  This was harder than I thought since there are a lot of recipes for French dressing.  It took a few tries, but I finally found a recipe I like and my husband likes too.  It only makes a few servings so there's not a lot left over.

Unlike some recipes for French dressing, this one only uses six ingredients.  There's no chopping -- only measuring -- so it only takes a few minutes to prepare.  You can eat it the day it's made, but it's better made a day ahead of time so the flavors have time to blend.

Margaret's Morsels | French Dressing

Like many dressing recipes, this contains oil and vinegar.  The recipe specified vegetable oil which is an edible oil made from vegetables, nuts or seeds.  Canola, corn, olive, peanut, safflower and sesame are some of the vegetable oils available.  I always use canola for two reasons.  One, it's healthier than some oils.  Two, it doesn't have a strong flavor.

The recipe didn't specify a type of vinegar so I use apple cider vinegar.  Unlike distilled white vinegar that is extremely sour, apple cider vinegar has a fruit flavor.  Strongly flavored oil and vinegar can overpower the tangy sweet flavor of the dressing, so choose your ingredients accordingly.

Other than the ingredients, the only thing you need is a container with a tight fitting lid; I use a jar.  Put the ingredients in the container, seal and shake until the ingredients are thoroughly combined.  Store the dressing in the refrigerator, shaking well before use.

Margaret's Morsels | French Dressing

The dressing is easy to make and tastes so fresh, you won't want to use bottled French dressing again!

French Dressing
6 Servings

1/4 cup plus 2 Tbsp. vegetable oil
1/4 cup sugar
2 Tbsp. vinegar
2 Tbsp. catsup
1/8 tsp. salt
dash of garlic powder

Combine ingredients in a container with a tight fitting lid; shake well.  Refrigerate any leftovers.

This is better made a day ahead of time.


© Margaret's Morsels

June 15, 2011

Grilled to Perfection

Pin It
Margaret's Morsels | Grilled Peppered Steaks


Every spring when gas grills start appearing in stores, my husband and I discuss whether or not we should buy one.  We know, thanks to friends with gas grills, how good food is when cooked outdoors.  However, neither one of us grew up in families that grilled so we're not sure we'd use a grill enough to justify the expense.


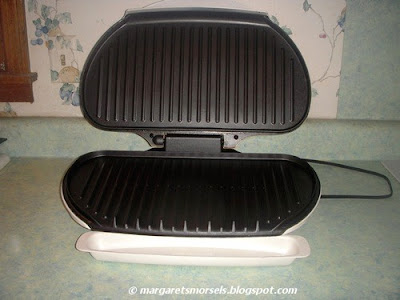
Although we don't own a gas grill, we do have a George Foreman electric countertop grill.  Unlike a gas grill, it has a slope so fat drains from the food.  It's also a contact grill so food cooks on the top and bottom at the same time, eliminating the need to turn food over.


Margaret's Morsels | Grilled Peppered Steaks
My George Foreman grill.

One of my favorite recipes to grill is Grilled Peppered Steaks.  Although I cook it on my George Foreman grill, it can be cooked on a gas or charcoal grill.


When it comes to grilling steaks, choose ones that are 1 to 1 1/2-inches thick.  Thinner steaks can dry out during the grilling time.  Four steaks that are good for grilling are:
  • Rib-eye:  A rib steak with the bone removed that's tender, juicy and flavorful.
  • T-Bone:  This tender steak, named for its shape, has a T shaped bone with meat on each side.  The larger side is strip steak; the smaller side is tenderloin.
  • Porterhouse:  A huge T-bone, except it has a larger tenderloin. It is one of the most expensive steaks.
  • New York Strip:  A tender and flavorful cut of meat known in some parts of the country as strip loin, shell steak or Kansas City steak.

Margaret's Morsels | Grilled Peppered Steaks
I always use New York strip steak.

Remove the steaks from the refrigerator 30 to 60 minutes before you're ready to cook.  Room temperature meat cooks more evenly and browns better than cold meat.  While the meat is coming to room temperature, combine the ingredients for the dry rub.

A dry rub is a combination of spices, seasonings and herbs that is put on the meat before it's cooked.  The rub infuses the meat with flavor which intensifies during cooking.  The rub for this recipe consists of three ingredients:  onion salt, garlic salt and freshly ground black pepper.  Don't substitute preground pepper; freshly ground pepper adds a lot more flavor.

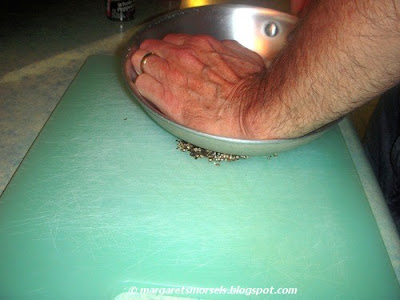
If you don't have a peppermill, you can still use freshly ground pepper.  Put the peppercorns on a cutting board and crush them using the edge of a skillet.  Or, use a mortar and pestle to crush the peppercorns.


Margaret's Morsels | Grilled Peppered Steaks
My husband crushing the peppercorns with a skillet.

Thoroughly coat the steaks, including any meat on the ends and sides, with the rub.

Margaret's Morsels | Grilled Peppered Steaks
The dry rub on the steaks.

Place the steaks on the grill and cook, turning once on a gas or charcoal grill, until they reach the desired doneness.  Medium-rare has a very pink center and is slightly brown toward the exterior.  Medium has a center that is light pink and the outer portion is brown.  Medium-well has meat that is light pink surrounding the center.  Well done is uniformly brown throughout.

Every fall when gas grills go on clearance, my husband and I discuss whether or not to buy one while they're on sale.  We always decide it's too late in the year to be of much use and agree to discuss it again in the spring.  Until we buy one, I'll continue to use my George Foreman grill.  I can use it in the comfort of an air conditioned house and don't have to worry about rain or bugs.  Given the comforts of grilling indoors, it makes me wonder why we want a gas grill in the first place!

Grilled Peppered Steaks
2 Servings

1 1/2 to 2 tsp. freshly ground black pepper
1 tsp. onion salt
1 tsp. garlic salt
2 (1/2 lb.) steaks

Combine the first 3 ingredients in a small bowl.  Rub onto both sides of the steaks, including meat on the ends and sides.  Grill covered until meat reaches the desired doneness.

If the steaks are larger than 1/2 pound, make 1 1/2 batches of the rub (I double it).


© Margaret's Morsels

June 10, 2011

Award Winning Cookies

Pin It
Margaret's Morsels | Award Winning Three Ingredient Peanut Butter Cookies

I try not to post recipes from the same category close together.  However, I couldn't let National Peanut Butter Cookie Day, June 12, pass without sharing an award winning recipe for peanut butter cookies.


Just about everyone has a recipe for peanut butter cookies.  Most recipes use some combination of these ingredients:


Margaret's Morsels | Three Ingredient Peanut Butter Cookies


The ingredients pictured above are what I used when I made peanut butter cookies using my mother's recipe.  They were good, but time consuming.


A dozen years ago, someone gave me a recipe for peanut butter cookies that uses these ingredients:


Margaret's Morsels | Three Ingredient Peanut Butter Cookies


That's right, the recipe only uses three ingredients.  I was skeptical the cookies would be any good, but I filed the recipe anyway in my untried recipe box, never expecting to actually make them.


A couple of years later, I was asked to make eight dozen peanut butter cookies for the Kairos prison ministry.  I didn't have a lot of time so I decided to give the three ingredient peanut butter cookie recipe a try.  I was pleasantly surprised to discover that, not only was the recipe good, it was better than my mother's recipe.  The recipe doesn't make a lot of cookies, but it's easy to double or triple if you need more cookies.


Combine the peanut butter, sugar and egg in a mixing bowl.  Refrigerate the dough for 20 minutes so it's easier to handle.  Shape the dough into balls and place on an ungreased baking sheet.  Make crisscross marks, pressing down on the dough with a fork in one direction and then in the other direction.  Crisscross marks, like jam on linzer cookies or cinnamon sugar on snickerdoodles, immediately identify the cookie as peanut butter. This is helpful, especially for anyone that is allergic to nuts.


Margaret's Morsels | Award Winning Three Ingredient Peanut Butter Cookies

Put the cookie sheet in the oven and bake the cookies 8 to 10 minutes. Remove the pan from the oven and let the cookies cool on the pan for one minute.  If you remove the cookies from the pan as soon as they come out of the oven, the cookies will crumble.  After one minute, the cookies are firm enough to transfer to a wire rack to cool.


If you're still skeptical, here's proof these are award winning cookies.  You know I love to cook, but what you don't know is I'm a competitive person. For a number of years, I entered culinary competitions at a regional fair held in my city.  The ribbons pictured below are the ones I have won in the peanut butter cookie category using this recipe.

Margaret's Morsels | Award Winning Three Ingredient Peanut Butter Cookies

There are variations of this recipe that include other ingredients, such as baking soda, salt and vanilla.  I made a batch for the fair one year adding a teaspoon of vanilla.  The consistency wasn't as smooth, the vanilla didn't improve the taste and the cookies didn't win a ribbon that year.


The cookies are easy to prepare, melt in your mouth and, unlike traditional peanut butter cookies, are gluten free.  Even if you don't enter these in a cooking contest, you're sure to win accolades from whoever is lucky enough to receive the cookies.


Three Ingredient Peanut Butter Cookies
28 Cookies

1 cup peanut butter
1 cup sugar
1 egg

Combine all ingredients in a bowl.  Refrigerate 20 minutes so the dough is easier to handle.  Roll dough into 1-inch balls.  Place on ungreased baking sheet.  Press down with a fork to make crisscross marks.  Bake at 350° for 8 to 10 minutes.  Let cookies cool on the pan for 1 minute before removing to wire rack.


© Margaret's Morsels

June 1, 2011

Baby Cakes

Pin It
Margaret's Morsels | Mini Mason Jar Cakes
The last few years, small desserts have become big business.  Brownie bites, cakepops -- decorated cake balls on a stick -- and cupcakes are just a few that have become popular.  Take a look in the baking aisle at the bookstore and you'll see a proliferation of books dedicated to the concept of diminutive desserts.  There are even cooking classes on the topic for the home baker.


I recently took a "Baby Cakes" class at a local cooking school.  I learned how to make individual pudding cakes, chocolate bouchons -- a two bite cake that resembles a cork (bouchon) -- and decorate petit fours.  The recipe that got my creative juices flowing the most, however, was mini Mason jar cakes.


Margaret's Morsels | Mini Mason Jar Cakes


Mason jars are glass jars with flat lids and screw top bands that are traditionally used to can food.  They can also be used to bake and serve individual desserts such as cakes, cobblers, pies and crisps.  You aren't canning the desserts, but using the jars as vessels to bake the desserts. The desserts should not be stored for long periods, but eaten within a few days of baking.


Jars are available in a variety of sizes, but the four ounce jars are wonderful for mini desserts.  The serving size is enough to satisfy your sweet tooth without feeling as though you're indulging.


You don't need a special cake recipe to make mini Mason jar cakes, but you do need a lot of jars.  I used a cake mix and ended up with 25 cakes. If you don't have enough jars, use the remaining batter for cupcakes or miniature loaves.  If you're making a cake from scratch and it can be halved, you can do that too.


Prepare the cake batter according to the directions.  Coat the clean jars with nonstick cooking spray and add approximately 1/4 cup cake batter, wiping any excess off the rims of the jars.


Margaret's Morsels | Mini Mason Jar Cakes
To make it easier to move the jars into and out of the oven, set them on a rimmed baking sheet.  I put them in a 9 x 13-inch pan.  Don't let the jars touch each other; air needs to circulate to ensure even baking.

Margaret's Morsels | Mini Mason Jar Cakes

Bake the cakes at the temperature listed on the recipe for about 20 to 25 minutes, or until a toothpick inserted in the center comes out clean.  The cakes bake much quicker than they would in a cake pan, so keep an eye on them to make sure they don't overbake.  Remove the pan from the oven and set the jars on a wire rack to cool completely.


Once the cakes are completely cool, they can be frosted or left plain.  If you leave them plain, there's enough room in the jar to add a scoop of ice cream or a dollop of whipped cream when the cakes are served.  To frost the cakes, spread your favorite homemade or store bought frosting over the top of the cakes, wiping the rims to remove any excess frosting.  


Margaret's Morsels | Mini Mason Jar Cakes

When you're finished, put on the lids and the screw top bands.


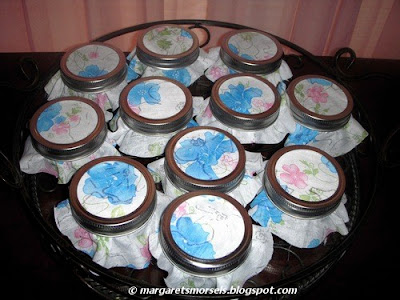
You can leave the jars as is or go one step further and decorate the lids. Use some fabric -- something that coordinates with the party theme or season is a nice touch -- to cut circles or squares to put on top of the lids before the screw top bands are added.  If you don't have enough fabric, cut a circle that fits only the lids with no overhang when the bands are added.


Margaret's Morsels | Mini Mason Jar Cakes
Fabric left to right:  circle, square, lid only

Mini Mason jar cakes are great for a casual get together or picnic.  Unlike a frosted layer cake, the jars are easy to transport.  If you want to make the cakes year round, it's a good idea to stock up on the jars while they're in season at a good price.  The jars will be hard to find and cost a lot more if you wait until later in the year.


Margaret's Morsels | Mini Mason Jar Cakes
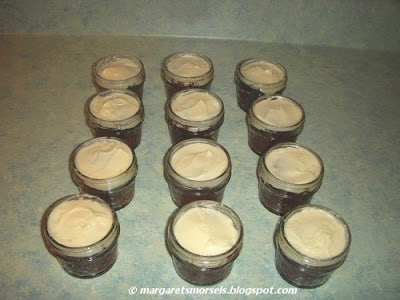
A tray of mini Mason jar cakes.

© Margaret's Morsels