May 27, 2011

Red, White and Blue Dessert Morselette

Pin It
Margaret's Morsels | Sour Cream Cherry Cheesecake

Memorial Day is Monday.  If you're looking for a red, white and blue dessert, make the Sour Cream Cherry Cheesecake pictured above, but with a twist.  Top one-third of the cheesecake with cherry pie filling, leave the middle section plain and top the remaining one-third with blueberry pie filling.  A quick and tasty red, white and blue dessert.


© Margaret's Morsels

May 25, 2011

Party on the Patio

Pin It
Margaret's Morsels | Easy Stove Top Beans

Memorial Day, the last Monday of May, marks the start of vacation season in America.  It's also the season when cooking and eating move outdoors. Grills are uncovered, picnic baskets come out of storage and the patio table is set for dining al fresco.


Whether you're grilling hot dogs and hamburgers or taking a bucket of chicken on a picnic, baked beans make a great side dish.  Easy Stove Top Beans are a tasty alternative to cooking baked beans in the oven.  The recipe definitely lives up to the name.  The beans are easy to make, cooked on the stove top and done in half the time of traditional baked beans.


Although the ingredients are typical of most baked bean recipes, the cooking method is different to make up for the fact the beans aren't cooked in the oven.  Instead of laying strips of raw bacon on top of the bean mixture before baking, this recipe starts with cooked bacon.  You can cook the bacon on top of the stove or in the microwave, but be sure to save the bacon grease.  When I cook bacon in the microwave, I use a specially designed tray called "Bacon Wave" that catches the bacon grease.

Margaret's Morsels | Easy Stove Top Beans
The grease drains from the bacon
and is collected on the tray.

Once the bacon is cooked, saute the chopped onion in the bacon grease. While the onion is sauteing, combine the brown sugar, catsup and vinegar. The original recipe called for two tablespoons of vinegar.  This was too much for us so I reduced the vinegar to one tablespoon.  If you want tangier baked beans, use the two tablespoons of vinegar.

Unless a recipe specifies otherwise, I always use apple cider vinegar. Apple cider vinegar is made from apple cider and has a fruitier flavor than white vinegar.  If you've never tried apple cider vinegar, give it a try; you'll notice a difference.

Add the vinegar mixture to the onion, along with the bacon and pork and beans.  Bring the mixture to a boil.  Reduce the heat to low and simmer until the mixture thickens, about 30 minutes.


Margaret's Morsels | Easy Stove Top Beans

If you're cooking for a crowd, the recipe can easily be doubled.  If there's any leftover beans, they're just as tasty -- if not tastier -- reheated.  The beans are a good alternative to baked beans and allow you to get out of the kitchen and into the outdoors a lot quicker.


Easy Stove Top Beans
4 to 6 Servings

3 strips bacon, cooked and crumbled
1/2 medium onion, chopped
2 Tbsp. brown sugar
1/2 cup catsup
1 Tbsp. vinegar
2 (11 oz.) cans pork and beans

Cook bacon in a skillet or in the microwave, reserving the bacon grease. Saute the onion in the bacon grease.  Mix the brown sugar, catsup and vinegar until combined.  Add the mixture to the onion, along with the bacon and pork and beans.  Bring mixture to a boil.  Reduce heat to low and simmer until mixture thickens, about 30 minutes.


 © Margaret's Morsels

May 21, 2011

Roll it Up

Pin It
Margaret's Morsels | Chicken Roll-Ups

When you hear the word tortilla, does it conjure up images of enchiladas and burritos?  Or, do you think about tortilla filled wraps that are becoming more commonplace on restaurant menus?  When you hear the word tortilla, does appetizer come to mind?


When it comes to appetizers, tables are usually laden with the norm:  hot wings, pigs in a blanket, potato chips of one variety or another, cheese, crackers, fruit, nuts and the obligatory veggies and dip.  Why not add something new to the table with a platter of tortilla roll-ups?  Tortilla roll-ups, also called pinwheels, are versatile and add variety to the table.


Tortilla roll-ups are made with tortillas and either a filling or layered ingredients.  These roll-ups can be made with whatever ingredients you have on hand.  Since they're made ahead of time, there's no last minute assembly required.


When it comes to roll-ups, just about anything goes, but there are two exceptions.  One, don't use anything that will make the tortillas soggy since they won't be eaten right away.  Two, the roll-ups aren't cooked so the foods you use need to be cooked or safe to eat in their raw form.  Other than that, if it's edible and pliable enough to be rolled, you can use it on a tortilla.  You can use a combination of meats, cheeses and vegetables for savory roll-ups and fruit, canned pie fillings, peanut butter, chocolate chips and even canned frosting for dessert roll-ups.


Tortillas are available in corn or flour varieties in the refrigerator section or, like the ones I use, in the Mexican food aisle at the grocery store.


Margaret's Morsels | Chicken Roll-Ups


Tortillas are available in white or wheat -- buy both so you can offer a variety -- and sold in various sizes.  I don't want the roll-ups to be too big so I buy the small fajita size tortillas.


Lay the tortilla flat on a work surface.  Spread the filling or layer the ingredients to within 1/2-inch of the edge.  You don't want to put the ingredients all the way to the edge or they'll fall out when the tortilla is rolled up.


Margaret's Morsels | Chicken Roll-Ups


Roll the tortillas up tightly, wrap in plastic wrap and refrigerate for several hours or overnight.  You can serve the tortillas as soon as you make them, but they're easier to slice when they're cold and not as likely to unroll.


Margaret's Morsels | Chicken Roll-Ups

When you're ready to plate the tortillas, remove them from the plastic wrap and slice off both ends of the tortillas; the ends don't have any of the filling or layered ingredients.  Cut the remaining tortilla into the desired number of pieces.  I usually cut four to six slices from each tortilla, depending on the number of people I'm serving and what else is on the menu.

The recipe I'm sharing today is for chicken roll-ups.  If that's not to your liking, try spreading horseradish on the tortilla and adding some thinly sliced roast beef.

Margaret's Morsels | Chicken Roll-Ups
Roast beef roll-ups.

I've made club sandwich roll-ups by layering lettuce, ham, turkey, bacon and cheese on the tortillas.  If you want a vegetarian option, mix cream cheese with your favorite diced vegetables.

Use ingredients you have on hand and creativity to come up with roll-ups that are pleasing to both your taste buds and wallet.

Chicken Roll-Ups

1 (8 oz.) pkg. cream cheese, softened
1 (1 oz.) pkg. dry Ranch dressing mix
1 (10 oz.) can chicken, drained and chopped
1/2 cup shredded Cheddar cheese
1 pkg. flour tortillas


Combine cream cheese, Ranch dressing mix, chicken and cheese in a large mixing bowl.  Use a spoon to mix the ingredients well.  Spread mixture on tortillas to within 1/2-inch of edge.  Roll up tightly, wrap in plastic wrap and refrigerate several hours or overnight.  When ready to serve, remove plastic wrap and cut off both ends of the tortilla.  Slice remaining tortilla into desired number of pieces.

© Margaret's Morsels

May 17, 2011

Thirst Quencher

Pin It
Margaret's Morsels | Cranberry Orange Cooler

Several years ago when my mother-in-law celebrated a milestone birthday, we hosted a luncheon for her at our house.  Since it was spring, I served my favorite warm weather meal:  individual mounds of chicken salad topped with a sprig of fresh parsley served on a bed of lettuce, cherry gelatin fruit salad made in individual molds, raw veggies with dip, a basket of croissants and, as with any family function, fruit tea.


I wanted to offer another beverage other than soft drinks and water, but didn't want to serve punch since the only sweet item on the menu was birthday cake.  I had recently attended an event where Cranberry Orange Cooler was served and decided to make it for the luncheon.  Everyone loved it!  In fact, it ran out before the fruit tea.


With summer fast approaching, I thought this would be a great time to share the recipe.  The recipe uses four ingredients and takes only a few minutes to prepare.  Like so many recipes, it's best made a day ahead of time so the ingredients have time to blend.


A lot of drink recipes call for the ingredients to be combined in a bowl and stirred until the sugar is dissolved.  The directions for Cranberry Orange Cooler say to heat the cranberry juice cocktail and orange juice first.  Out of curiosity, I decided to make a batch and see what would happen if I didn't heat the ingredients first.  It wasn't pretty.  Instead of a beautiful pink shade, I ended up with one that looked like this:


Margaret's Morsels | Cranberry Orange Cooler


Science isn't my forte so I have no idea what caused this to happen.  The beverage still tastes the same so, if you don't care what the finished product looks like, you can prepare it without heating the ingredients first.


If you want a more aesthetically pleasing color, heat the cranberry juice cocktail and orange juice on low heat until warm; don't let the mixture boil. Pour the warm juices over the sugar and stir until the sugar is dissolved. Stir in the lemon juice and refrigerate the mixture.


Although the beverage is served cold, it's nice to serve it over ice.  Regular ice cubes dilute the beverage.  To avoid this problem, freeze some of the leftover orange juice.  You can even freeze some of the Cranberry Orange Cooler if you have enough.


You can use any ice cube tray.  I prefer silicone ones.  Not only are they available in a variety of shapes and sizes, the ice cubes are easy to remove.  A quick and easy way to fill these small compartments is with a bulb baster.


Margaret's Morsels | Cranberry Orange Cooler
A bulb baster's not only for basting a turkey.

For a ladies luncheon or shower, I like to use this ice cube tray with three different types of flowers:


Margaret's Morsels | Cranberry Orange Cooler

If I want whimsical ice cubes, I freeze orange juice in ice cube trays with compartments shaped like orange slices.  If you purchase additional cranberry juice cocktail, you can freeze some of it in ice cube trays with round compartments.  The ice cubes would give the illusion of orange slices and cranberries, but without the choking hazard of real fruit.

Margaret's Morsels | Cranberry Orange Cooler
Ice cubes that resemble orange slices.

Cranberry Orange Cooler is a versatile recipe.  Not only is it a refreshing tangy fruit drink, the beautiful pink shade makes it an ideal beverage for baby or bridal showers.  It's also a good way to get your kids to drink juice!

Cranberry Orange Cooler
6 to 8 Servings

1 cup sugar
1 (2 qt.) bottle cranberry juice cocktail
2 cups pulp free orange juice
1/4 cup lemon juice


Put sugar in a large mixing bowl; set aside.  Heat the cranberry juice cocktail and orange juice over low heat until warm, but not boiling.  Pour warm juices over sugar; stir until dissolved.  Add lemon juice; mix well. Refrigerate. 


© Margaret's Morsels


May 13, 2011

Skillet Sensation

Pin It
Margaret's Morsels | Hamburger Macaroni Casserole

I love recipes that are cooked in one pan.  Not only are they usually easy, clean up is minimal.  A lot of recipes claim they're one pan meals, but that's not always the case.  Sometimes there's an ingredient that needs to be cooked separately.  The recipe I'm sharing today -- Hamburger Macaroni Casserole -- is cooked from start to finish in one pan.  The only thing you need other than the ingredients is a large pan that has a lid; I use a 12-inch skillet.


Brown the ground beef in the pan and remove it to a bowl using a slotted spoon.  Normally, I drain the drippings when I cook ground beef.  However, two to three tablespoons of drippings need to stay in the pan.  If you have more drippings than that, discard the excess.


The reason this recipe is a one pan meal is the macaroni isn't cooked separately.  The uncooked macaroni goes into the drippings with the onion and green pepper and is cooked until the onion is soft.


Margaret's Morsels | Hamburger Macaroni Casserole
Cooking the macaroni, onion and green
pepper in the drippings.


The meat and remaining ingredients -- diced tomatoes, catsup, water, salt and pepper -- are added to the pan.  If you want a spicier casserole, substitute a can of diced tomatoes with green chilies for the diced tomatoes.  This is too spicy for me so I give the dish a little kick with a dash of cayenne pepper instead.


Put the lid on the pan and simmer for 25 minutes or until the macaroni is cooked as desired.  Stir the dish every 7 to 8 minutes to make sure the macaroni isn't sticking.  If the macaroni sticks, turn the heat down.


I like the casserole plain, but you can add cheese.  The cheese makes a pretty topping plus adds some flavor.  When the casserole's done, remove the pan from the heat.  Sprinkle shredded Cheddar or Mozzarella over the top and put the lid on the pan until the cheese melts.


If you want to make this a one dish meal, serve the casserole from the pan.  Add a salad and some garlic bread and you've got a meal that's not only a skillet sensation, but a taste sensation as well.


Margaret's Morsels | Hamburger Macaroni Casserole

Hamburger Macaroni Casserole
4 to 6 Servings

1 1/2 lb. ground beef
1 (8 oz.) pkg. elbow macaroni (uncooked)
1/2 cup chopped onion
1/2 cup chopped green pepper
1 (14 1/2 oz.) can diced tomatoes (undrained)
1/2 cup catsup
1 cup water
1 tsp. salt
1/4 tsp. pepper
dash of cayenne pepper (optional)
shredded Cheddar or Mozzarella cheese to taste (optional)

Brown ground beef in large pan.  Remove beef from pan using a slotted spoon.  Discard all but two or three tablespoons of drippings from the pan. Put the uncooked macaroni, onion and green pepper in the drippings and cook until the onion is soft.  Return beef to the pan and add the remaining ingredients, except cheese.  Cover and simmer 25 minutes or until macaroni is cooked as desired, stirring every 7 or 8 minutes to keep macaroni from sticking.  If using cheese, add it when the casserole is done.  Remove the pan from heat.  Sprinkle cheese on top of the casserole and put the lid on the pan until the cheese melts.


© Margaret's Morsels

May 11, 2011

Easter Bunny Cake Morselette

Pin It Several readers emailed and asked if I was going to post a picture of the bunny cake I made at Easter.  I hadn't thought about posting it, but am happy to share the picture since people want to know what this year's cake looked like.  This is the first year my son hasn't wanted to decorate the cake.  However, my husband helped; he decorated the tie!


Margaret's Morsels | Easter Bunny Cake


2011 Easter Bunny Cake

© Margaret's Morsels


May 6, 2011

Muffins for Mom

Pin It
Margaret's Morsels | Cinnamon Muffins

Mother's Day is Sunday.  What a great time to pamper mom and cook her breakfast.  If cooking's not your specialty, I've got the perfect recipe. Cinnamon Muffins are easy to make; there's more mixing than measuring!


The recipe starts with a box of yellow or white cake mix plus the ingredients to prepare the mix.  Once the cake mix is prepared according to the package directions, stir a tablespoon of cinnamon into the batter. Before you get busy baking, combine the cinnamon and sugar in a small bowl and set aside for later.


You can bake the muffins in mini muffin pans or regular muffin pans.  No matter which size you use, be sure to grease and flour the pans before each batch.  To save time, I use Baker's Joy, a nonstick baking spray with flour.  


I make the muffins in mini muffin pans, using one tablespoon of batter in each muffin cup.  This yields approximately 8 1/2 dozen muffins.  If you use regular muffin pans, you'll get 24 muffins.

Margaret's Morsels | Cinnamon Muffins
Mini muffin pans with 1 tablespoon batter in each cup.

The pans go in the oven until the muffins are lightly browned, 10 to 12 minutes for mini muffin pans, 15 to 20 minutes for regular muffin pans.

Margaret's Morsels | Cinnamon Muffins

Remove the muffins from the pan and put them on a wire rack.  The mini muffins are delicate so don't dump them out of the pan.  Cool the muffins a minute or two until they can be easily handled.  Remove the muffins individually from the pan -- use a butter knife to loosen the edge and lift up the muffin -- and place on a wire rack.  

While the muffins are warm, put them in the bowl with the cinnamon sugar mixture, coating the muffins on all sides.  The easiest way to do this is with a spoon.  After the muffins are thoroughly coated, put them back on a wire rack.

Margaret's Morsels | Cinnamon Muffins

For a pretty presentation, put the muffins in a basket or on a platter or cake stand.  Serve the muffins with some bacon or fruit for a complete meal.

Moms deserve to be pampered on Mother's Day.  What better way to start the royal treatment than muffins for mom.  If you want to earn more accolades from mom, be sure to clean up the kitchen when you're done making muffins.

Cinnamon Muffins
8 1/2 dozen mini muffins
or 24 regular muffins

1 (18.25 oz.) pkg. yellow or white cake mix (plus ingredients to prepare mix)
1 Tbsp. ground cinnamon
1 cup sugar
1 1/2 tsp. ground cinnamon

Preheat oven to 350°.  Grease and flour muffin cups.  

Prepare cake mix according to package directions; stir in 1 tablespoon cinnamon.  Spoon batter into prepared muffin cups, filling regular muffin cups 2/3 full.  Use 1 tablespoon batter for mini muffin cups.  Bake 10 to 12 minutes for mini muffins or 15 to 20 minutes for regular muffins, until lightly browned and toothpick inserted into centers comes out clean.

Remove muffins from pans.  Combine sugar and cinnamon in a small bowl.  Cover muffins in sugar mixture until completely coated.  Cool muffins on a wire rack.


© Margaret's Morsels

May 3, 2011

Cinco de Mayo: Parte Dos

Pin It
Margaret's Morsels | Cinco de Mayo

A couple of days ago, I shared recipes for Mexican Deep-Dish Pizza and Spanish Rice.  Today, I'm going to share two more recipes; one to serve at the beginning of the meal, the other at the end.


Whenever I fix Mexican food, I serve tortilla chips and salsa.  On Cinco de Mayo, I like to spice things up a bit and serve queso dip.  Queso may sound exotic, but it's actually the Spanish word for cheese.


The cheese dip I make only uses three ingredients -- Velveeta cheese, Ro-Tel, cream cheese -- and is heated in a crock-pot.  Not only does the crock-pot do all the work, it keeps the dip warm during the meal.  If the dip gets too hot, turn the crock-pot off.


Ro-Tel is a canned tomato product that also contains green chilies.  I use mild Ro-Tel, but it also comes in hot.  If you want the dip to have more texture, use chunky Ro-Tel.  I use Neufchatel cream cheese which has 1/3 less fat, but you can use regular cream cheese instead.  You can leave the cream cheese out, but it makes the dip richer and creamier than using Velveeta alone.  


Cube the Velveeta and cream cheese and put in a 1 1/2-quart crock-pot. Add the Ro-Tel, stirring to combine the ingredients.


Margaret's Morsels | Queso Dip
The dip starts out looking like this.


Cover the crock-pot with the lid and heat on low.  Stir the ingredients periodically as the cheeses melt.  It doesn't take the dip long to heat so start it about an hour before you're ready to eat.


Margaret's Morsels | Queso Dip
The dip ends up looking like this.


To end the meal, I serve a batch of Mexican Sugar Cookies.  Normally, I use margarine in recipes, but this is one time I use real butter.


Butter comes in salted and unsalted varieties.  I use unsalted butter for two reasons.  One, it has a fresher flavor.  Two, salted butter has more salt than a recipe needs.  It's easier to control the amount of salt when you use unsalted butter.


The recipe makes a very soft cookie dough.  Even when I've added the additional 1/4 cup flour, the dough has been too soft and sticky to form into balls.  I refrigerate the dough about an hour until it's firmer.  To make sure the dough stays firm, put it back in the refrigerator when it's not in use .


Shape the mixture into balls -- I use a small cookie scoop -- using 1 tablespoon of dough for each.  Place the balls on a greased cookie sheet. The cookies spread during baking so make sure to place them 3-inches apart.


Margaret's Morsels | Mexican Sugar Cookies

Flatten each cookie with the bottom of a glass dipped in sugar.  If the glass sticks to the dough, lightly spray the bottom of the glass with Pam before dipping it into the sugar.  Be sure to dip the glass in sugar before flattening each cookie.  If the glass starts sticking, lightly spray it again with Pam.


It's always best to make cookies the same size to ensure even baking.  To do this, I use the bottom of the glass as a guide and press the dough until it reaches the edge of the glass.


Margaret's Morsels | Mexican Sugar Cookies
Use the bottom of the glass to flatten the dough.

While the cookies are baking, combine the sugar and cinnamon in a shallow bowl and set aside.

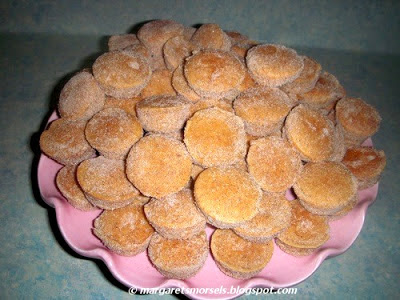
When the cookies are done, remove the pan from the oven.  The cookies are extremely delicate, so make sure to leave them on the cookie sheet three to four minutes before removing to a wire rack.

Coat the cookies while they're still warm with the cinnamon sugar mixture. Put one cookie at a time in the bowl and use a spoon to cover the top of the cookie with the mixture.


Margaret's Morsels | Mexican Sugar Cookies

After the cookie is thoroughly coated, turn the cookie over and coat the other side the same way.  Place the cookie back on the cooling rack to cool completely.

Margaret's Morsels | Mexican Sugar Cookies

Cinco de Mayo is about more than drinking margaritas and eating Mexican food.  It's a day to celebrate Mexican heritage and pride.  The fifth of May commemorates the Mexican victory over France at the Battle of Puebla in 1862.  It's also a great time to enjoy the wonderful cuisine from South of the border.


Queso Dip

1 (1 lb.) box Velveeta cheese, cubed
4 oz. cream cheese, cubed
1 (10 oz.) can Ro-Tel diced tomatoes and green chilies (undrained)

Place ingredients in a 1 1/2-quart crock-pot.  Cover and heat on low 60 minutes to combine flavors. 


Mexican Sugar Cookies
39 Servings

1 cup (2 sticks) butter, softened
1/2 cup powdered sugar
2 Tbsp. milk
1 tsp. vanilla
1 1/2 tsp. ground cinnamon, divided
1 1/2 to 1 3/4 cups all-purpose flour
1 tsp. baking powder
1 cup granulated sugar  (plus extra for flattening cookies)

Beat butter, powdered sugar, milk, vanilla and 1/2 teaspoon cinnamon in a large bowl at medium speed of an electric mixer until light and fluffy, scraping down side of bowl once.  Gradually add 1 1/2 cups flour and baking powder.  Beat at low speed until well blended, scraping down side of bowl.  Stir in additional flour with spoon if dough is too soft to shape. Refrigerate dough for 1 hour until it's firmer.

Preheat oven to 325°.  Grease cookie sheets and set aside.

Roll a tablespoon of dough into a ball.  Place balls 3-inches apart on prepared cookie sheets.   Flatten each ball into a 2-inch round with bottom of glass dipped in granulated sugar.  Bake 10 to 12 minutes or until edges are golden.  Let stand on cookie sheets 3 to 4 minutes.

Meanwhile, combine granulated sugar with remaining 1 teaspoon cinnamon in a small bowl.  Transfer cookies, one at a time, to sugar mixture; coat both sides.  Remove to wire racks; cool completely.


© Margaret's Morsels

May 1, 2011

Cinco de Mayo: Parte Uno

Pin It
Margaret's Morsels | Cinco de Mayo

There's a lot of events to celebrate in May:  Mother's Day, Memorial Day, high school and college graduations, bridal showers for June brides and, one of my favorites, Cinco de Mayo.


I love Mexican food and enjoy serving it on the fifth of May.  Although I love the cuisine, I've never tried making it from scratch.  Authentic Mexican food is delicious, but it's also time consuming to prepare.


Before I was born, my parents hosted a Cinco de Mayo party.  Years later, my mother told me she spent two 12 hour days cooking before the party started.  Even with all the work she did ahead of time, she still had more cooking to do the day of the party.


If you want to have a Cinco de Mayo party -- or enjoy Mexican food during the year -- but don't have a lot of time to cook, you're in luck.  Although the recipes I'm sharing aren't authentic, they give the food a taste of Mexico without all the work.


For the entree, I prepare Mexican Deep-Dish Pizza.  Whenever I serve this to someone the first time, they always assume it's a round pizza made in a pizza pan.  This isn't the case at all.  The pizza doesn't use a pizza crust, but refrigerated crescent rolls instead.  The pizza also isn't made in a pizza pan.


The rolls are pressed into a 9 x 13-inch pan.  The recipe calls for two cans of crescent rolls.   Save some of the dough to build up the sides, if necessary, and to repair any tears in the dough.


Margaret's Morsels | Mexican Deep-Dish Pizza

The pizza toppings are layered on the rolls, beginning with browned hamburger meat and onion.  A package of dry taco seasoning is combined with tomato sauce and refried beans and spread on top of the meat.  I use mild taco seasoning, but you can make it spicier by using medium or hot taco seasoning.  The pizza goes in the oven for 25 minutes before the cheese is added.


Whenever I use cheese as a topping, I always use fancy shredded cheese which is finely grated.  It costs a little more, but it melts faster and smoother than regular grated cheese.  You can use regular grated cheese, but it might take longer to melt.  Once the cheese is added, the pizza goes back in the oven just long enough to melt the cheese.


Margaret's Morsels | Mexican Deep-Dish Pizza


We like the pizza plain, but you can serve it with chopped lettuce, tomatoes, sour cream and taco sauce, if desired.


I make a batch of Spanish Rice to accompany the pizza.  One feature I like about this recipe is the rice is cooked ahead of time and refrigerated. Since the rice is already cooked, it only takes a few minutes to finish the dish.


Melt the margarine in a 2-quart saucepan and cook the onion and green pepper until tender.  I always use fresh onion -- I don't think frozen onions have much flavor -- but I always use frozen green pepper.  I don't use green pepper very often so the leftover always ended up in the garbage. Frozen green pepper is a good alternative for me, but you can use fresh green pepper if you prefer.


Once the onion and bell pepper are tender, add a can of whole tomatoes that have been chopped into pieces.  The easiest and quickest way to chop canned tomatoes is with a pair of kitchen scissors.


Margaret's Morsels | Spanish Rice
The tomatoes cut into pieces with kitchen scissors.


Cook the ingredients until the liquid has been reduced, but don't reduce it too much.  If there's not enough liquid, the rice will be dry.  Add the rice and reheat it with the ingredients in the saucepan.


Margaret's Morsels | Spanish Rice


These recipes take care of the main part of the meal.  Check back on Tuesday for recipes to serve at the beginning and end of your Mexican feast.

Mexican Deep-Dish Pizza
8 Servings

2 (8 oz.) cans refrigerated crescent rolls
1 1/2 to 2 lb. hamburger meat
1 onion, finely chopped
1 (1.25 oz.) pkg. taco seasoning
1 (8 oz.) can tomato sauce
1 (16 oz.) can refried beans
2 cups shredded Colby/Monterey Jack cheese

Place crescent roll dough in the bottom and up the sides of a greased 9 x 13-inch pan to form the crust.  Brown meat and onion together in a skillet; drain grease.  Put the meat and onion on top of the crust.  Mix together the taco seasoning, tomato sauce and refried beans; spread on top of the meat.  Bake at 350° for 25 minutes.  Remove from the oven and sprinkle cheese on top of the filling.  Place pan back in the oven and heat just long enough for the cheese to melt, about 5 minutes.  Serve with chopped lettuce, tomatoes, sour cream and taco sauce, if desired.


Spanish Rice
4 to 6 Servings

1 cup rice, cooked according to pkg. directions
1/4 cup margarine
3 Tbsp. chopped onion
2 Tbsp. chopped green pepper
1 (14 1/2 oz.) can whole tomatoes, chopped
salt and pepper to taste

Cook rice at least 1 hour ahead of time and refrigerate.

In a 2-quart saucepan, melt the margarine.  Add onion and green pepper and cook until tender.  Add tomatoes and liquid to pan.  Cook until liquid is reduced.  Stir in rice, salt and pepper.  Cook until the rice is heated.


© Margaret's Morsels